Flexible Solar Panel Installation

Zirdu

Senior Member
Joined
Aug 17, 2016
Messages
110
Location
St. George, UT
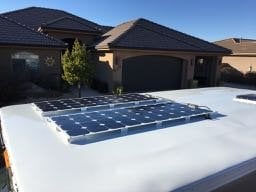
About 8 months ago I installed flexible solar panels on the roof of my new 2016 Grandby. My mounting was a bit unique, so I thought I would post it. Thanks to all the others who have gone before in posting their issues with flexible panels. My installation was an attempt to solve some of the issues others have had.

Many have had issues with gluing the panels directly to the roof. It apparently can cause overheating and failure of the flexible panels, also possibly raising the temperature of the interior, and making it difficult to remove any failed panel.

My solution was to (1) reinforce the flexible panel with 1 inch by 1/20 inch aluminum strip attached to the panel along the edges with VHB tape. Then (2) screw or bolt the panel to small pieces of 1 inch by 1 inch by 1/20th inch square tubing. The tubing was, in turn, attached to the roof with VHB tape. The result is a 1 inch air gap between the panel and the roof, and the panel reinforced somewhat on the edges to prevent fluttering in the wind.

The flexible panel I choose was the Solar Cenergy 120 Watt panel purchased from SolarBlvd. (I think I paid $119 per panel - now listed at $149, but out of stock.) Here is the info listed on the back:
View attachment 28597

I wired the two in series, making the supposed maximum voltage of 45.6 volts. These are wired into a Victron 100/300 MPPT controller. The 100 means it can take up to 100 volts max input, and the 30 means it can output up to 30 amps.

Here are the aluminum stock I used to make the base, purchased at Home Depot and/or Loews.
3 - 1.jpg

I used VHB tape to attach the 1 x 1/20 aluminum strip to the edges of the back of the panel.
1.jpg

I cut the 1 inch square tubing into small pieces and lightly glued them with a drop of silicon caulk to the aluminum strips.
3 - 1 (1).jpg

Then I turned the whole thing over and screwed the panel to the 1/1 supports with flat head sheet metal screws. (The first one I attached with little stainless steel bolts, but this was too tedious, and the sheet metal screws worked just as well.)
5 - 1.jpg

I then placed VHB tape on the bottoms of the 1x1 supports, and simply attached to the roof of the camper.
6 - 1.jpg

The panels as mounted have a very low profile to wind, are extremely lightweight, have a lot of air flow underneath, and are fairly cheap. In a subsequent post I will outline the performance of the system so far.
 

Attachments

  • 6 - 1.jpg
    6 - 1.jpg
    13 KB · Views: 556
I installed these with the intent that if they did not work, I could easily remove the panels by unscrewing them, leaving the 1x1 "mounts" attached, for future use with other panels.

The performance of the panels has been very good so far. In using them this summer, I logged a maximum voltage of 49.3 volts at one brief point. The maximum daily production was 920 watt hours one sunny day. Dividing by 12 would give 76.7 Amp Hours. But maybe I should divide by the actual average voltage the batteries were charged at, maybe 13.7 volts? That would result in 67.2 Amp hours.

The maximum system output I logged this summer was 219 watts at one point. Typical day maximum might be 185 watts. This for a 240 watt nominal setup. I was hoping for a bit more from this system, but I guess this is OK for a horizontal mounting? Not sure. What production do others measure from thier systems?

My measurements are from the Victron "dongle", sold separately from the Victron controller, but very useful in monitoring the performance of your solar system. With an app downloaded from Victron you can read the production of your solar system, and 30 days of history, on your smart phone.

The only issue in the mount so far is a possible movement of the roof in high winds. The mounts as attached by VHB tape to the roof do not always hit the roof "joists", making for some play in the whole system. To help in this, I may VHB another 1 x 1/20 aluminum strip along the front edge of the panels, thereby reinforcing the roof where most needed. This would add little weight and give me some peace of mind.

I have room on the roof to add two more panels. I am thinking of doing this, since in my opinion, you really can't have too much solar. I would probably wire the two more in series, then parallel the two new panels with the existing ones. That way I would be keeping the voltage of the panels to the controller at the current 46 volts or so. If I wired all four in series, this would be a voltage of up to 98.6 volts (per my maximum measured voltage) which would be pushing the 100 volt maximum of the controller.

By the way, I live in the US Southwest, where most of my camping takes place.
 
When using the VHB tape, I first lightly sanded the aluminum stock with very fine sandpaper, then cleaned with Isopropol Alcohol. I marked the spots on the roof where the mounts would hit, then very lightly sanded there, and cleaned with isopropol alcohol. I used a little roller to add pressure when applying the tape to the aluminum stock, as the tape needs pressure to activate. Then I added some weight for an hour or so.

Finally, when installed, I went around the edges of the mounts on the roof with Sikaflex 221. This is more to protect the VHB tape than for additional adhesion. Here is a close up on the front corner of a panel installed, using the little bolts instead of the screws. The screws actually worked better. This is after some use, so the roof is now a bit dirty. Like others have said, the VHB method makes for a VERY secure mount. I used more total square inches of mount in my system than is recommended by AM Solar in their mounting feet.
7 - 1.jpg
 
Nice work. That air gap is just what you need for flexible panels. And, like you mentioned, if one fails it's easy to remove and replace.

I have the same two panels and controller (plus an additional 50 watt panel). I'd say your power production looks fine and pretty spot on.
 
Thanks for the detailed writeup! If I ever decide to go solar I expect to use your thread for my inspiration and rough template.
Rico
 
Zirdu, one of the best Solar posts I have read anywhere, props to you. I have been thinking of adding more solar than I have (160w) that came with my '15 Fleet. I was getting close to adding stock panels until I started seeing the much lighter Flex ones. So I have been keeping an eye what is going on with them and agree they look like the way to go. With my solar panel and rack, the top is already heavy (will update struts too to rectify that). Back in the 80's I was working at a distributor for 3M and VHB (Very High Bond) tape came out. We put a strip between 2 small 4'' long aluminum I-Beams and in 5 seconds no one could pull them apart. So we knew it was strong. In fact we would show customers who came in and big burly guys thought they could break it apart, they couldn't. The aluminum on one side "broke" before the tape failed. This was Silicon Valley so a myriad of ideas came about from that tape. I caution folks here that we were using the 10 mil thick and not the 5 mil which did pull apart with the I-Beams. It's not really tape but more like stretchy, tacky translucent rubber cement with a paper liner that you peel, then place it down on your surface, and press (or roll over like above) down and then peel the liner off. Then apply your part to attach to and press down. According to 3M, it actually shrinks a bit to increase it's bonding shortly after application. When you see a nameplate on equipment and you cannot pull it off, it's probably VHB under it. Only a razor blade or 1,1,1, Trichlorethane would probably work. But once apart, it's easy to clean off either surface, unlike epoxy or other glues.
 
Sharx said:
Only a razor blade or 1,1,1, Trichlorethane would probably work. But once apart, it's easy to clean off either surface, unlike epoxy or other glues.
OMG, dont ever touch 111-TCA, it is cancer causing chemical, hazardous material
 
I don't touch the stuff, it was a joke really. But it would make it separate the bond. Get your MSDS first though (another joke).
 
Sharx said:
I don't touch the stuff, it was a joke really. But it would make it separate the bond. Get your MSDS first though (another joke).
They're calling them SDS now; safety data sheets.
 
Nice job on that project. I was going to do something very similar. In the end I decided rather then framing a flex panel to just go rigid. So far so good.
 
VHB is amazingly strong ... but, I'd be worried that with the kinds of temperatures the roof will see that the adhesive or foam would eventually dry up and give way ... probably on the highway. Are you concerned?
Dave
 
I am not too concerned that the VHB tape will fail. They use similar tape or adhesive in installing the aluminum skin of the roof of the 4W Camper, gluing or taping it down to the underlying aluminum support ribs. I did go around each of the "feet" with Sikaflex, to protect the tape from deterioration. AM Solar, who are supposed to be RV Solar experts, use this method of taping down even smaller mounting "feet" for their solar installations. It seems to work very well.
 
Since I had such good luck with my 120 W Solar Cynergy flexible panels, I decided to buy two more and install them on my roof. I found what seemed to be the same 120 W Solar Cynergy panel, again from SolarBlvd, for $139 each. I got them on SolarBlvd EBay store, where there was free shipping.

I ordered on Friday, and they arrived today, Wed. Adequately packaged. Upon opening the package, it was at once obvious that these panels were different than the original 120 W Solar Cynergy panels. The new panels were 5 inches shorter, and had 36 cells rather than 40 like the old panels. The width was identical at 21 1/8 inches. Here is a picture of the new panel next to a cardboard cutout to the exact dimension of the old one.

14 - 1.jpg

Despite the fewer number of cells in the new panel, they still claim 120 Watts:

14 - 1 (1).jpg

Other than the dimensions, this sticker is identical to the sticker on the back of my original flexible panels..Here is a close up of the new cells:

14 - 1 (2).jpg

All I can figure is that they are using more efficient cells, so they can get exactly the same performance from 36 cells that they got from 40 cells. The new cells do look different than the old ones. On the old cells you can't see any wires.

The new panel also has 6 pretty weak looking grommets, whereas the old one had no grommet. This is actually not helpful to me in my mounting method, but should not be a big problem.
 
This is fantastic; thanks so much for not only sharing your build, but explaining why you chose what you chose and providing pictures. This is ideal for those of us who are considering flexible panels but are reluctant due to the longevity issue. A great compromise and an incredibly helpful post!!
 
Great write up.
I had no idea what VHB was until I read the entire thread. Sounds like a great product.
If my flexible panels, which are mounted flush to my roof, ever fail I will use your technique on their replacement.
 
AT Overland used a similar tape (5100C) to install my flexible panels and they are holding fine. My truck is outside all the time and I've probably driven 30k miles since the panels were installed, fwiw.
 
Zirdu, are you satisfied with the solar panel mounts you created for your roof and would you change anything if you had to do it again such as the screw fasteners into the tubing or the tubing size, etc? I have no concerns about the VHB if applied to clean surfaces. From the pictures it looks like the small tubing supports in the middle of the panel are simply to provide a little support in that area and to keep the panel from sagging. I'm assuming you haven't noticed any fluttering while driving, but I guess you would need to mount a go pro camera on the roof to document if it's happening.

I'm getting ready to replicate your process or at least some variation of it. I'm thinking about using a smaller size aluminum square tubing although I know it may not provide enough space for heat reduction as opposed to the 1-inch tubing that you used. I bought one of the 120w Solar Cynergy flexible solar panels per your recent post re Thanksgiving black friday sale. Thanks for the heads-up. This will be my first solar installation. I'll try one and see how it goes.
 
Back
Top Bottom