JediahPorter
Member
- Joined
- Jun 7, 2017
- Messages
- 26
I'm the proud owner of a 1999 Hawk. For a while I watched national listings through the links on the "used truck camper listings" thread. I found this particular camper through a local web listing. I think I got a good deal, and have confidence in that thanks to the diligent sharing of links on the used listings compiled elsewhere on this forum. Thanks all!
I'll gladly post here as I renovate. Also, I'll ask some questions as I go.
I've had the camper since June of '18. I've probably spent 40 nights in it already, largely "as is".
At time of purchase:
Things I've done so far:
As winter locks down on Wydaho, my next priorities are winterizing. Help me out:
What am I missing?
Oh, and a crazy fantasy. Neither my truck ('01 F150. Airbags and heavier leaf spring installed) nor the camper has a sliding window where their respective windows meet. What would it be like to remove both windows? Entirely remove them. And install a giant version of one of those dust/water boots. Dumb idea? They're roughly the same size as each other. It would be nice to be able to pre heat the camper while driving the truck (and curtain it off when I don't need to heat the camper) and to crawl back and forth from time to time.
I'll gladly post here as I renovate. Also, I'll ask some questions as I go.
I've had the camper since June of '18. I've probably spent 40 nights in it already, largely "as is".
At time of purchase:
- one roof lift panel was completely gone
- stove works
- fridge seems to not work
- Gritty and dirty inside
- No bed mattress.
- Leaks in vinyl
- Sink drains, but electric pump doesn't work
- Water tank doesn't hold water. Leaks at the drain.
- Never included heat of any sort
Things I've done so far:
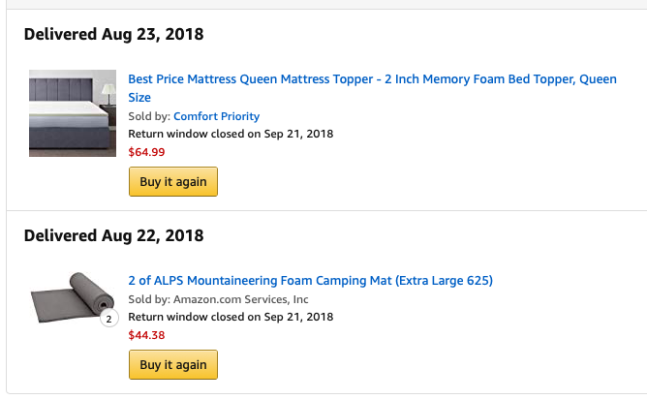
- Assembled a mattress. I think I did well at this. Foam is expensive! And getting good cushion and insulation is tricky. Also, I wanted the mattress to fit in the smallest iteration of the cabover (roof down, bed "slide-out" collapsed) yet still fold out to the queen size. I had 5 vertical inches to fit the doubled mattress in. That meant I could make a mattress that is just less than 2.5 inches thick in queen and ~4.5 inches as a single bed. Attached photo shows the foams I used. I taped the closed cell sheets together along their long edges, doing so such that they hinge flat together. The memory foam covers the harder foam. I shoved it all in a queen size comforter duvet cover. The duvet is larger than necessary, but it was cheap and easy. Sewing a cover wouldn't be too complicated. The resulting bed works in either queen or single orientation. My lady digs the spartan cushion of the queen configuration. I think I'd prefer to use a latex foam topper instead of the memory foam. Next time...
- Replaced the front roof lift panel. Marty at ATC made one up. The entire transaction went real smoothly. Half the price I was quoted from FWC Cali. (my local FWC dealer -Jackson, WY- sent me straight to the Cali team). Manufactured and shipped in a couple weeks. I installed using existing holes and included hardware. Kind of a bear to install, but not impossible for my 10 thumbs. Maybe 2.5 hours installing, solo.
- Coated visible vinyl holes. There's still a leak somewhere, but not too bad. I coated the holes with the "HH66" vinyl sealant I saw recommended elsewhere here.
- And, of course, general clean up. I tore out some peeling flooring, washed the couch upholstery, reinforced the bed/couch/storage foot locker.
As winter locks down on Wydaho, my next priorities are winterizing. Help me out:
- Insulating the vinyl is an obvious step. I've seen some of the home-made solutions, and I've asked ATC about making me an "Arctic Pack". I was curious to learn that installing an ATC Arctic Pack would require temporarily detaching the existing vinyl from the roof, in order to install the velcro. I'm inclined to do something much simpler. Something with that reflectix stuff?
- I want baller propane heat. I'm not afraid of the cost of the Propex heaters. But I dunno where to install. The obvious place is beneath the fridge in the externally-accessed storage spot there. Seems best to maybe just ask advice from the Propex importer? For venting and air supply etc. Or consider something else entirely? Again, ATC surprised me when they said that a furnace install would require reframing the camper. That seems excessive? What am I missing?
- With a proper propane furnace, I'll need an upgraded electrical system... (the current lights run on the truck battery. Like, the truck's only battery. I don't use 'em much, as a result) Which is a whole ball of wax, I know... If I'm upgrading electrical, seems appropriate to consider future needs. Like maybe even a 12v fridge/cooler. There are piles and piles of web resources for "vanlife" electrical systems. Too much information, really.
- First, is there any reason that someone's Sprinter van electrical system won't work in my Hawk? Next, can anyone point me to a clear and reliable source of super-basic information on planning and purchasing for an upgraded electrical/battery system?
- I'm thinking of about 125 amp-hours of 12v AGM/Gel batteries, charged mainly from the truck inverter (with the option to add solar later). Seems like that'll run, for a few days, the lights, the water pump (or a replaced water pump), the heater (super basic/dumb question: do Propex heaters blow heat, or just radiate/convect it? Some of their draw seems like it must be from a fan?), and maybe charge a cell phone a little bit. Double up the battery capacity if and when I add in a full electric cooler/fridge.
- Don't worry... I won't fill the water tank up in the winter. I'm not super handy, but I'm not ignorant either.
What am I missing?
Oh, and a crazy fantasy. Neither my truck ('01 F150. Airbags and heavier leaf spring installed) nor the camper has a sliding window where their respective windows meet. What would it be like to remove both windows? Entirely remove them. And install a giant version of one of those dust/water boots. Dumb idea? They're roughly the same size as each other. It would be nice to be able to pre heat the camper while driving the truck (and curtain it off when I don't need to heat the camper) and to crawl back and forth from time to time.
") )
)