hpcbmw
Advanced Member
My 1997 Granby has had a roof leak off and on for a few years. Being in California with the drought the last few years, it hasn't really been an issue, but we took it to Yellowstone a few weeks ago and it became a problem. After reading lots of posts, my plan is to remove all the roof and side strip screws, scrape off any exposed old sealant, then replace with new sealant, new screws and new washers with rubber backing. I'll put a dab of sealant into each screw hole before the screw, and another dab on top of each screw. I"ll also shoot some exapanding foam into every other trim screw hold in the rounded corners.
Here are all my questions (so far):
1. should I replace all the old no. 8 screws with stainless no. 10 screws, or use stainless no. 8's, and only use no. 10s where the hole is stripped out.
2. I see dicor self leveling lap sealant recommended in a lot of posts. That should work for the screw holes on the roof, but will it work on the edge/seam between the roof and the side trim? It seems like it will just drip, since it's "self leveling". If not, what product should I use?
3. There is a bunch of sealant on and around the two roof vents. Should I remove ALL the exposed sealant and re apply with the dicor stuff?
4. When I remove the roof screws, a lot of the screw holes have sharp edges sticking up. Do you leave these as is? Tap them down with a hammer and a punch or flat plate? Try to trim them off somehow?
5. I see people re-painting their roofs with Rustoleum oil based enamel (often recommend by Stan). I assume this is mostly aesthetic, and won't provide any sealant properties. Has anyone tried the RV rubber roof paint products, like this: https://www.amazon.com/Liquid-Roof-Coating-Repair-Gallon/dp/B003K9XGTK
6. One roof vent is a fantastic fan. The other looks like it was probably installed at the factory 20 years ago. The vent cover has come off and the replacement I put on it doesn't fit right. Is it better to keep the 20 yr old vent and just find the correct replacement cover, or to replace the whole vent with a new one? The existing vent is in good shape and the part above the roof is metal. On the one hand, I prefer to follow "if it aint broke, don't fix it". On the other hand, I intend to have the camper 5-10 more years and don't want to have to mess with the roof after this repair job.
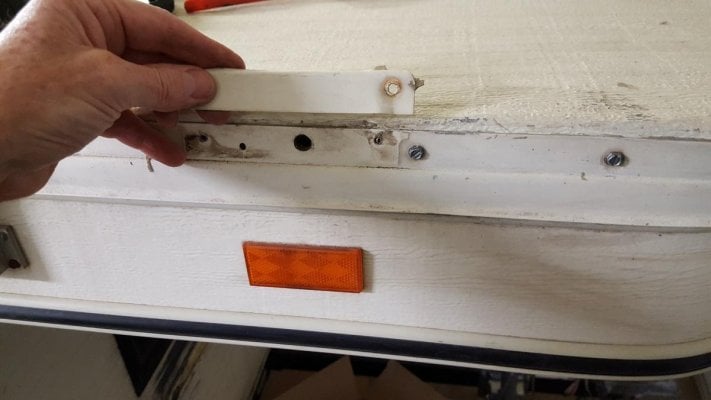
7. My roof has what looks like four little "vents" -basically one on each corner. I'm attaching a picture. I pulled one of the little vent covers and underneath is a round hole about 3/4" across. I assume this is necessary for venting and I should re install it the same way I took it off (my first thought was to plug all the holes to stop the damn water from coming in).
Any ideas, tips or tricks to get the old sealant off, prep the roof, etc is appreciated! I'm currently using razor blades, a small wire brush and rubbing the old sealant with my finger while wearing rubber work gloves.
Here are all my questions (so far):
1. should I replace all the old no. 8 screws with stainless no. 10 screws, or use stainless no. 8's, and only use no. 10s where the hole is stripped out.
2. I see dicor self leveling lap sealant recommended in a lot of posts. That should work for the screw holes on the roof, but will it work on the edge/seam between the roof and the side trim? It seems like it will just drip, since it's "self leveling". If not, what product should I use?
3. There is a bunch of sealant on and around the two roof vents. Should I remove ALL the exposed sealant and re apply with the dicor stuff?
4. When I remove the roof screws, a lot of the screw holes have sharp edges sticking up. Do you leave these as is? Tap them down with a hammer and a punch or flat plate? Try to trim them off somehow?
5. I see people re-painting their roofs with Rustoleum oil based enamel (often recommend by Stan). I assume this is mostly aesthetic, and won't provide any sealant properties. Has anyone tried the RV rubber roof paint products, like this: https://www.amazon.com/Liquid-Roof-Coating-Repair-Gallon/dp/B003K9XGTK
6. One roof vent is a fantastic fan. The other looks like it was probably installed at the factory 20 years ago. The vent cover has come off and the replacement I put on it doesn't fit right. Is it better to keep the 20 yr old vent and just find the correct replacement cover, or to replace the whole vent with a new one? The existing vent is in good shape and the part above the roof is metal. On the one hand, I prefer to follow "if it aint broke, don't fix it". On the other hand, I intend to have the camper 5-10 more years and don't want to have to mess with the roof after this repair job.
7. My roof has what looks like four little "vents" -basically one on each corner. I'm attaching a picture. I pulled one of the little vent covers and underneath is a round hole about 3/4" across. I assume this is necessary for venting and I should re install it the same way I took it off (my first thought was to plug all the holes to stop the damn water from coming in).
Any ideas, tips or tricks to get the old sealant off, prep the roof, etc is appreciated! I'm currently using razor blades, a small wire brush and rubbing the old sealant with my finger while wearing rubber work gloves.