Anatomy of a Hawk Flat Bed Build.

CamperCamper

Senior Member
Joined
Jun 19, 2015
Messages
122
After a long winter of waiting, planning, hoping and more planning, My all aluminum flat bed has been built and I picked it up yesterday. A 2017 Hawk will be paired up with my 2015 Tundra next Wednesday.

I will be detailing the build process over the next couple of weeks as time permits. The flat bed is covered in a rhino liner material. The bed includes a 20 gallon fresh water tank that will be tied into the camper water system and a 10 gallon grey water tank. The camper was ordered without a heater and I will be installing diesel heat. There is also a 5 gallon diesel tank (since the Tundra is gas). Both fresh and diesel tanks have fillers built into the bed rails. There is a custom modified Little Giant ladder for entry, a stealth side entry system for when I need to access the camper without deploying the main ladder. There is a storage box (waterproof) in the rear of the bed to house/store the main ladder. There are 4 storage boxes in the bed, a built in air compressor with air line and in cab controls to the Firestone Ride Rites that were installed on my truck for my prior camper which was a slide in Hawk. The factory back up camera was built into the bed as were the parking sensors. We were able to also preserve the HD factory tow package and plug.

Stay Tuned!


gallery_6092_1134_852124.jpg
 
My wife and I bought a used 2014 Hawk slide-in model in August of 2015 and quickly became hooked on the FWC platform for all of the reasons that you are aware of. After a three week trip living on the beaches of Baja, Mexico, in March 2016, we knew exactly what would serve our long term needs from the FWC lineup and it was a flat bed Hawk model. That decision was the easy part of this project. But, this camper was going to require a flat bed and if I was going to go that far, I might as well get it exactly as I wanted it! Thus began a ten month journey of reading and researching everything I could find from other members who had written about their flat bed builds and projects. I am grateful to them and the folks at FWC who have assisted me immensely in my research. Hats off to all of them! My hope is that by detailing my build process in detail, I can pass some of that inspiration on to future "dreamers" and give back some of that compiled knowledge to the community.

For me, probably the hardest part of this project was locating the right builder to bring my concepts and dreams to fruition. I don't weld, don't have a shop and still work most days. But, I do know how to dream and research the web to find what I am looking for. There are many fabricators that can build a flat bed for a truck. Most however are reluctant to customize the bed to fit your needs. I probably spoke with a dozen different shops prior to meeting the owner of Precision Welding in Oroville, CA. I was running into constant dead ends and was pretty much resigned to ordering an "off the shelf" bed and giving up on many of the ideas I have incorporated into this build. Originally, I visited Precision to look at the two different models of beds that they carry to see if either could at least be adapted to fit my needs. It was then that the owner, Jerry, asked me if I wanted him to build a bed for me from scratch just as I wanted it. How could I possibly resist that offer??

That conversation took place in early December 2016. He gave me a price and told me to write up exactly what I wanted in the bed. Well, he got what he asked for when I delivered a 15 page document with drawings, photographs and requests for features we had not even discussed on the first visit. Jerry never even blinked an eye. He told me how long it was going to take, how much it was going to cost and informed me that I would need to visit the shop at least two more times to make decisions as the project evolved. You see, Toyota does not publish an up fitters guide so until the bed came off of the Tundra, we weren't even sure where things were going to end up!

This photo shows the grey water tank. It is located in the front left corner of the bed. By my best calculations (it is an odd shape), it will hold 10 gallons of grey water. It is hidden behind a door made to look like another storage box on the bed. What the heck, I still have 3 more boxes!

gallery_6092_1134_491298.jpg


This photo shows the top of the grey water tank built out of aluminum with all of the plumbing fittings. It includes a 3/4" inlet to match the size of the drain hose inside the FWC. You can see the edge of the fresh water tank in the corner of the photo.

gallery_6092_1134_786776.jpg


During my first build visit to Precision, we explored locations for the largest possible fresh water tank. This area at the front of the bed looked like a winner! It is just below the FWC internal tank, forward of the rear axel and as low as possible in the frame. We were able to fit a 20 gallon polyethylene tank in this location. Jerry welded a support tray for the tank which is visible in the final photo of this post where the bed sits upside down just prior to the liner application. It will only be used for extended trips off the grid because of the extra weight. Those extra 20 gallons will allow me to stay longer on some remote Mexican beach next winter!

gallery_6092_1134_1179086.jpg


And here is an image with the fresh water tank in place. You can also see the fuel inlet, water inlet and the air vents for the fresh and grey water tanks. The fill and air vent styles were chosen to exactly match those on the FWC which will be directly above the flat bed components.

gallery_6092_1134_1363086.jpg


The next image shows the location of the drain petcocks for the fresh and grey water tanks. They are out of the way, high enough to avoid rocks on the trails (I hope), easy to access and change when they inevitably fail. Black was chosen to hide them, match the color of the bed and the style matches those used by FWC. Now, if I can just keep it straight as to which one is for the grey water tank!

gallery_6092_1134_1417984.jpg


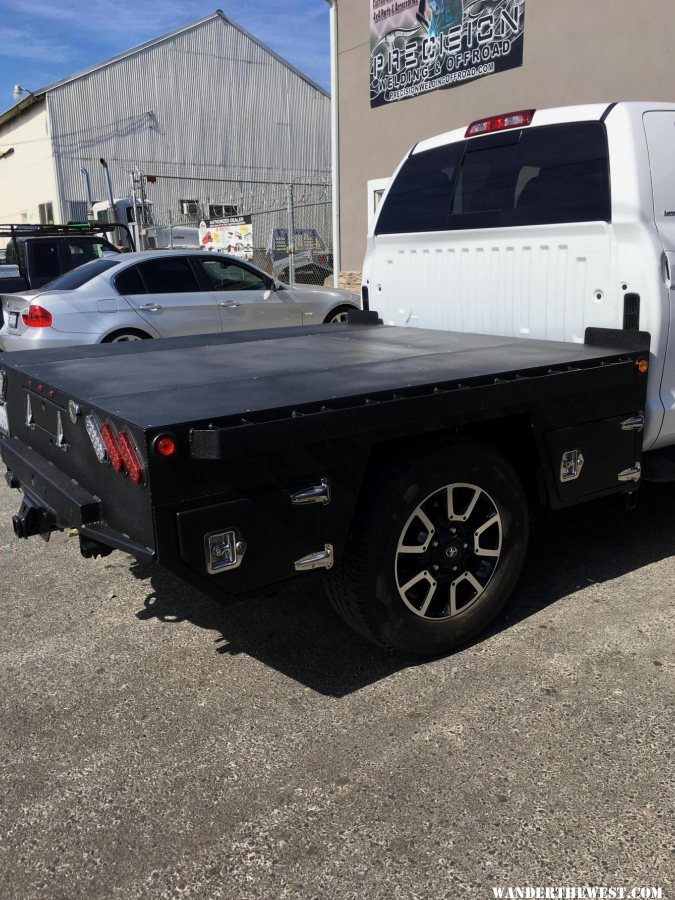
Jerry even gave us four different wheel opening mock ups to choose from. We ended up choosing the last one for its angular simplicity and how it matched the rest of the angles on the bed. That is a good thing for a person who is suffering from OCD!

gallery_6092_1134_1706878.jpg


gallery_6092_1134_287553.jpg


gallery_6092_1134_581705.jpg


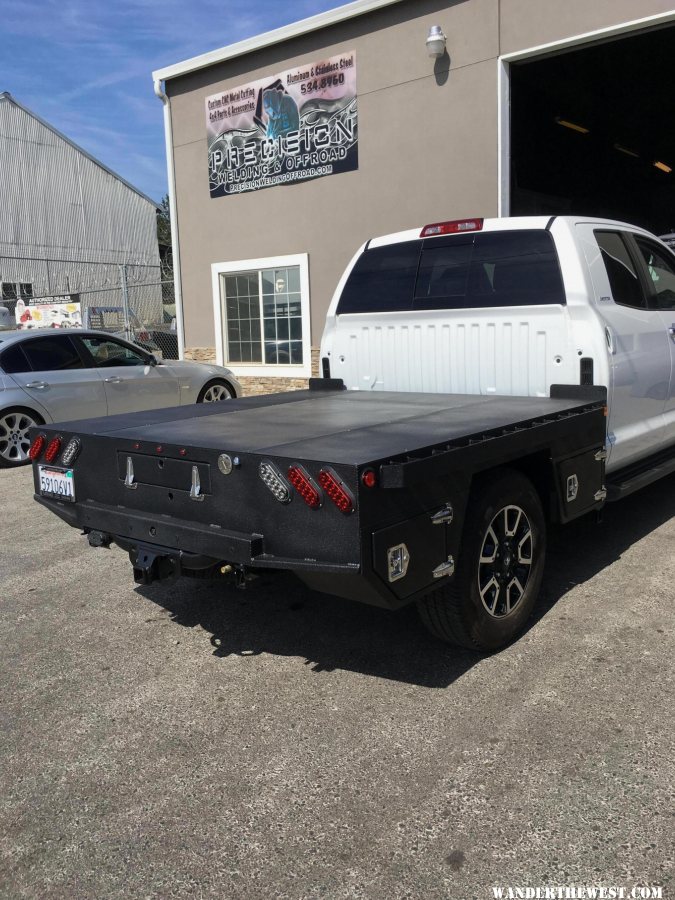
The final photo today is of the bed just prior to getting sprayed with bed liner. The bed is upside down and gives a good view of the fresh water support brace and the rear ladder storage box in the rear apron of the bed. I chose bed liner to give the bed a finished look and hope that it will resist scraping and chipping better than paint or powder coat paint. You can see the permanently mounted studs that hold the boxes in place in the lower left corner of the photo. We chose this method of install to give us an easy access for the removal of the boxes. It also allows us to gain access to the compressor, air tank and liquid tanks as well as wiring in the event of needed repairs.

gallery_6092_1134_451076.jpg
 
Well thought and well constructed.
I reckon you'll dial the suspension and tires upon completion of the project?
 
I am curious what you are using for your stealth step - I have tried various options and none have been to my liking. I usually end up using the tire for quick in and out.
 
Sounds like you and Jerry are two of a kind... even more OCD than me!

One reminder which I'm sure Jerry is on top of is many flatbeds suffer from serious problems filling the gas tank properly because you have dropped the angle of the filler tube. Originally my flatbed was agonizing to fill with the pump clicking off. My builder rerouted the angle by attaching it to the camper and it is still slow but tolerable now.

NOTE: The photo is before we changed the filler tube and the plywood ramp under the front wheel is what I would drive the truck up onto at a gas station to change the angle and get gas into the tank. Don't have to do that now. Kinda miss the ramp for leveling though!

Keep us posted. You are going to have to exercise seriously self-control to stay even remotely within your GVWR. I'm slightly over with my Ram 2500! :)

Steve
[sharedmedia=core:attachments:22035]
[sharedmedia=core:attachments:22032]
 
I am a fan. Thanks for sharing. Jerry looks to be an excellent fabricator. I'm surprised how difficult it was to find someone willing to do a full custom bed build. Perhaps it is because you went aluminum, and there aren't that many shops out there capable?
 
GoinBoardin said:
I am a fan. Thanks for sharing. Jerry looks to be an excellent fabricator. I'm surprised how difficult it was to find someone willing to do a full custom bed build. Perhaps it is because you went aluminum, and there aren't that many shops out there capable?
Correct. Everyone will work in steel. Few will do custom aluminum fabrication. By far the biggest challenge of my project. Fortunately I did find a good company 50 miles away.
 
What is your target dry weight of flatbed plus camper and what is the payload on your Tundra? The aluminum should help but seems like this is cutting it close. Beautiful design and fabrication!
 
Durango1 said:
...many flatbeds suffer from serious problems filling the gas tank properly because you have dropped the angle of the filler tube.

Steve
Right you are Steve! And, I appreciated your forewarning when I was planning my build. I addressed the issue with all I spoke with before choosing Precision Welding for the build. They nailed the angle. Bought my first tank of gas on the way home without a hiccup!
 
rando said:
I am curious what you are using for your stealth step - I have tried various options and none have been to my liking. I usually end up using the tire for quick in and out.
Rando, I will have to keep you in suspense until I get the camper installed and confirm that it indeed works as planned. I plan to do a write up on the ladder system (which incorporated and improved upon your original plan with the Little Giant) next week after making sure all is well. No point in showing great design that fails the functionality test!
 
One other suggestion - which may be a bit on the late side - consider some sort of fuel storage in your flatbed arrangement. Like water, fuel is really heavy, so down low under the flatbed is the perfect place to store it, preferably in front of the wheels. With our Fleet/Tacoma combination we get pretty abysmal fuel economy (15-16 mpg average, less off road) which means we often need to carry extra fuel, and I am guessing you will be in the same situation. I have mounted two 3 gal rotopax under the bed in front of the drivers side wheel. This has been a really convenient place to carry fuel, but in hindsight I wouldn't recommend the rotopax. If you could fit one or two standard 5 gal fuel cans somewhere under there, that would be awesome.
 
The bed was equipped with a Viair compressor mounted above the right front box.

gallery_6092_1134_37552.jpg


gallery_6092_1134_533480.jpg


An air tank was mounted above the left rear box.

gallery_6092_1134_57162.jpg


An on/off rocker switch, pressure gauge and fill/release switch were mounted in cab inside of the center console.

gallery_6092_1134_1608794.jpg


A quick connect air valve and independent schrader valves (if compressor fails) were mounted just below the rear apron.

gallery_6092_1134_1102.jpg
 
Entry into a FWC flat bed is challenging due to the height of the bed and the absence of the rear step bumper (since the entry door is moved to the side of the camper). Traditional entry method has been by use of an attachable step similar to the Brophy scissor step. I found the steps to be heavy (up to 45 lbs-depends on number of steps required) clunky and bulky They created a storage problem in addition to the weight.
My solution was inspired (as most things I have done-modifications of great ideas found on this forum) by similar solutions. I started with a Little Giant safety step ladder and removed the rear tripod leg and safety rail. Looking for a way to attach it to the bed, I found a patented hook system that drops over the top of the rub rail. The rail hooks are permanently attached to the top of the Little Giant ladder. It was an expensive solution but the hooks are patented and the ladder that comes with the hooks has steps that are too narrow for my taste. So I ended up with two ladders that were taken apart and put back as one unit to fit my needs. I am getting close to retirement age and want a safe, secure platform for entering the camper as I age. The Little Giant provides a very wide and stable step to reach that objective and the hooks give me a stable attachment that should last for as long as I will be camping. As an added bonus, this solution weighs in at less than 8 lbs!

Here is a link to the to the semi flatbed ladder if someone thinks they would not mind a narrow ladder with thin steps: http://www.discountramps.com/step-deck-trailer-steps/p/Ladder-16-48/?CID=DSC-Criteo-DynReMKt-Ladder-16-48-step-deck-trailer-ramps-leveler&utm_source=criteo&CA_6C15C=820562990000003198


gallery_6092_1134_722273.jpg


gallery_6092_1134_1386113.jpg


gallery_6092_1134_50288.jpg


A sealed, (waterproof, dust proof) lockable storage box was built into the rear of the bed. Sealing it from the elements was made easier by building a tray that does not roll out. The ladder is light and it easily slides in or out of the box. We did explore building a storage box into the side of the bed and having a ladder drop straight out of the box but that would have required raising the bed structure 4 inches higher and I did not want to further raise the height and C.O.G of the build so that idea was scrapped.

gallery_6092_1134_15729.jpg


gallery_6092_1134_537902.jpg


Another goal for the build was to provide entry into the camper for quick uses such as a stop at a store or pulling over on the side of the road for lunch and needing to access/place things inside the camper. In those instances, deploying a full entry ladder is not practical and may not even be possible. After all, it is bad manners to run your entry ladder half way across a one person sidewalk in a small Baja village!
To solve this problem and make entry quick and easy, we reinforced the right rear box at the wheel well to support a fold down step similar to those that FWC installs on the rear of the slide in campers. It works well and for the younger members will prove to be plenty enough height to accomplish the task. I can use it and get inside the camper but it is still too much of a stretch from it to the inside for an aging hip and back. A second step that hangs from the rub rail and is stashed inside the right rear box is being fabricated and I will update this post with a second photo when that is completed.

gallery_6092_1134_65651.jpg
 
Ronski said:
What is your target dry weight of flatbed plus camper and what is the payload on your Tundra? The aluminum should help but seems like this is cutting it close. Beautiful design and fabrication!
The Tundra is a 1/2 ton truck. Put a decent amount of options on it, two people, a full tank of fuel and a small bag of apples and you are pretty much over GVWR. That having been said, any camper on a 1/2 ton truck will push the GVWR in a New York minute (they tell me that is real fast). But, I believe you can properly build this vehicle platform to support a flat bed Hawk. This particular Tundra has been carrying a well appointed slide in Hawk for two years and 28,000 miles. It has performed flawlessly and has taken me to some very remote locations.

The vehicle was built with Load Range E rated tires, Firestone Ride Rite Airbags, a TRD sway bar and a custom spring pack built by Deaver Springs in the L.A. area. You can read about it here. http://www.wanderthewest.com/forum/topic/12021-suspension-mods-to-a-2015-tundra-with-a-2014-hawk/?hl=campercamper#entry139286

The flat bed Hawk is around 300 lbs more weight than the slide in and it does shift more of the weight to the rear wheels and off of the front wheels (not sure why just yet). It is carrying the load much differently than it carried the slide in Hawk. I will get it dialed in soon and most likely will be visiting Deaver once again to tweak the spring pack so that it supports the load properly. My goal is to utilize the air bags strictly for balancing the load and not supporting it. I like it when I can run with no more than 15 psi in the bags.

I will post an update to my truck build post when I get it all figured out.
 
Last Wednesday was the day that I have been patiently (yeah right) waiting for since January. I visited the factory in Woodland and the folks in the shop did a great job getting the new camper mounted to the flat bed. Then I spent the next 4 days getting familiar with how it all worked and figuring out where to put all of my gear. Way too much time was spent in the parking lots at Target and Bed Bath & Beyond for my tastes. But, I now have all of my gear stowed away and the camper is now back at the builder's shop (Precision Welding) for some final tweaks. Once I get it back, I can get weighed and finish up with the suspension mods. I am planning a fall trip to Canyon de Chelly and Albuquerque with some long week ends at the coast before that this summer.

gallery_6092_1134_1047117.jpg


gallery_6092_1134_79060.jpg


gallery_6092_1134_2072523.jpg
 

Latest posts

Back
Top Bottom