pvstoy
Senior Member
Arctic Pac Benefits & Tip (REVISED)
Revised 4/10/2007 to include clearer details:
Arctic Pack Benefits & Tip
When we first ordered the 4-Wheel Camper Ranger we did not purchase the Arctic Pack. The camper was prepped with the Velcro in place for the future if we wanted to buy one. The older FWC Fleet model had a thicker liner and there was insulation between two layers. And yes, it would soak up water in the rain if it was popped up. Coming from the 4-Wheel Camper Fleet model, we did not know what to expect with the Ranger model.
On the “shake down” trip, we discovered that when the sun beats down on the side of the canvas, the heat is transferred inside. When sleeping in cold weather, water condensed on the inside of the canvas and our sleeping bags got wet. In the morning we used a towel to wipe down the inside. Now we sleep with the vents open more and re-scaled the thermostat to have a minimum 40-degree setting to keep the temperature above the dew point inside; the original thermostats have 50 degrees as the lowest temperature you can set it to maintain, but 50 degrees is too hot to sleep with nice down sleeping bags.
When cooking or boiling water the Fantastic power roof fan does a great job pulling out the extra moisture produced. By opening one or two access panels for the turnbuckles will provide fresh air to replace what is removed by the fan.
So we went ahead and bought the Arctic Pack. The other option was to find a suitable fabric and make one (we chose the easy route). The Arctic Pack is a thin, dense liner that when mounted provides a dead air space to better insulate. It comes in two pieces, a right and a left and they are labeled. The windows open up from the bottom. If your camper is prepped for the liner you will see a strip of Velcro running down the side length of the camper just below the liner. At the ceiling you will see a piece of liner hanging with a strip of Velcro sewn to it. To install the liner you will start at either the front or back of the camper. Look at the first window and line it up with the camper window. Press the two Velcro parts together. There is some extra that you will push behind the end panels.
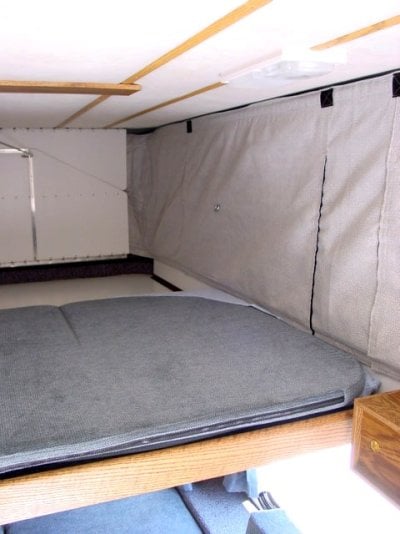
We have found that the camper is cooler in the summer and warmer in the winter. The Arctic Pack is always on and is a great benefit for all seasons. The daily morning wake-up routine is to wipe the water from under the mattress where the bed overhangs over the truck cab. Also, pull back the Arctic Pack in the front (over the bed) and wipe the condensation off the liner. This is from breathing while sleeping. If you have an Arctic Pack, feel between the layers on a cool morning and see if it is wet. This is why you should always dry out the camper before storing with the top down, especially if you live in a climate that has higher humidity. Remember there could be moisture between the Arctic Pack and the liner that could cause mold.
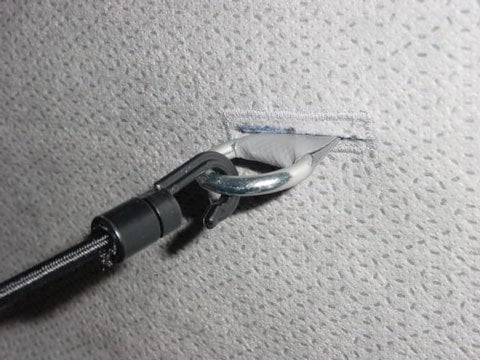
This brings me to the problem I saw right off the bat. Before lowering the camper top, you have to pull back the Arctic Pack window to get to the hooks that the bungee attaches to. The bungee helps pull in the canvas liner when you lower the top. After thinking that you would have to do this all the time, and for four windows, I came up with a solution.
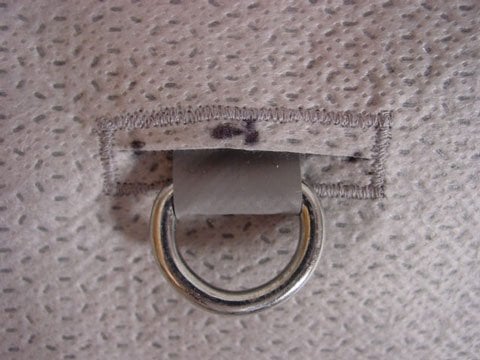
I asked my better half if her sewing machine could sew this fabric; sure she said. Then I marked where the metal rings were and gave her the Arctic Pack to sew button holes. After she did a great job sewing the button holes, I took a razor knife and made the slits between the stitching. Now you can just stick your finger in the hole and pull out the ring and attach the bungee. She just used a zigzag stitch to sew a rectangle around the slit area, to keep the slit from enlarging. I have made a small reference mark with a sharpie on the Arctic Pack and ceiling, so if I removed the Arctic Pack it will be re-installed in the same place allowing the rings to line up with the button holes.
These have been my opinions and observations and I hope this will help in the decision to have or have not an Arctic Pack. If you have any of your own opinions and experiences I sure would like to hear them.
Thanks for looking……….Patrick (aka pvstoy)
The picture below shows the stitching and the ring pulled out.
Revised 4/10/2007 to include clearer details:
Arctic Pack Benefits & Tip
When we first ordered the 4-Wheel Camper Ranger we did not purchase the Arctic Pack. The camper was prepped with the Velcro in place for the future if we wanted to buy one. The older FWC Fleet model had a thicker liner and there was insulation between two layers. And yes, it would soak up water in the rain if it was popped up. Coming from the 4-Wheel Camper Fleet model, we did not know what to expect with the Ranger model.
On the “shake down” trip, we discovered that when the sun beats down on the side of the canvas, the heat is transferred inside. When sleeping in cold weather, water condensed on the inside of the canvas and our sleeping bags got wet. In the morning we used a towel to wipe down the inside. Now we sleep with the vents open more and re-scaled the thermostat to have a minimum 40-degree setting to keep the temperature above the dew point inside; the original thermostats have 50 degrees as the lowest temperature you can set it to maintain, but 50 degrees is too hot to sleep with nice down sleeping bags.
When cooking or boiling water the Fantastic power roof fan does a great job pulling out the extra moisture produced. By opening one or two access panels for the turnbuckles will provide fresh air to replace what is removed by the fan.
So we went ahead and bought the Arctic Pack. The other option was to find a suitable fabric and make one (we chose the easy route). The Arctic Pack is a thin, dense liner that when mounted provides a dead air space to better insulate. It comes in two pieces, a right and a left and they are labeled. The windows open up from the bottom. If your camper is prepped for the liner you will see a strip of Velcro running down the side length of the camper just below the liner. At the ceiling you will see a piece of liner hanging with a strip of Velcro sewn to it. To install the liner you will start at either the front or back of the camper. Look at the first window and line it up with the camper window. Press the two Velcro parts together. There is some extra that you will push behind the end panels.
We have found that the camper is cooler in the summer and warmer in the winter. The Arctic Pack is always on and is a great benefit for all seasons. The daily morning wake-up routine is to wipe the water from under the mattress where the bed overhangs over the truck cab. Also, pull back the Arctic Pack in the front (over the bed) and wipe the condensation off the liner. This is from breathing while sleeping. If you have an Arctic Pack, feel between the layers on a cool morning and see if it is wet. This is why you should always dry out the camper before storing with the top down, especially if you live in a climate that has higher humidity. Remember there could be moisture between the Arctic Pack and the liner that could cause mold.
This brings me to the problem I saw right off the bat. Before lowering the camper top, you have to pull back the Arctic Pack window to get to the hooks that the bungee attaches to. The bungee helps pull in the canvas liner when you lower the top. After thinking that you would have to do this all the time, and for four windows, I came up with a solution.
I asked my better half if her sewing machine could sew this fabric; sure she said. Then I marked where the metal rings were and gave her the Arctic Pack to sew button holes. After she did a great job sewing the button holes, I took a razor knife and made the slits between the stitching. Now you can just stick your finger in the hole and pull out the ring and attach the bungee. She just used a zigzag stitch to sew a rectangle around the slit area, to keep the slit from enlarging. I have made a small reference mark with a sharpie on the Arctic Pack and ceiling, so if I removed the Arctic Pack it will be re-installed in the same place allowing the rings to line up with the button holes.
These have been my opinions and observations and I hope this will help in the decision to have or have not an Arctic Pack. If you have any of your own opinions and experiences I sure would like to hear them.
Thanks for looking……….Patrick (aka pvstoy)
The picture below shows the stitching and the ring pulled out.
")