FWC Bronco to "Hawk" Build

jcr5155

New Member
Joined
Mar 22, 2019
Messages
5
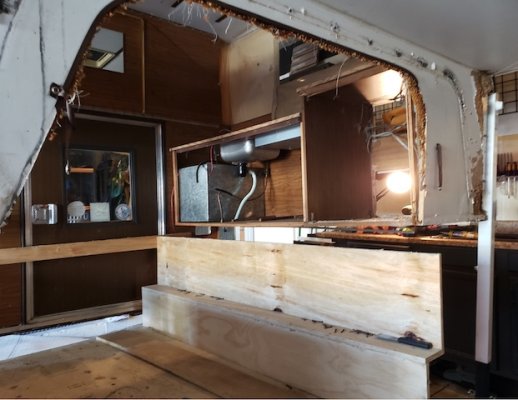
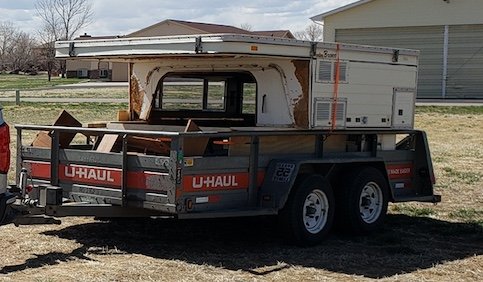
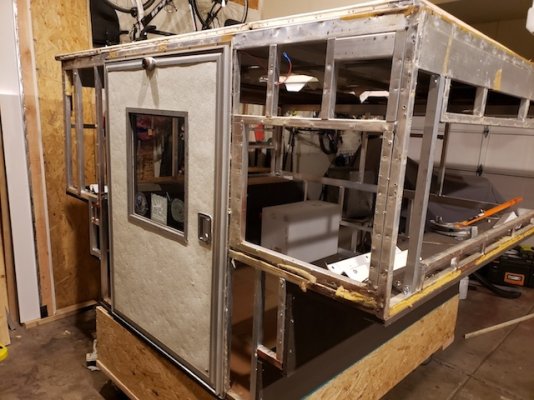
Hey All, I just bought a fwc bronco for $200 that was in pretty rough shape, but I knew that going in. I mostly just wanted it for the skeleton and a template to build onto. I've dug through a ton of the forums and chats on here prior to buying, but wanted to start a topic to see if anyone is interested in following the build and I also know that folks on here will have great ideas when during roadblocks and brain farts. I'm located just south of Denver, so if anyone has tips for local vendors, that would definitely be appreciated!

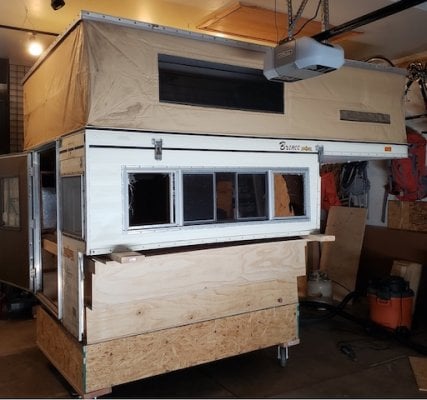
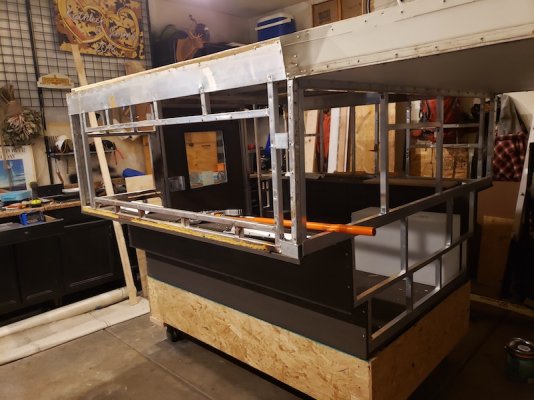
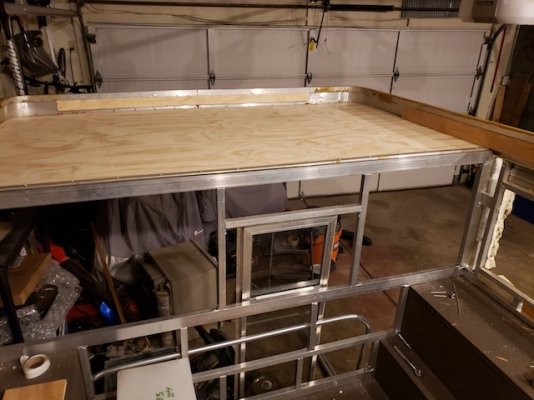
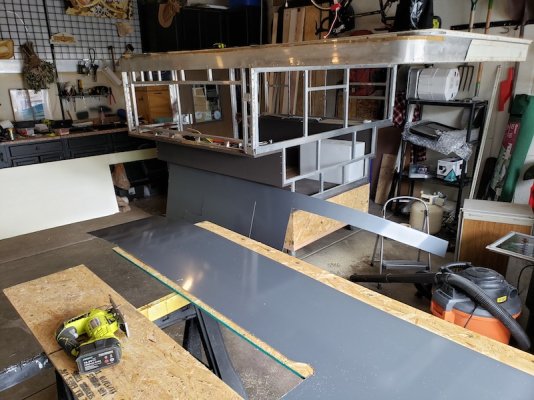
I'm building a floor pack and front frame to make it fit my 1500 short bed (5'9") Silverado. I made the floor pack from 3/4" marine grade plywood and plan to paint it with heavy duty dock paint. This week I plan to lay out and start welding the aluminum frame with a neighbor experienced in TIG welding. Bought some 6063-T52 square aluminum tube online in 1"x1" and 1"x2" and found pictures from ski3pin during their camper build on how the frame and floor pack is all mounted together. If anyone hasn't seen this build out, it's awesome.
http://www.wanderthewest.com/forum/topic/8078-building-our-new-camper/

Some of my main thoughts I'm still pondering are below. Happy to accept any advice or comments along the way too. I'll add more questions and builds as I go further into it.

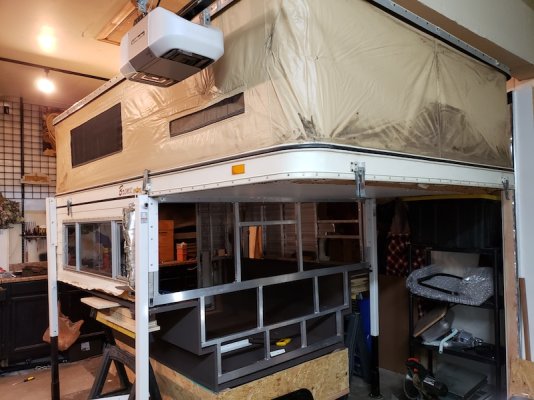
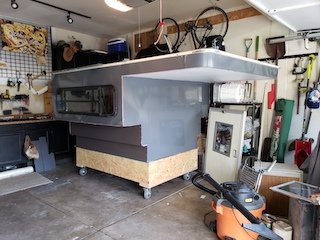
- I hope to use filon siding to replace the badly dented aluminum siding (Colorado hail storm actually pierced the aluminum). I'm unsure whether I should mount it to a luan backer board or if this stuff is sturdy enough to adhere to the aluminum and rigid foam insulation (and rivet around the edges?).
https://www.ebay.com/i/292661593581?chn=ps

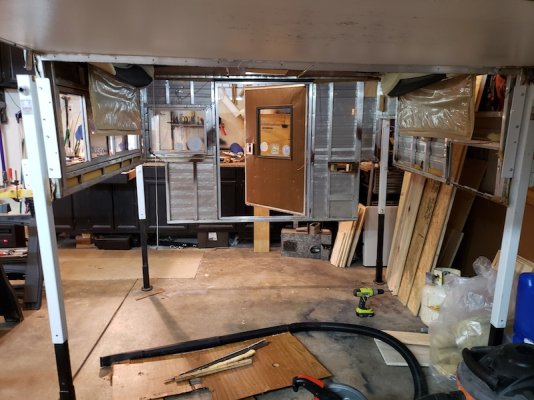
- Thoughts on the roof? It's badly dented, but I coated it with the hose and didn't see any signs of a leak. There's also no water damage on the insides, only on the front where it attached to the bronc, the exposed floor portions, and under the bed where it was exposed to the elements. I plan to just paint the roof back to white with the rubber roof paint for aesthetics and to add another coat for assurance.

- Any thoughts on mounting a propane tank to the outside to save space inside? Can this freeze in the winter? I am insulating all sides to make it a 4-season camper.

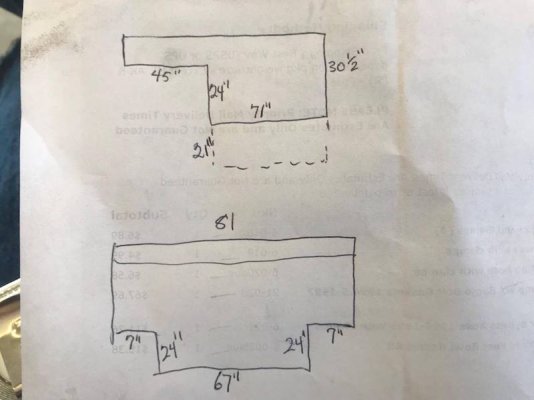
- Does anyone know where to get a new side window? I've scoured eBay and most Rv sites that came up within the first 4 pages in Google searches, but nothing is close to the 60" x 16" dimensions. I'd love for a long awning style window and am open to modifying the frame to accommodate something slightly different.

I also built a tow behind camper last year and sold it for a profit on hardware (definitely not labor...), so I'm not afraid of 90% of the work required. Honestly, resewing the canvas eventually is the scarier part, but Tim Morrissey's videos on youtube are helpful calm my nerves there. With the last camper I basically built everything three times to finally get it right
 

Attachments

  • Interior 1.jpeg
    Interior 1.jpeg
    108.8 KB · Views: 319
  • Towing it home.jpeg
    Towing it home.jpeg
    78 KB · Views: 344
  • popped up in the garage.jpeg
    popped up in the garage.jpeg
    98.5 KB · Views: 343
  • 20181006_13594222.jpg
    20181006_13594222.jpg
    165.3 KB · Views: 262
Dang, I thought we were going to see a Bronco build! :p

Good luck with the build, even if its not for what I hoped!
 
JCR,

Welcome to the forum and best wishes on your Bronco build out, converted for your Silverado. Tim has many great videos on his build which have been a a lot of help to others. There are several other builds that might be useful reference. Because you are doing some frame alterations, I thought I'd link you to my build in which I did something similar. Additionally, a ways in on the thread, you'll find information on doing a headliner if needed, as well as some detailed photos on sewing and fitting the sideliner. Hope this might be helpful for you. Again good luck, and we'll be enjoying watching you bring it back to life.

Poky

http://www.wanderthewest.com/forum/topic/12116-new-build-1981-grandby-to-become-a-hawk/
 
When I rebuilt my 1979 Grandby, I used painted aluminum from a building supply company. I think it was .032. To fasten it to the aluminum framing, I used 3M VHB tape. A little expensive, but no screw holes through the siding. Between the tape, window and door fastening, plus the edge trim, it's tight!
 
I guess I should have said Bronco Camper transformation or Bronco to Hawk? I can't figure out how to change the name now, so I hope others aren't bummed that this isn't an actual Bronco build!

Poky Bro, you did something very similar to what I'm undertaking and your thread is helping a ton! I plan to do something similar with the windows using a strap and insulation as backing. Also, the L-bracket tip is a lifesaver. I am new to welding (literally my first time), but a neighbor with a TIG welder is helping a little bit. For now the L-brackets are holding a couple of sections in place before they can be welded.

Shellback, I like the idea of that 3M VHB tape, I might use that and some screws around the edge. I definitely want to use filon as it doesn't show minor curves and irregularities in the smooth finish. I know my work won't be perfect and can use all of the smoothing as I can get! I plan to back the filon onto a luan and try to seal the edges somehow to further avoid any potential damage from water sneaking behind the filon.

Found some windows at an RV salvage yard, 5-star RV Center here just North of Denver (they weren't cheap, but they are in great shape and included the trim rail), I like awning style windows better than sliders to keep the rain out.

This past week I've done a bunch of demo (ripping out the headliner, insulation, all interior paneling, removed the cabover wood (rotted straight through in parts..), made the front aluminum tubing vertical (it was angled for the contour of the Bronco, and painted and started attaching the floor pack to the frame (temporarily until I am sure I don't need to adjust anything else). I used Restore 10X deck paint as a low cost sealant for the floor pack. $25 a gallon and I used a gallon on either side. My dad painted their deck with this stuff and you can drag anything across it without damage. I figured that would be good enough for my purposes to seal the floor pack. I plan to put boards sideways under the camper to add stability but also to raise it up about an inch off of the truck bed. These will be sacrificial and can be replaced instead of the floor pack sitting directly on the truck bed and rubber mat.

Some useful dimensions for anyone else looking at a Bronco camper are below. I've used these for most of the construction of the frame.

Length of the base at bedrails = 71"
Width of the base at bedrails = 81"
Overall length = 116"
Bed overhang = 45"
Height from bottom of the door to the bed rails = 21"
Height from bedrails to overhand = 24"
Height from bottom of overhang to top trim on the hard side = 6.5"
Width of the door
Ask for any other dimensions, I have a bunch more, but those are the majority of them.


The one big thing I am nervous about is redoing the canvas. While Tim Morrissey did a great job doing his canvas himself, I'd rather just outsource that part as I don't have access to an industrial sewing machine and that gigantic table he used at CU Boulder. Does anyone know of a canvas place around Denver that would make a new canvas with 4 windows? The dimensions of the canvas for this top would be 116 front to back and 81 side to side. I stupidly didn't measure the height yet.... I'll get to that, but am assuming around 24".

My next steps are to clean and repaint the roof, replace the cracked roof vents, and replace the headliner. Thanks again for the tips and great forums on here about the headliner, that's been ordered and is on it's way!

I'm uploading pictures to this Flickr album to help others out. If you have any questions about how I did something please ask!
 

Attachments

  • Camper Dimensions.jpg
    Camper Dimensions.jpg
    39.4 KB · Views: 421
  • 20190412_093651.jpg
    20190412_093651.jpg
    216.3 KB · Views: 246
  • 20190414_124458.jpg
    20190414_124458.jpg
    208.4 KB · Views: 318
I was looking forward to a Bronco build too. But I've got a Blazer camper. Any build is good. There's a guy on Instagram with a toyota pickup using a Bronco FWC camper. He did some interesting things to get the camper adapted to the pickup. OverlandNomad is his handle.

As far as the Canvas, you might talk to the guys at Phoenix Campers or Outfitter Campers. Both located north of Denver. I'm not sure if either would take it on though. I'd be interested in the cost if they were willing since I'll have to do mine sooner or later.
 
Sent you a message Zoomad, but I also thought others might find this useful. Phoenix gave a quote over the phone of roughly $1499 (rough cost, no dimensions shared yet) and All Terrain Campers gave a quote of around $1200 (that was specific to my needs and didn't include shipping). Phoenix is local here in Denver, but $300 is a big difference to me. I'm still weighing my options on that.


Another question I had is regarding the cabover wood? Mine was heavily rotted from the bottom up, and I was able to pull it out by poking holes in it. Any suggestions for replacement? I was thinking about getting 3/4" outdoor grade plywood and painting it with an exterior paint on both sides. I'm still trying to think of ways to reduce moisture under the mattress (I've read that is an issue).
 
jcr5155 said:
Another question I had is regarding the cabover wood? Mine was heavily rotted from the bottom up, and I was able to pull it out by poking holes in it. Any suggestions for replacement? I was thinking about getting 3/4" outdoor grade plywood and painting it with an exterior paint on both sides. I'm still trying to think of ways to reduce moisture under the mattress (I've read that is an issue).
Checking the thickness on the original pressed stuff in mine was close to one inch. I ended up doubling up 1/2" and 5/8" plywood glue together with construction adhesive and screws. I lined mine with aluminum skin on the outside and sealed the inside with clear sealer. So far over one summer's worth of use it's holding up well.
 
Made a little bit of progress over the last few weeks but haven't had time upload to here. I'm uploading all of my unedited pictures to a flickr account if anyone is interested in more detailed pictures than I can upload here.

Most of this post is just the finally stripped camper, with the new floor pack and front frame attached. I also adjusted the frame to fit a hot water heater, window to the truck cab, and a new slightly longer jalousie window on the passenger side.
The floor pack is screwed to the frame every 6-8" from underneath and once they were together this thing became rock solid. The unpainted portion on the bottom is a cart I made to roll it out of the way in the garage during construction and for storage.

Just recently ordered a new two-piece aluminum roof from The Metal Company here in Denver. I believe it was quoted at $2.75 per square foot. Since we get a ton of hail storms in Denver, I'm hoping the ridges in the older style roofs will add some rigidity to protect my homemade version (and to hide the future dents). But, the new smooth roofs from FWC are awesome and I thought about getting a single sheet from TheMetalCompany.

I liked Zoomads idea of doubling up the plywood on the overhang. I used construction adhesive to glue together two 15/32 pieces of plywood from home depot, and added a layer of FRP as the water resistant layer. My hope is that because it is under the overhang and out of the elements, there won't be much of an impact from the expansion everyone talks about for the FRP panels. Just in case, I'll add some screw reinforcements to the middle of the panel to support the adhesive.

I also got the camper skinned with aluminum, but will put that in another post to show the pictures.

https://www.flickr.com/gp/165239689@N02/V96j11
 

Attachments

  • 20190425_085331 copy.jpg
    20190425_085331 copy.jpg
    201.1 KB · Views: 244
  • 20190425_085315.jpg
    20190425_085315.jpg
    155.4 KB · Views: 517
  • 20190422_172721 copy.jpg
    20190422_172721 copy.jpg
    127.8 KB · Views: 286
Got the camper skinned this weekend. Picked up these 0.04 charcoal gray aluminum sheets from a place here in Denver, H&H Metals, would definitely recommend $90 per sheet and I used 3. I think these older campers used 0.024 or 0.03 aluminum, this new stuff is thick!

Cut out the shapes using a sheet metal blade on a jig saw, it went much better than I could have hoped! The hardest part was getting the window holes cut out just right.

I placed insulation between the aluminum siding and the frame to reduce conductivity through the aluminum. I remember someone mentioned this on another forum in WTW. I plan to use 1" rigid foam insulation between the frame tubes.

I used rivets at the main corners to hold the sheet in place since they sit relatively low profile and shouldn't impact the trim and butyl tape seal. The trim is screwed in approximately every 6", so these sheets will hold the camper tight. I didn't worry about putting silicone on these rivets, since they'll be covered by the trim and the butyl tape, any thoughts on this?

I sanded down the bigger pieces of trim to reuse them, but during demo I bent the shorter pieces and plan to just order new ones. Couldn't think of an easy way to get new 20' trim pieces home from themetalcompany here in Denver (I was told they sell the 20' pieces for roughly $20 depending on the shape), also this was a great way to save money in the build.
 

Attachments

  • 20190426_132928 copy.jpg
    20190426_132928 copy.jpg
    238.5 KB · Views: 195
  • 20190427_185821 copy.jpg
    20190427_185821 copy.jpg
    191.7 KB · Views: 246
  • 20190427_185752.jpg
    20190427_185752.jpg
    49.4 KB · Views: 226

Latest posts

Back
Top Bottom