CoreyTrevor
Senior Member
Ok, some of you said to go ahead with this report, so here goes nothing.
I offer a blanket apology for mediocre to poor quality photos for the duration of the thread, so I won't have to apologize for each photo individually.
I welcome suggestions and ideas. I'm guessing I will gain more from this thread than you people reading it.
The goal here is to get my 2012 Eagle shell, originally ordered new for my 2002 Tacoma, onto my current 2006 3/4 ton Dodge, with 6' 4" bed. A bunch of mods and additions will hopefully make it really useful for decades to come.
I put the camper in the truck, sitting on a pallet and plywood, to get an accurate measurement on how tall of a riser I will need. To get the recommended 2" clearance to my sunroof it looks like a riser made of 2x6s on edge will be about right. The 2x6s will lay in the bed grooves, and will center the camper within about 1/4", so that will be a nice bonus. I'm planning to screw through the camper floor into the riser, and also bolt the camper to the bed in 6 spots, through the u-channels that run crosswise under the bed. For some added overkill, the rear of the riser will be full width and lock into the bed so the camper can never slide back. I think I will also put the front turnbuckles in.
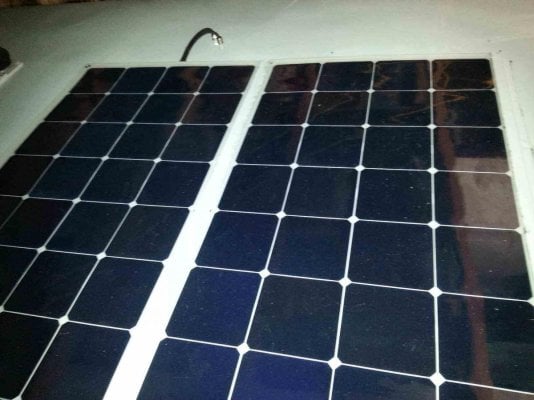
Before all the camper mounting fun takes place, I'm trying to get all the other work done that will be difficult or impossible with the camper on. Solar panels on the roof are already completed, easier to do with the camper sitting on the floor.
I went with 3 Sunpower 110w flexible panels in series. I know some have had bad luck with the flexible ones, but I couldn't resist the low weight and wind resistance. I came up with a mounting system that should give great airflow under the panels to help keep them alive, and with any luck will also keep them from flying off the roof. I got some 10mm dual-layer polycarbonate sheet, and hole-sawed a big pile of 1-1/2" discs out of the sheet. I VHB taped the discs to the underside of the panels, and the discs/panels to the camper roof. 50! on each panel, around the perimeter and at each junction between cells. Overkill? Why not! I used a solid piece across the front of the front panel, and some Eternabond tape to close the gaps.
The panels seem to be adhered really well and hopefully will get enough airflow underneath to keep them alive (and on there) for all eternity!
Here are a few pics. I forgot to get them before the camper was raised in the garage, so they are not really great. And I probably messed something up resizing them.
View attachment 37536


I offer a blanket apology for mediocre to poor quality photos for the duration of the thread, so I won't have to apologize for each photo individually.
I welcome suggestions and ideas. I'm guessing I will gain more from this thread than you people reading it.
The goal here is to get my 2012 Eagle shell, originally ordered new for my 2002 Tacoma, onto my current 2006 3/4 ton Dodge, with 6' 4" bed. A bunch of mods and additions will hopefully make it really useful for decades to come.
I put the camper in the truck, sitting on a pallet and plywood, to get an accurate measurement on how tall of a riser I will need. To get the recommended 2" clearance to my sunroof it looks like a riser made of 2x6s on edge will be about right. The 2x6s will lay in the bed grooves, and will center the camper within about 1/4", so that will be a nice bonus. I'm planning to screw through the camper floor into the riser, and also bolt the camper to the bed in 6 spots, through the u-channels that run crosswise under the bed. For some added overkill, the rear of the riser will be full width and lock into the bed so the camper can never slide back. I think I will also put the front turnbuckles in.
Before all the camper mounting fun takes place, I'm trying to get all the other work done that will be difficult or impossible with the camper on. Solar panels on the roof are already completed, easier to do with the camper sitting on the floor.
I went with 3 Sunpower 110w flexible panels in series. I know some have had bad luck with the flexible ones, but I couldn't resist the low weight and wind resistance. I came up with a mounting system that should give great airflow under the panels to help keep them alive, and with any luck will also keep them from flying off the roof. I got some 10mm dual-layer polycarbonate sheet, and hole-sawed a big pile of 1-1/2" discs out of the sheet. I VHB taped the discs to the underside of the panels, and the discs/panels to the camper roof. 50! on each panel, around the perimeter and at each junction between cells. Overkill? Why not! I used a solid piece across the front of the front panel, and some Eternabond tape to close the gaps.
The panels seem to be adhered really well and hopefully will get enough airflow underneath to keep them alive (and on there) for all eternity!
Here are a few pics. I forgot to get them before the camper was raised in the garage, so they are not really great. And I probably messed something up resizing them.
View attachment 37536