Tips to drill through and mount to rear wall?

camper101

Senior Member
Joined
Oct 18, 2012
Messages
224
Location
Colorado
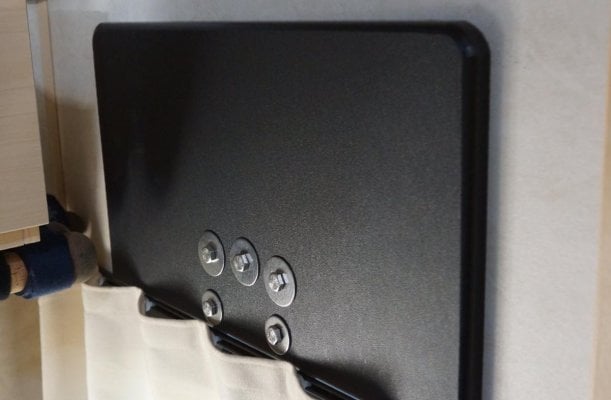
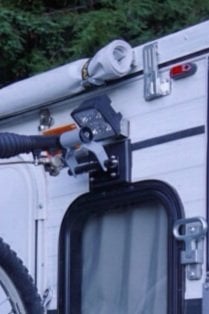
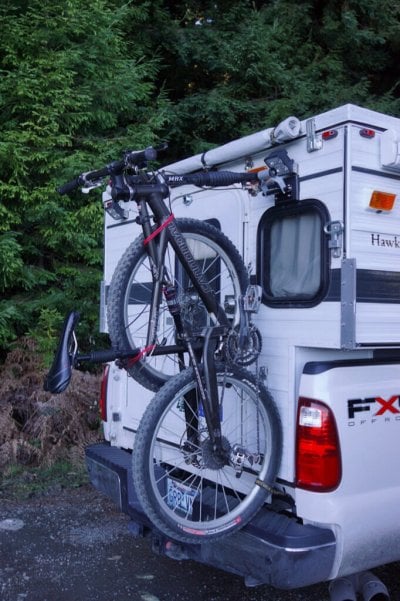
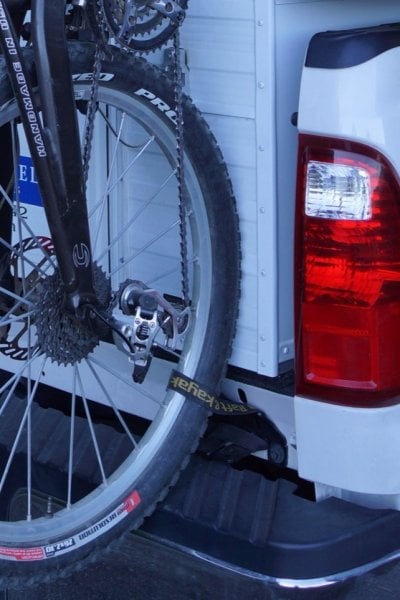
I’m getting ready to install a bike rack on the rear wall similar to this.

The questions for now are: how best to drill through for the mounting, and how to not mess up wiring.

I’m confirming with FWC (and I’ll take any lessons you’ve learned from experience) whether or not there should be a stud/frame where I want it, and the whole thing makes me a little nervous... so I’d love any guidance on the actual steps to get this done.

It seems like I'd:
  1. Drill from the outside in (because that’s the only way I’ll know where to put the holes)
  2. Go very slow and try to figure out which layers I’m going through (again, ideally I’ll find and identify studs – not just sheet)
  3. Put the bolts/mount almost all the way on
  4. Stuff a small amount butyl tape around the bolt/hole before tightening
  5. Seal everything (I’ve got Proflex, which is supposedly equivalent to Silaprene… not that I know how these things work, and I figure sealing around the outside as well as using butyl tape stuffed in the hole should suffice)
  6. Enjoy
The only hitch seems to be wiring: my porch light wiring will be in the frame there on the passenger side . So do I just drill a tiny hole first and try to push stuff out of the way, or what?

Please let me know any suggestions you have.

Thank you!
 
Two things I did on my build.

1. Pulled back the thin plywood siding inside. Just take out the top screws and pull back far enough to look down with a flash light, mark with a pencil. You will also see the wires. I did this on the drivers side to find the studs to fasten to.

2. I used an ice pick to find the studs where I knew the hold would be covered. I did this where I mounted corner cabinets.


EDIT: I also drilled a very small hole (1/64") inside to outside. This way you know where the hole will be on the outside. I did have to cover two holes that did not work where they came out, easy with a small stainless screw.
 
Good to know, thanks Bill.

I was assuming if I take the screws off the back wall to look behind the plywood I'd unhook the lifting panel. Am I assuming wrong (wouldn't be the first time), or maybe you look back there from the side and not from the top?
 
Here is a method that has worked for me even if I know there are wires in place.

1) Confirm with FWC where the framing members are and if there is sufficient compression to mount your flanges front and back and also that you are not drilling into a web in the framing. Small holes are easier to seal than big ones.

2) Drill a small exploratory hole from the outside in but be careful to stop when into the cavity. Make that hole the size of a small rigid tube that another size step down drill bit can slide through. Pass the tube through to the opposite wall and sweep wires out of the way, then drill through that tube through the other side wall. A hobby shop is a good place to find the right sized tube.

3). Drill the balance of the flange holes on both sides from the outside in carefully stopping before entering the cavity.

4). When pushing bolts through their threads can also damage wire insulation. If you are real concerned make the holes bigger to accept a tube that the bolts can be passed through and then remove the tube before bolting up your flanges. If you do not slide them through a tube, carefully rotate them through. If there is any resistance go to a tube. If you think the wires will abrade against threads due to future off road movement, cut and leave the smooth tube over the bolt thread inside the cavity. It is better to size the bolt so there is smooth shank inside the cavity.

I used neoprene on the outside flange as a gasket. The inside flange is made of Starboard and large enough to bridge the gap in framing and provide compression strength. Here are a few pics. The bike is a Cannondale Lefty. I thought you might be scratching your head?
 

Attachments

  • image.jpg
    image.jpg
    74.5 KB · Views: 641
  • image.jpg
    image.jpg
    23.4 KB · Views: 767
  • image.jpg
    image.jpg
    276.7 KB · Views: 834
Yeah those Lefty's are a little confusing. Good suggestions and thanks for the pictures - looks like yours is nice and low so you didn't need to do anything else to the camper to secure the rear wheel. I'm planning to avoid drilling any more holes in the aluminum for the rear wheel as well.

Now I'm curious about your roll above the door (awning perhaps).
 
Here is a link to LOW TEC AWNING MOD...
http://www.wanderthewest.com/forum/topic/3551-ultimate-awning-thread/page-2

As for the rear tire,.. I just slid a strap behind the tailgate alignment bracket that is no longer in use because no tailgate, and then secure the strap around the rear wheel. The rear tire rests on top of the rear bumper. This position is high enough that it is out of the way of my back-up sensors. For ugly off-road conditions I strap the bike off from the seat post to the corner of the the camper jack flange on one side and to a folding rear bulkhead step on the other side. This isn't required for urban travel. It probably isn't even needed for off road, but It makes me feel better.

ALSO NOTE: Before I started drilling Brenda at FWC provided me intel by sending me a picture of the open framing of a unit in production. I knew going in that this location was effectively a junction box of wires for the solar panel. I have used this method for years working on boats. I would also like to draw additional attention to my above comments on bolt treads. They can damage wire just as easily as a drill. Also give yourself plenty of slop in the holes. The neoprene will seal around them. Take it slow, think things through and,. Be careful!!!
 

Attachments

  • image.jpg
    image.jpg
    182.6 KB · Views: 315
  • image.jpg
    image.jpg
    258.7 KB · Views: 333
Thanks again Kispiox.

OK, I was able to look behind the wall (don't need to unscrew the lifting panels after all).

I saw the wire, which is a good 5 inches below the top of the cardboard wall - and that's lower than I'll be drilling. So assuming there's no wire running through the frame and studs in addition to what I saw (?) I should be good. FYI I have a shell and the only thing that needs electricity in that area is the rear porch light. However, the driver's side had the same wiring.

As far as the studs, again measuring from the top of the cardboard interior wall, I found:
- After 2 inches, a "seam" (probably don't want a bolt going through there)
- Another 1.5 inches, another seam
- Another 1.5 inches, the area where the wire is

Another question if you know about these things: I'm going to use carriage bolts to make the bike mount more theft resistant (of course they can just break in and unscrew from the inside, but that's more work...).

I need to make a "shoulder" so the bolts won't spin when I tighten from the inside. Basically it's a plate that goes over the bike mount (so on the exterior it's: Exterior camper wall --> bike mount --> plate/shoulder --> washer --> carriage bolt). I've already done this out of 1/4 inch polycarbonate. But I also have some 1/4 inch aluminum flat bar and am wondering if that'd work better (or if the strength difference is enough to worry about). I like the look of the polycarbonate better and I'd prefer not to do it again, but I am concerned that the polycarbonate could crack.

Anybody know how the polycarbonate would stand up over time?

And just for fun, a photo of the wall in question, taken where the measurements were taken (it was too cold to hang out outside last night anyway):
IMG_0722.JPG
 
An example might help. Here's the mount, and one of the plates that'll hold the bolt in place (photo was before I filed out the holes to make them square holes):
IMG_0720.JPG
 
I don't remember much about polycarbonate. I used Starbouard for backing on both sides of the rear bulkhead to bridge to solid framing. It has excellent UV qualities and used on boats quite a lot. Any Commercial plastics company will have some scraps in their bin. BTW comes in black, white, blue and red.

I am am not as concerned about theft as you are. The way I see it, with all of the battery tools these days, if someone wants to rip it, they will. Better they cut a small cable than damage the camper. Throw up a pic or two when you are done.
 
Good points, and you can turn a carriage bolt into a pan-head screw in about 30 seconds with a grinder. I guess I want to make it appear a little harder for the lazy, poorly-equipped ones (which I hope are most of them). But I would be bummed to find a busted up camper and the bikes missing...

I looked around a little last night at Starboard and tried to find some strength/UV comparisons. I also took an extra piece of polycarbonate out to the alley with a hammer and although the stresses will be different when it's mounted, I'm more confident that it won't just crack -- not for years at least.
 
Kispiox, I see you have a through-axle adapter, as do I. I'm curious if there's any reason you have it at the particular angle you have it at (at 45 degrees up, let's call it)? Have you found that the bike is any more stable that way, or does it just put the rear tire where you want it?

Here's a rough draft to look at. I haven't done the driver's side yet, or fully tightened everything, or sealed it up. But it seems promising so far...
IMG_0729.JPG
IMG_0730.JPG
Thanks again everybody.
 
Camper101: Well, I guess I should have been more concerned about someone stealing my bike, because someone did last night. I was in a campground in South Lake Tahoe and it wasn't mounted. It was just sitting along side my RR truck wheel with a cable through the frame and one of my rear bulkhead steps. They just sheared the cable in two. I heard something in the middle of the night, but just figured it was something falling from the tree. I made up flyers offering $800 for the bike, no questions, or $3,000 with a felony arrest and handed them out to every bike shop in town. I want him.

Anyway, that angle was just the angle that the second Lefty gizmo ended up at. So that should not apply to your bike. Now I hope mine is at the right height for another bike that I own. I'm hanging out here for a while to see if I can find my bike and hopefully get the crack head that stole it.
 
I am mad too, but I know not anything close to how mad you are. I want him too.

This is unacceptable, uncivilized behavior.

Best of luck with getting it back.
 
Bummer! How blatant is it to steal a locked bike right off your camper? {Full disclosure: I've had a bike stolen.}

These thieves must hit the campgrounds pretty regular to have a set of cable cutters with them.
Where do they park their car, or do they walk from nearby?
 
Lame! I'm so sorry to hear that, and I hope you get it back and the crackheads get to spend some time with the cops. And maybe their little contribution to the Karma pool will be repaid in a fitting way...

I had just been thinking that it might also be easy to steal a frame by removing the fork. It's probably not that hard to get a bike, but most people don't suck so it doesn't happen too often. And here I am sitting in a campground with my bike just laying on the ground thinking everybody's cool so I'll take care of it later (I gotta do some work so I can stay out on the road but I'm having a little fun too). Again, sorry to hear about your experience.

Here's the rack in action on the maiden voyage. It stood up to many hours and miles on the road, and I'm pretty happy with it. It's not as effortless as I'd like to close the skewer on the passenger side, but it's much easier than loading the bikes in the camper.

IMG_0744.JPG
IMG_0745.JPG

I stuck a rag between the wheel and camper, and that's probably as fancy as I'll get to protect the camper... The strap connects to a factory D-ring in the back corner of my truck, which happens to be in a good spot, and goes through the D ring on the camper to keep the wheel from going side to side. This might be a bit more than I need, but I had already made the D ring for a different attempt at this (I didn't like just having the D ring on the camper hold the wheel).
 
Kispiox, sorry to hear of your misfortune. Very disheartening. I hope things turn out for the better with time.
 
Hooligans, zombies, losers... That makes me angry too, darned thieves.

Good thread by the way, been following and have some ideas myself.
 
I've long used toe-clip straps (remember those?) to hold the rear tire in place. A couple footman loops holding a wear plate to the rear of the camper is what first comes to mind when thinking about how to tie down the rear wheels with this sort of mount.

After using an adapter and then an extension to get out past the spare tire carrier last weekend I'm pondering a mount that attaches to the spare carrier itself.
 
After a few weeks with this I have a tip or two for anybody who's going to do a bike rack mount.

First is that I didn't really try opening/closing the skewers and I've found that it's a little tight (close to the camper wall). You might try adding a spacer (maybe 1/4 or 1/2 inch aluminum flat bar) between the fork mount and the camper, especially if you have big locking skewers. The ones Lighthawk used are nice and small and I don't think it's an issue if you use those. Or if you have a through-axle adapter you'd be fine. But my wife's bike doesn't so I have to unhook the roof latch while I tighten down her bike (which is fine, but it's tight).

Next, you might want to make it so the bike on the driver's side (if your door is the same as mine) is angled a bit - so the rear tire is closer to the center than the fork is. That way when the wind blows the door open it'll hit the rubber tire and not something harder like the fork. I didn't do this and have spent a lot of time in the wind recently.

A photo to illustrate how I didn't do that, and show how much the handlebars stick out (maybe as much as the mirrors):
IMG_0766.JPG

Also, sending out some good juju to Kispiox: hope things are working out and/or you end up with a bike that you love even more than the last one.
 
Back
Top Bottom