Puma complete build-out retrospect--everything I did and why

Ralph

Member
Joined
Jul 15, 2024
Messages
13
Location
Salt Lake City
After following this forum for quite awhile, I was finally inspired to buy a completely bare Puma shell from All Terrain Campers back in 2020 and do the entire build out myself (after selling my way-to-big way-too-luxurious Bigfoot 1500). I picked it up our new beauty in February—timing was perfect, because when COVID hit I had plenty of spare time to work on it and finished in about six months.

IMG_2261 2.jpg


It was always my intention to document the build and share what I learned so that others could benefit (like I did from you all), but never got around to it. After using what I learned from others on this forum and coming up with some unique solutions on my own, I was pleased with the results, and we have loved using it ever since. Now that I am selling it (see listing here), I felt like I owed it to the community to share what I learned before it finds a new home. So below is a (very long) description of my build, to the best of my memory.
Unfortunately I have very few pictures of the process--to busy calculating to document (rookie mistake)--but I will do my best to show the finished product as well as the rationale for doing what I did.
 
Last edited:
PART I - Planning

As everyone knows who has dealt with ATC, Marty is amazing to work with—never too busy to discuss details or work together to come up with the best solution. The whole planning and ordering process was amazing, as has been the ongoing customer support. You just don’t get that kind of flexibility or personal touch anywhere else (that was quickly apparent after one visit with FWC). We determined (correctly) the an 8’ Puma would easily fit on my 6.5’ short bed F-350 Super Cab. The overhang is minimal, the truck doesn’t care, and we enjoy the extra floor space. We chose 78” width, just slightly wider than the bed rails to allow access down narrow trails without scraping the sides. With our design, the extra width wouldn’t have helped much anyway. Things added to the basic shell:
  • 2 roof vents, front and rear (probably overkill—I think one centrally located would have been fine)
  • Small passenger size rear window (probably unnecessary—it is just too small do provide much extra light, and the curtains are closed all the time anyway
  • Installation of an external door on the rear driver’s side wall for access to the cassette toilet—(I had it shipped from Thetford to ATC). NO CHARGE.
  • Propane box and door on the passenger side forward of the main window.
  • Additional lights positioned over bathroom and kitchen.
  • 28” slide-out bed which I permanently mounted (see details below).
  • Deleted the bed cushions, since we knew we would be getting a upgraded mattress that we wouldn’t have to fold over
  • Cold weather pack (must have for summer or winter)
  • Rear wall steps on both sides (I won’t add these next time. No way I’m climbing up on top of the camper that way at my age—just use a ladder. You could always easily add them later. However, they have come in handing while steering the camper on the wheeled dolly)
  • Boat rack. Custom designed to carry our two 10’ kayaks. (Turned out great, and also provided a place to mount solar panels without drilling into the roof. Loading kayaks that high off the ground is a challenge, so we don’t do this very often.)
IMG_2121.JPG
 
PART II - Fixed Slide Out Bedroom

Similar to what Vic did in his build, I cut 6” off the 28” slide out panel and permanently affixed it to the rails. I built a frame underneath the overhang out of 80/20 and mounted most of the large and heavy items under that—including the 30 gallon fresh water tank, DC compressor fridge, lithium batter and inverter, 20 lbs propane tank box , and still had room for a small closet and two slide out drawers. That helped put the center of gravity a little farther forward, important since I have short bed truck.

IMG_2112.JPG

IMG_2087.JPG


The resulting bed platform is 78” wide by 76” long, perfect for a standard RV short queen mattress. I added reading light/usb charger to each corner.

IMG_4534.JPG


Here is the finished product. I had to leave space on either front corner access the turnbuckle doors. It’s pretty tight, but do-able.

The propane box is under the shelf on the upper right in the above photo (what it looks like on the outside is below). I should have put the propane box on the driver side, where the heater, stove, and water heater are so I wouldn’t have had to run the hoses so far. That also would have filled up some of the inaccessible space on the drivers side under the overhang and given me more storage space on the passenger side.

IMG_4490.JPG


With this setup I obviously deleted the front window, since that area is totally covered up.
 
PART III - Kitchen

Installed a scratch and dent Smev two burner stove and Thetford sink I found on Ebay, both with fold-down class covers which leaves a large flat countertop when closed. I bought a cheap pullout faucet from Amazon that hooks up to fresh water pump and water heater.


IMG_4518.JPG


To save under counter space, I used a Hepvo Sanitary Waste valve instead of a p-trap and has worked with no issues. (Hepvo.com). I used braided water lines to hook everything together because I didn’t know much about plumbing back them. Next time I will use PEX now that I know how easy that is.

IMG_4500.JPG


Kitchen counter and the dinette table are made out of matching Lamalite, a super lightweight, strong, laminate-covered composite panels (similar to Ikea tabletops) that is half the weight of wood. Both were custom made by rv-sinks.com. A little pricey, but unbelievably light, and they cut the holes for the sink and stovetop for free (using manufacturer specs). They also added reinforced metal attachment points on the bottom according to my design, because you can’t attach anything to the material itself since it’s mostly made out of paper. I located reinforcement in the center of the table to attach the Lagun table bracket, around the perimeter of the kitchen counter top to attach to the 80/20 cabinets, and at the attachment points around the stove and sink. The counter is 23” deep and 41” wide (fits under the bed overhang a bit).
IMG_0314.JPG


The kitchen cabinets are made with an 80/20 frame that is strong and lightweight. I had a lot of fun designing and building them using this “Erector Set” technology. It was surprisingly easy. I found a local distributor in my small town (it is not cost effective to use 80/20 if you have to pay for shipping). You can either order all pieces cut to length or do it yourself with an aluminum blade on your saw. I bought a cheap drill press from Harbor Freight and just used regular drill bits to cut holes where necessary. . Most of the mounting and attachment hardware I sourced from other companies because it was cheaper (Ebay is a great source). I made a large cabinet under the sink that sits on top of the side overhang inside the bed, and a smaller one underneath that sits on top of the kick out for the wheel wells. When I do this again I will use lightweight plywood instead—80/20 is easy and strong, but comparatively heavy and takes up way more space than wood.

IMG_4563.JPG


I used scrap pieces of white interior paneling for the cabinet sliding doors (using 80/20 sliding door brackets) to save weight and space, so there are no latches, hinges, or swinging doors to take up space or get in the way. We’ve had no problems with them opening during travel.
 
Last edited:
Part IV - Bathroom

Having an interior, semi-private, flushing toilet was a mandatory requirement for my wife. I only had a 24” x 34” space to work with (the fat part of the camper behind the wheel well), so it took some doing to get it all to fit.
IMG_4519.JPG

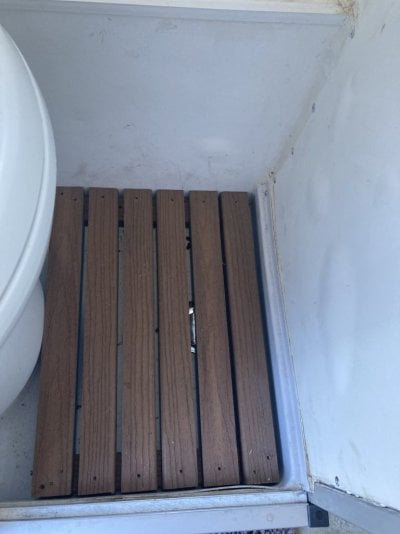
I found a 9 gallon gray water tank that exactly fit in that space (with a drain to the outside) that I used as a foundation, built a platform on top of that, then a one-piece shower pan (cut in half to fit) that drains directly into the gray-water tank. There is a pop-up drain that we keep closed so the gray water doesn’t slosh into the bathroom. I also built a shower mat out of some Trex decking I had lying around so you don’t have to stand in a puddle of water.

I attached a faucet to the wall that accepts a plug-in hose you can use inside the shower enclosure or stretch if through the back door to outside if you want to take an outdoor shower or just rinse off. (The hose is stored under one of the dinette seat boxes).
Also mounted waterproof toilet paper holder and plastic organizer to the wall with VHB Tape.

IMG_4573.JPG


A Thetford C263 cassette toilet was mounted on top of the shower platform. ATC installed the cassette access door exactly where I needed it, and I will take emptying a cassette at the closest outdoor toilet over fighting with a sewer hose after finding a dump station any day. This is a comfort height, real flushing toilet requires both water and electricity, but that wasn’t a big deal since I installed both before doing anything else.

IMG_4561.JPG


IMG_4538.JPG


I made the bathroom half walls out of 80/20 mounted to the floor. I then mounted 1/2” aluminum u-shaped channel brackets to interior of the walls using t-nuts, cut white interior panel to exactly fit on the inside, drilled holes through the panel into the channel, and riveted the panel to the u-channel. Not the prettiest, but effective, and has held up well. I attached 1/8’ fiber board to the inside of the two 80/20 walls, and covered those walls and all the spaces inside the bathroom with white FRP panel from Home Depot. Anyone who has ever attached FRP know that it is a bit of a challenge to provide pressure on the whole panel to get it to adhere properly especially in such a small space. So the panel has bubbled up in some places. There is door to the enclosure the slides open and closed.

IMG_4521.JPG
 

Attachments

  • IMG_4560.JPG
    IMG_4560.JPG
    85 KB · Views: 15
PART V - Dinette

I really struggled with a design for this one, but am very pleased with the way it turned out. I wanted to eat facing my wife, so the normal side dinette couch was out, and a front dinette wouldn’t work with my fixed bed slider configuration. I originally planned to have two padded seats, with rollover brackets that would turn it into a small bed, but I wasn’t happy with that design. After a lot of time on the forum, I finally decided to just build two seat boxes (with storage underneath) and mount fishing boat seats on top of them that I first saw at Cabella’s.

IMG_4520.JPG


The seats are a bit pricey, but they are very comfortable (designed to be sat on all day), clean up nice (high quality vinyl that feels more like fake leather), fold down, and mount easily to any solid flat surface with 5 bolts. I ordered the seats directly from Tempress, in a matching color, and we couldn’t be happier. (This is the style that worked best.)
IMG_4571.JPG


The table is made of Lamalite and we love the Lagun mount. If I were to do it again I would make the table narrower-it’s a bit hard to get in and out. We had Marty move the window back so it would be centered on the dinette, so we have good views outside while playing cards.
IMG_4527.JPG


If I need a third/stealth bed, I fold down the seats, remove the table, and put a cheap Coleman cot over the whole dinette. I cut off the legs to sit on the bed overhand along the outside wall, and added PVC leg extensions for the other side to provide a flat and stable platform. Works great (especially for children).
IMG_4536.JPG
 
PART VI - Heat and Hot Water

After a lot of bad experiences with the typical RV water heater, furnace, and propane fridge in our 29’ old motorhome, I wanted to go a totally different direction.

For hot water I installed a cheap propane-fired instant water heater under the kitchen counter. I realize these are meant to be used outside, but with proper ventilation we have had no issues—especially when you only run it for less than 30 seconds at a time and open up the cabinet doors. I insulated and the underside of the kitchen cabinet to keep it from getting too hot. And this thing just works—fires up every time, even after sitting all winter. If I were going to do it again I would mount it against the outside wall and vent it to the outside, but so far so good.

IMG_4566.JPG


Copying someone else’s idea, I installed an Olympus Wave 3 catalytic heater on a small TV swivel mount in the space under the kitchen cabinet between the turnbuckle access doors. It rotates out to the middle of the floor when in use. Plenty hot (even on low), and without the noise and power drain of a forced air furnace. I open the access doors and crack the overhead vent to insure proper ventilation, and have a CO2 alarm. No issues so far, and a real space and weight saver.
IMG_4508.JPG


Also no issues with the electric-only fridge (and especially like that I don’t have to be level to run it). I put 2” of rigid foam insulation all around the box before sliding it into the frame. I cut holes for two vents in the front wall of the camper.
IMG_4534.JPG
 
PART VII - Electrical


Will Prowse’s web site and forum were invaluable for someone like me who knew nothing about solar power, or even electricity for that matter. After a lot of research I just built his “Beginner Friendly all in on solar power system” (see this video) which was pretty easy and has worked great.
IMG_4484.JPG


All this heavy stuff is mounted as far forward as possible and hidden by a front panel with a place cut out to see the monitor screen. All the other electrical components are close by so wire runs are minimal.
IMG_2112.JPG

I mounted 2 x 260 watt flexible solar panels to the roof boat rack, connected them to the ATC-installed plug on the roof, connected the other end of the wires to the MPP Solar charge controller/inverter, hooked up a Lion Energy 105 ah battery (awesome product and only 23 pounds) I got on sale at Costco, added a DC bus, main fuze, and cheap battery monitor, and ran wires behind the paneling to where it was needed. Even though I have a shore power connector, we’ve never used it, and have plenty of power to run our 2.6 cu.ft. compressor refrigerator. It just works. The whole system fits in the space under the fridge. We turn on the inverter only when needed.

IMG_4485.JPG
 
PART VIII - Finishing

When I picked up my camper from ATC, Marty let me sort through the scrap pile and pick up several scrap pieces of the white interior paneling, and I also bought an extra 4’x8’ sheet of the same paneling (a bit of a challenge to get something that big into the camper). That gave me enough paneling to cover all my additions and everything else that was exposed (cabinets, doors, closet interior, seat boxes, overhang shelves, everything) with paneling that matched the stock walls, and I didn’t have to paint or stain anything. I love the white color as it keeps everything light and bright inside. I riveted aluminum angle brackets to inside and outside corners to give a nice finished look.

IMG_4568.JPG


IMG_4556.JPG
 
PART IX - Conclusion

That's the story start to finish. We’re going to miss this camper. But looking forward to my next winter project—building out a lightweight shell for my new F-150. Looking at something like a Tune M, FWC Project M, or ORU Bruin (or maybe I can talk Marty into building me an Ocelot shell without bottom half).

Happy to answer questions or provide additional details (sorry I don’t have more build pictures, so I’ll have to rely mostly on memory.)

A new well-equipped Puma sells for over $20,000, and a FWC Grandby with just a few options is well over $30,000, and neither has all the features of mine--which you can get for $15,000. Or for less than the price of a Grandby ($29,000) I'll see you my camper and throw in a free F-350 Truck!
 
Excellent write up and wow, the ideas and execution are really nice. I may have to use a lot of your ideas for my next build too!
 

New posts - WTW

Back
Top Bottom