1979 Granby

I like the old saying, "Two steps forward, one step back." I have been looking forward to your report on the door rebuild, because I narrower my camper, I will therefore be narrowing my door also. I am heading out for the summer in my main motorhome so will probable get to the door until fall, so I be waiting.

Boonie
 
Had a better day with the door. I needed to cut the extrusions back to form better corners. By doing that I knew the door would be too narrow for the frame. I corrected for that by adding an aluminum channel to the lock side of the outer frame. Hoping the weather seal will work properly. I've got it painted and will install it today and put the weather stripping on. I got the 45 degree corners looking pretty good on the outside, but the inner ones, not so. With the extrusions spread and twisted, I just couldn't get it right. Got some offers on my WTB for a door. If I can get some good extrusions, I'll build another door next winter.
 
Getting behind on the project. Was in Canada fishing for ten days. The plan was to have it ready for another trip to Canada mid July. Unfortunately that won't happen, but it's okay because the wife's health won't allow the long trip. Her sister will stay with her as my brother takes her place. We have a cabin rented for a week. I started on the fabric side walls and ran into some trouble. The thread starts fraying and bunching up, then breaking. I think the needle I have is the problem. Going to go up one size and see how that does.
 
Got straightened out with the sewing. The needles a fellow gave me with the machine were round point needles, I bought new sharp point needles and am about 3/4 of the way done 1 side panel with a window. Hope to have some pictures tomorrow.
 
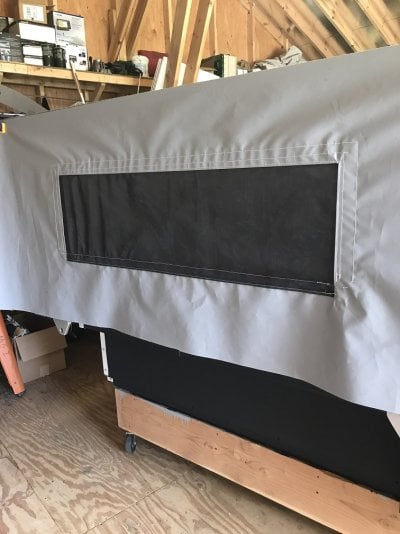
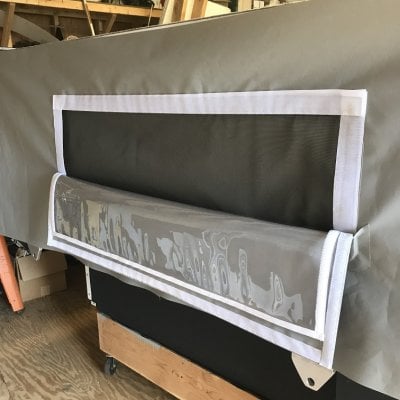
Got one side panel done with the screen, eisinglass and privacy curtain. It was a learning experience and I hope to do better on the next one. Some of the stitching isn't quite straight and I have one pucker at a corner of the window. The vinyl material sticks to the sewing machine table some and you have to help feed it along. Pull or push too hard and it starts to stretch, hence the little pucker. Hopefully the next one will be easier and come out better. I have just enough material to finish the project. If the second one comes out much better, I may order more and redo the first one. It's basically fully functional, just could look better.
 

Attachments

  • side curtain 1.jpg
    side curtain 1.jpg
    224.8 KB · Views: 149
  • side curtain 2.jpg
    side curtain 2.jpg
    186.2 KB · Views: 151
Hey Ron, its looking great!

You're right about it being a learning curve when you undertake this project. I don't know about you, but I was concentrating so hard, I wore myself out trying to get it to turn out just right. It's intense!

I thought of a couple of tips that might be of help. I ordered a teflon foot for my sewing machine, which is supposed to be somewhat less sticky on vinyl fabrics, but you may be doing fine with a metal foot. Secondly, I sprayed silicone spray on the table to get the fabric to slide along better. you can wipe it off once completed.

I also had "puckers" at the end of a stitch in the corners, which might be less with a walking foot machine, which I didn't have. Not sure if it makes a difference, perhaps an expert at sewing knows the trick for this. in the end it didn't matter on mine, and you'd likely not notice unless studying the whole thing carefully. I also had not-so-straight stitches as well, so sounds like you got it about right in my opinion! Thanks for the update, and keep up the good work.

Poky
 
I've been told scotch tape on the foot helps. Like a cheap teflon foot. I wonder if you could cover the base in tape to alleviate the sticking.
 
Poky, Without your thread I would have been lost. Very good detailed instructions with pictures. I'll have to give the silicone spray a try on the next one. I'm using white velcro and white thread so it was tough hold a straight stitch. Once I concentrated on the position of the fabric edge in relation to the foot, I got better. I'm waiting on some more velcro to arrive and then will get started on the second one.
 
Unfortunately my second window panel was a fail. It was going good until the final sew that ties the screen, clear vinyl and privacy panel in at the bottom. This one puckered worse than the first! I just can't use these, as the camper body looks excellent with the new siding and painted door and windows. The original windows were 1 on each side, and 40 inches long. I think the length is my problem. Sewing the long seam stretches the fabric. I'm using the seam tape and would think it would prevent movement between the pieces. Can anybody with an older FWC give me some measurements on your windows if you have the model with 2 windows on each side? I'm sure the shorter the seam, the less chance for puckering. The wife and I camp mainly in the spring and fall, I'm wondering if I even need the windows? I have the front opening window, the side opening window, and the door also has a screened window. I'll be going with a Fantastic fan in the roof. I've got to order more vinyl material, so I think I'll order extra. If I botch the 3rd window panel, I may just delete them.
 
I just measured the window openings on my 01 Hawk. The cutout size is 30" x 12".

I'd really miss those windows if I didn't have them. That upper area traps heat quite easily and the low-down windows aren't enough to clear it. A vent-fan of course helps but has it's own downsides.

I'd also miss the view. For some reason, looking out those windows first thing in the morning just makes me feel good.

And when night falls, if you're camped anywhere around people, you'll probably want to cover the front, side, and door windows with a curtain so there goes your ventilation.
 
Old Crow said:
I just measured the window openings on my 01 Hawk. The cutout size is 30" x 12".

I'd really miss those windows if I didn't have them. That upper area traps heat quite easily and the low-down windows aren't enough to clear it. A vent-fan of course helps but has it's own downsides.

I'd also miss the view. For some reason, looking out those windows first thing in the morning just makes me feel good.

And when night falls, if you're camped anywhere around people, you'll probably want to cover the front, side, and door windows with a curtain so there goes your ventilation.
Are there 2 windows on each side @ 30" x 12"? I have a short cabover, the roof length is 10 feet.
 
shellback said:
Are there 2 windows on each side @ 30" x 12"? I have a short cabover, the roof length is 10 feet.
Shellback. My old Fleet originally just had the two large windows on each side with an additional two little windows near the cab over. The large main windows measured ~38 X12". If you check out my build you will see some photos of the original canvas.

I am actively sewing my canvas now too. Actually going to sew the screen, clear, privacy into the panel today. I would love to see some photos of how you attached all that on the inside. I think I have a clear idea but I am sure it is easier said then done.

I'll post some photos of my sewing progress soon too. Good luck.
 
I followed Poky's thread on his build,
http://www.wanderthewest.com/forum/topic/12116-new-build-1981-grandby-to-become-a-hawk/page-12.
I really liked how he made the slits and had the clear vinyl and privacy curtain go the the outside. My original wasn't built that way, everything was sewn to the inside. Everything went very well for me until the last step. Poky mentioned about his machine not being a "walking foot" model. I know my machine will pull the fabric through, so I guess it's a walking foot? When making this last seam, maybe it's the difference in the materials, screen, clear vinyl, then vinyl polyester, that's causing my problem.
 
shellback said:
Are there 2 windows on each side @ 30" x 12"? I have a short cabover, the roof length is 10 feet.
Yes, two each side. In 2001 there was an extended cabover option and it's 48". Overall roof length on mine is 10' 8".

Here's a photo as of a few minutes ago....

hawksideview.jpg

Not sure this is helpful for your specific situation but the left side of the rear cutout edge is 12" from the rear of the camper, it's 36" between window cutouts, and 18" from the right edge of the right cutout to the front of the camper.

Top of the cutout line is about 9" below top of the top of the roof.
 
Old Crow said:
Yes, two each side. In 2001 there was an extended cabover option and it's 48". Overall roof length on mine is 10' 8".

Here's a photo as of a few minutes ago....

attachicon.gif
hawksideview.jpg

Not sure this is helpful for your specific situation but the left side of the rear cutout edge is 12" from the rear of the camper, it's 36" between window cutouts, and 18" from the right edge of the right cutout to the front of the camper.

Top of the cutout line is about 9" below top of the top of the roof.
Thanks! It looks like your clear vinyl and privacy panels velcro on the outside. My panels velcro on the inside. Interesting?
 
shellback said:
Thanks! It looks like your clear vinyl and privacy panels velcro on the outside. My panels velcro on the inside. Interesting?
No, the velcro on the outside is only for the storm flap. The clear vinyl and privacy panels are on the inside.

FWC discontinued the exterior flap in the mid 2000s. All Terrain Campers still have exterior storm flaps but they are removable. For those who like to have a shaded window, that's a good option.... prop out the storm flap as a little roof over the window or remove the flap entirely when you don't care to mess with it.
 
Hi Ron,

Sorry you had difficulty with your second panel, it must be frustrating.

I had a thought that might be useful with your next attempt.

When you sew that last bottom seam, even though you apply double sided basting tape, you might want to make some corresponding pencil marks every so often along the length of the seam so you can keep an eye on things before you get to the corner. You could use masking tape on the screen surface to receive the marks.

I'm not sure if this will make sense, so have a look at the attached how-to video. Toward the end, the lady making a cushion uses marks on the vinyl to keep track of how things are lining up, and makes adjustments along the way. See what you think, maybe it won't work for this application, but it would seem to give you a gauge to work with before you get to your corner and have too much bunching.

Also this is what I meant by a walking foot sewing machine. Instead of grabbing the material only from the bottom, the foot has a walking action to help feed evenly from the top as well.

http://www.sailrite.com/How-to-Make-a-Stadium-Cushion-Video

Good luck,

Poky
 
Poky. Watched the video and saw what a walking foot was and also the use of marks. I used the seam tape between the screen and the privacy curtain when I folded the screen back sandwiching the clear vinyl and the privacy curtain, and also between the folded screen and the side panel. I didn't use any on either side of the clear vinyl. It seems to be stretching the lower side panel at the bottom of the window, so when I get to the far side, the bottom is longer than the rest of the side panel and it bunches there. I was sewing it with the screen side down. I think I'll pull the stitches, straighten it out and resew it to see what I'm doing wrong. Maybe I need to help pulling it through.
 
I think I sewed mine screen side up so I could make sure I was straight with the edge of the screen material on the bottom that folds back around underneath. My thinking was also, that that is the stitch that shows up on the outside, and I think I did two rows of stitching on that edge. Just adding that for perspective for what it's worth.

It's kind of nerve racking, because no matter what, you can't see all the layers of material you're sewing through regardless of which side is up. So you feel around and hope the stitches catches all the layers, especially at the corners.
 
Back
Top Bottom