michgoblue
Senior Member
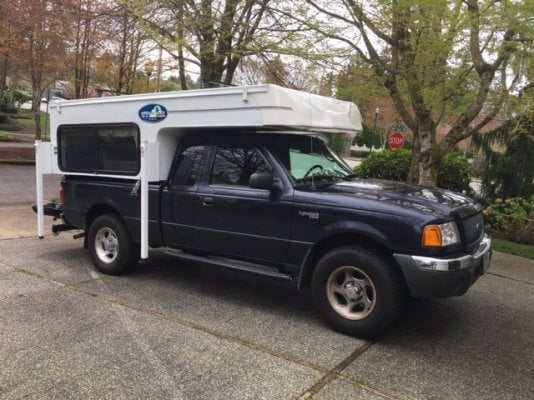
Sold my 1987 Four Seasons Magnum (to be picked up this Friday) and purchased a 2008 Phoenix for what I sold my old camper for. I had spent the Winter updating the old camper in preparation for this Summer, so now trying to catch-up with the new camper.
Well the big issue for the Phoenix was that it had some leakage in the past, which left some residual staining and warping, and also resulted in the removal of the underbed storage it seems. It also had a bent lifting bar, and a pretty weird electrical set up.
I have had it for a couple weeks and done the following:
1. Cleaned and treated the canvas with 303 (two coats). I don't think it had been treated before/in a long time and this may be one of the major reasons for past leaking.
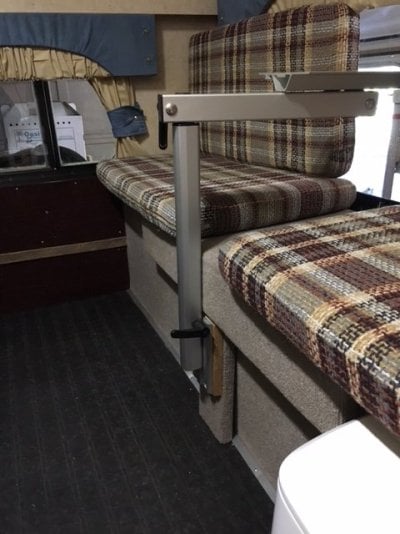
2. Recovered the side bench and added a Lagun table. Delivery from the UK was really quick and I am very impressed with the quality.
3. Installed two 120 watt flexible solar panels mounted on aluminum angle and then bolted to the Yakima tracks on the roof. Went with the flexible panels as they are lighter and I don't have a good way to install exterior lifting struts due to the front valence of the camper. Have it configured so that I can very easily add a 3rd panel if needed.
4. Sealed the roof rack screws with spray on rubber flex-seal. The roof screws appeared to a possible source for roof leaks given how poorly sealed they were.
5. Replaced the original converter with a WFCO 8735 three stage converter/charger. Went with the WFCO as it was supposed to be a drop in replacement, but ended up having to modify both the cabinet and the facing of the converter.
6. Rebuilt the under bed storage, with lifting struts, along with rebuilding the slide-out for the bed. It is a small E-W Queen when closed and an oversized N-S Queen when open (my preference).
7. Replaced the bent lifting bar with conduit. Also treated the lifting tracks with silicone and teflon spray as suggested by Cari at Phoenix campers when I asked about doing the repair of the lifting bar. This helps make it really easy to open and close. I think the bar got damaged due to drag in the tracks.
8. Adding VMAX XTRM 155ah battery (arrives via UPS today). This is the largest size battery that will fit in the space under the fridge. Previous owner used a Group 24 unsealed battery and put it in the truck bed. But since I have a midsize instead of full size, I can't fit it in the wheel well so went with an AGM that will go inside. Will see how things go to determine if I need more solar or an additional battery. With a 3 way fridge and adding a catalytic heater there is not much power draw.
9. Adding 30A Mppt controller with remote head (will mount this after I get the battery in place)
10. Adding DC volt indicator, dual USB ports, and car charging ports.
11. Adding Wave 3 catalytic heater (purchased here last week). Will either run a second line from the the propane tank or use the propane from the 3 Way fridge if I replace it. Going to test out the 3 way first to see how I like it. I had a 65L Truckfridge 2 way in my older camper that I really liked a lot, but want to see of the 3 way works before I drop the cash on a new Truckfridge. Thinking the 2 way will be better for ferry rides, though none are super long here.
Edit: Almost forgot I forgot I have a True ACR (automatic charge relay) to use as a battery separator when connected with my truck. https://www.amazon.com/Smart-Battery-Isolator-Voltage-Sensitive/dp/B00400IYTK/ref=sr_1_2?ie=UTF8&qid=1493075147&sr=8-2&keywords=true+smart+battery+isolator
I should have all the electrical work done by Tuesday, so will just be waiting to decide how to connect the Wave 3. Then I need to order some new bench cushions and maybe build a forward bench for storage.
Having spent the Winter working on my old camper in the garage, I really had a good idea what I liked and didn't like in a new one. When the new one came along it was really easy to see what I wanted to change and having had practice doing the updating it has been going pretty quickly - and I am doing a neater job while I do it. The big difference is that the old camper was pretty worn out exteriorwise while the new one is if pretty good shape with regards to the exterior. Also the new camper is shorter so wont extend onto my tailgate, yet has a larger over cab section so has more storage there as well as better sleeping set-up.
Haven't taken many pictures yet but will try to get some once I put it back on my truck this week.
Well the big issue for the Phoenix was that it had some leakage in the past, which left some residual staining and warping, and also resulted in the removal of the underbed storage it seems. It also had a bent lifting bar, and a pretty weird electrical set up.
I have had it for a couple weeks and done the following:
1. Cleaned and treated the canvas with 303 (two coats). I don't think it had been treated before/in a long time and this may be one of the major reasons for past leaking.
2. Recovered the side bench and added a Lagun table. Delivery from the UK was really quick and I am very impressed with the quality.
3. Installed two 120 watt flexible solar panels mounted on aluminum angle and then bolted to the Yakima tracks on the roof. Went with the flexible panels as they are lighter and I don't have a good way to install exterior lifting struts due to the front valence of the camper. Have it configured so that I can very easily add a 3rd panel if needed.
4. Sealed the roof rack screws with spray on rubber flex-seal. The roof screws appeared to a possible source for roof leaks given how poorly sealed they were.
5. Replaced the original converter with a WFCO 8735 three stage converter/charger. Went with the WFCO as it was supposed to be a drop in replacement, but ended up having to modify both the cabinet and the facing of the converter.
6. Rebuilt the under bed storage, with lifting struts, along with rebuilding the slide-out for the bed. It is a small E-W Queen when closed and an oversized N-S Queen when open (my preference).
7. Replaced the bent lifting bar with conduit. Also treated the lifting tracks with silicone and teflon spray as suggested by Cari at Phoenix campers when I asked about doing the repair of the lifting bar. This helps make it really easy to open and close. I think the bar got damaged due to drag in the tracks.
8. Adding VMAX XTRM 155ah battery (arrives via UPS today). This is the largest size battery that will fit in the space under the fridge. Previous owner used a Group 24 unsealed battery and put it in the truck bed. But since I have a midsize instead of full size, I can't fit it in the wheel well so went with an AGM that will go inside. Will see how things go to determine if I need more solar or an additional battery. With a 3 way fridge and adding a catalytic heater there is not much power draw.
9. Adding 30A Mppt controller with remote head (will mount this after I get the battery in place)
10. Adding DC volt indicator, dual USB ports, and car charging ports.
11. Adding Wave 3 catalytic heater (purchased here last week). Will either run a second line from the the propane tank or use the propane from the 3 Way fridge if I replace it. Going to test out the 3 way first to see how I like it. I had a 65L Truckfridge 2 way in my older camper that I really liked a lot, but want to see of the 3 way works before I drop the cash on a new Truckfridge. Thinking the 2 way will be better for ferry rides, though none are super long here.
Edit: Almost forgot I forgot I have a True ACR (automatic charge relay) to use as a battery separator when connected with my truck. https://www.amazon.com/Smart-Battery-Isolator-Voltage-Sensitive/dp/B00400IYTK/ref=sr_1_2?ie=UTF8&qid=1493075147&sr=8-2&keywords=true+smart+battery+isolator
I should have all the electrical work done by Tuesday, so will just be waiting to decide how to connect the Wave 3. Then I need to order some new bench cushions and maybe build a forward bench for storage.
Having spent the Winter working on my old camper in the garage, I really had a good idea what I liked and didn't like in a new one. When the new one came along it was really easy to see what I wanted to change and having had practice doing the updating it has been going pretty quickly - and I am doing a neater job while I do it. The big difference is that the old camper was pretty worn out exteriorwise while the new one is if pretty good shape with regards to the exterior. Also the new camper is shorter so wont extend onto my tailgate, yet has a larger over cab section so has more storage there as well as better sleeping set-up.
Haven't taken many pictures yet but will try to get some once I put it back on my truck this week.