2016 Improvements to 1966 8’ NCO

Denver Alaskan

Advanced Member
Joined
Sep 27, 2013
Messages
86
In Fall 2016 I made additional improvements to my 1966 8 foot long Non-Cab Over (NCO) Alaskan camper. The improvements made in 2015 are covered in this older thread:

http://www.wanderthewest.com/forum/topic/11452-engel-12-volt-refrigerator-in-1966-8-nco/

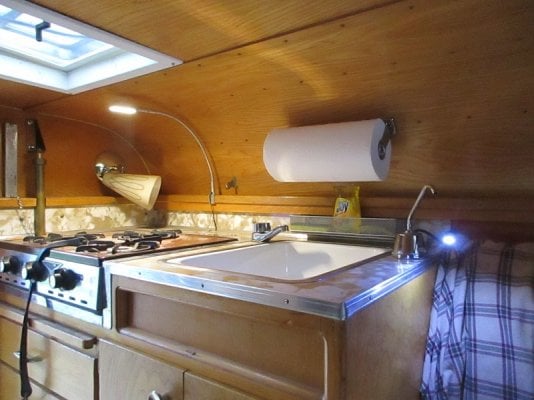
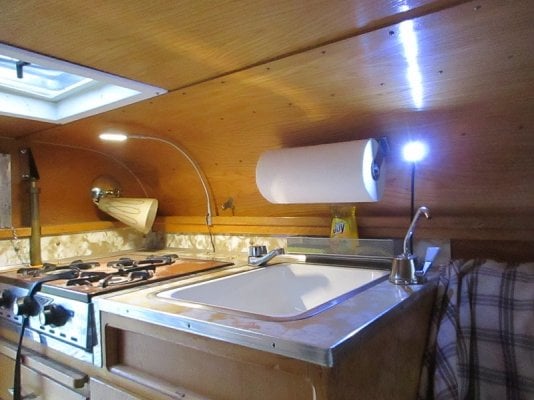
The new 2016 improvements are, clockwise from the kitchen galley:

(1) Two new flexible shaft LED lamps on the galley countertop.

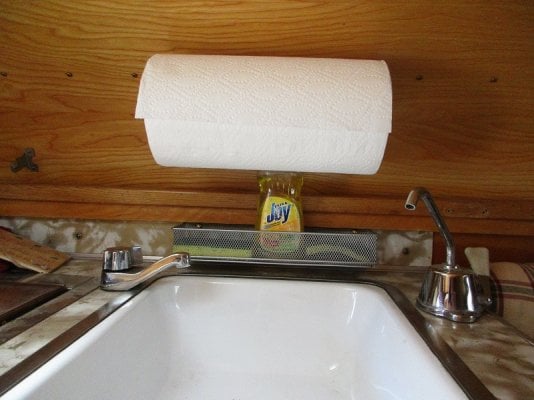
(2) Basket and towel holder above sink.

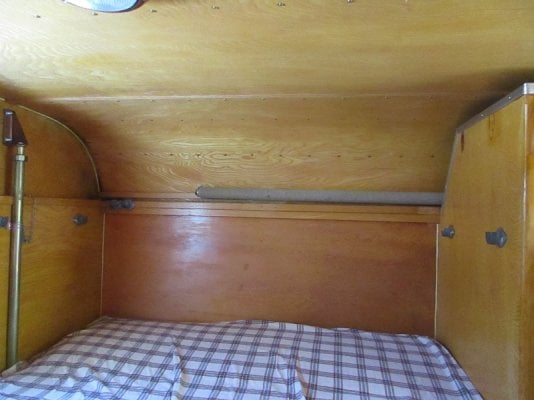
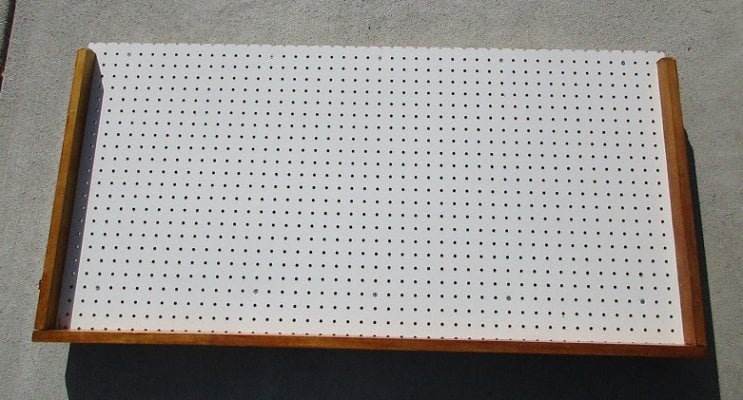
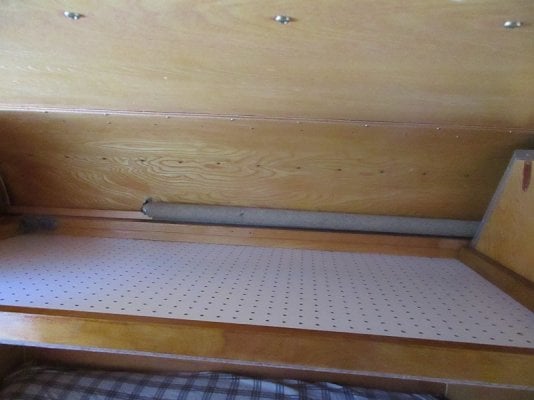
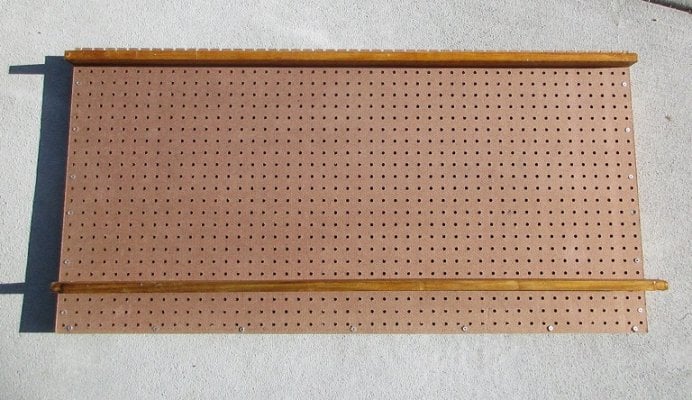
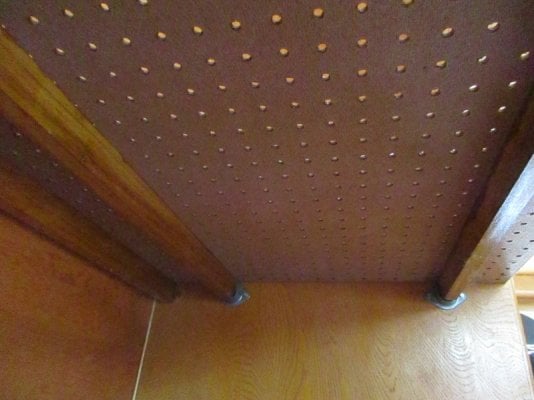
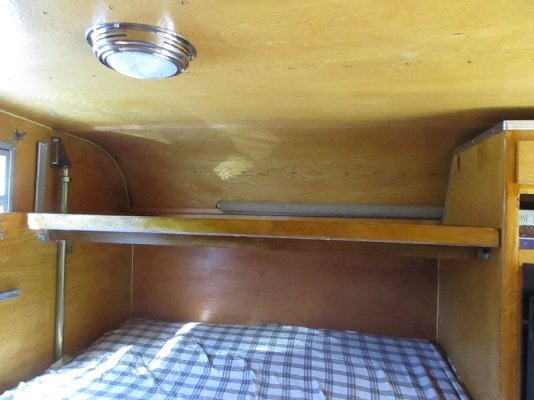
(3) A 2’ x 4’ pegboard shelf over the foot of my front crossways bed.

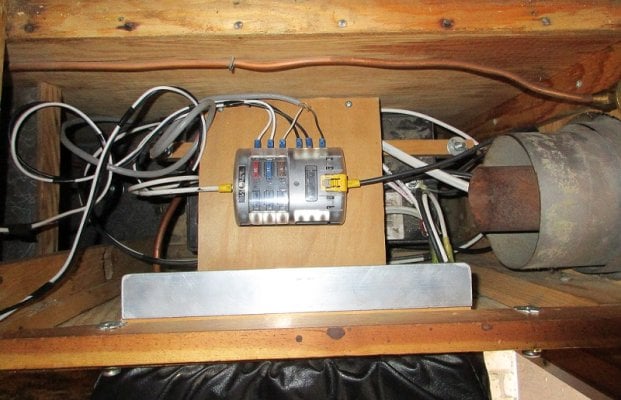
(4) A new 12 volt fuse box for all interior 12 volt circuits.

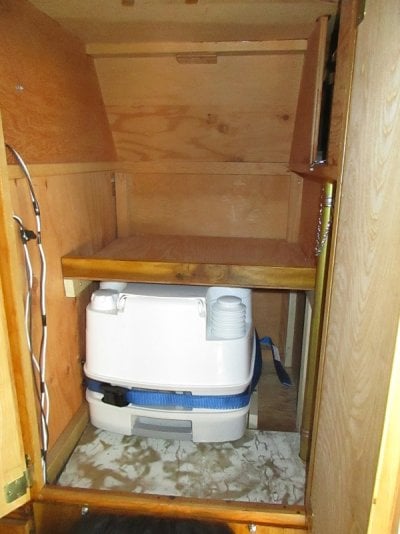
(5) A porta-pottie and a smaller shelf in the large closet.

(6) A solar heated shower bag for use outdoors; and

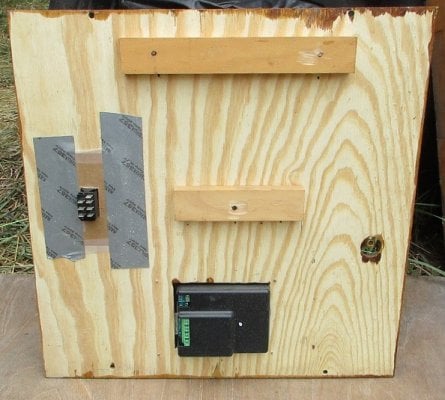
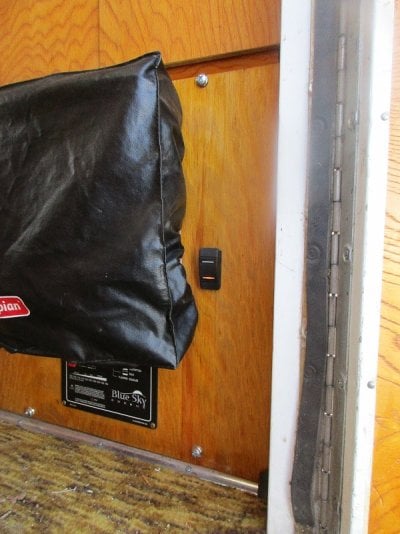
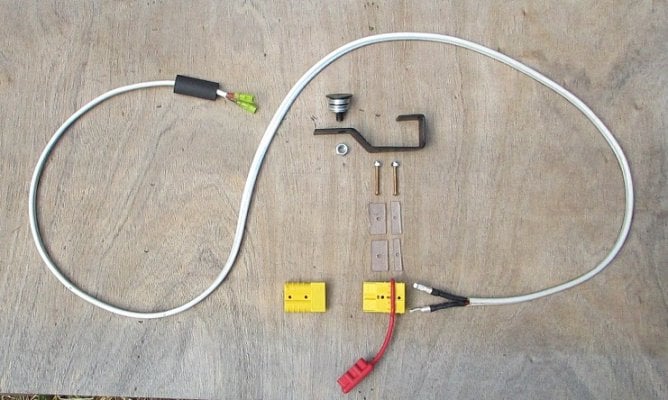
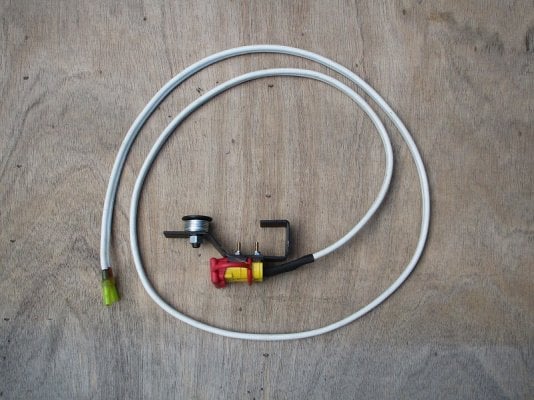
(7) A double pole – double throw (DPDT) illuminated rocker switch to direct the output amperage from my two 100 watt solar panels to either the solar charge controller in my Alaskan to charge it’s AGM battery, or to a new solar charge controller in my (occasionally towed) 1953 Airstream 21’ Flying Cloud travel trailer to charge its AGM battery.

Each 2016 improvement will be described separately in this thread.
 
Two flexible shaft LED lamps.

A whole day of heavily overcast, dark rainy weather at the Double Cabin Campground east of DuBois, Wyoming kept me inside the Alaskan all day this summer. My entertainment was reading a Walt Longmore novel by the light of my small battery powered puck LED flashlight. Even with my back to the front window at high noon, there was not enough ambient light outdoors to decently illuminate the text in my paperback book. That was the day it dawned on me that a 12 volt LED reading light wired to my huge solar-rechargeable Group 31 AGM battery was a necessity for the Alaskan.

After perusing Amazon for flexible shaft 12 volt LED lamps, I chose two: a thin small one for reading and a larger brighter one for cooking. The reading light is a 12 volt DC Cool White LED Mini Gooseneck Pilot Light with Switch 240 mm sold on Amazon.com by Britta Products for $27.95. It is Britta model number MGLS-240mm-Switch-CW-12V. It is 10.5” long and has a pushbutton on-off switch on its head for convenient operation. Its focused beam works wonderfully to illuminate any book while reading. When not reading the lamp can be swung over the sink for washing dishes or pushed upright out of the way.

I drilled the ¼” diameter mounting hole in the galley countertop behind the manual water pump so I could illuminate my books while resting in bed sitting up against the driver’s side wall. There is a second plywood panel underneath the countertop, so from inside the cabinet below the sink I had to drill a 1” diameter hole in that lower panel with a wood drill bit in order to reach the threaded bottom of the lamp base so it could be properly tightened. Driving around in my truck loosened the single nut that came with the lamp, so I later bought a second metric nut and lock washer to double-nut the base tight against the bottom of the countertop. So far that has held fast.

The larger cooking lamp is a Gooseneck 12 volt Map Light - Chart Light Warm White (3800K) also sold on Amazon.com by Britta Products for $39.95, model Gooseneck-27006-WW. It is 15.75” long and has 12 ‘5050’ LEDs in its head, where the on/off switch is conveniently located. I screwed this lamp’s angled mounting bracket into the wall behind the cooktop, from where it arches forward along the lowered ceiling above the stovetop to illuminate whatever is cooking. Raising the head up slightly illuminates the closet opposite and the whole interior generally.

Both LED lamps are wired to a small terminal strip located high on the rear wall inside the storage compartment underneath the sink. A separate 14/2 gauge power wire runs from the terminal strip down to the floor, forward inside the lower closet then along the floor underneath the center drawer to the passenger side lower cabinet, then rearward to the fuse box above the AGM battery. I have a 5 amp blade fuse in this circuit.

Either lamp by itself sufficiently illuminates the interior for getting ready for bed or doing other chores during night time. Their amperage draw is minimal and the large AGM battery powering them is recharged every day the sun shines. These LED lamps are a wonderful addition to the Alaskan.
 

Attachments

  • two flexible LED lights.jpg
    two flexible LED lights.jpg
    189.2 KB · Views: 372
  • sink flexible light in raised position.jpg
    sink flexible light in raised position.jpg
    188.7 KB · Views: 360
Basket and towel holder above sink.

I installed a small wire basket to hold scrubbers and dish soap on the wall behind the sink, then added a paper towel holder above it to hold a roll of paper towels in a convenient location.
 

Attachments

  • basket and towel holder above sink.jpg
    basket and towel holder above sink.jpg
    193.5 KB · Views: 219
Large shelf above foot of bed.

While comfortably reading in bed with my back against the driver’s side interior wall, I’d look up and notice a large unused void at the other end of my bed. Hummnnn, a shelf there would certainly convert that useless void into practical storage space. A tape measure told me the available space was 49-1/2” long by 24” deep. But the right front hydraulic cylinder impinges on the most forward 1-1/2” of the length, making a 2’ x 4’ shelf ideal.

I chose that size piece of 3/8” thick white pegboard as the shelf flooring material, to provide ventilation for long term storage and help dry out damp or wet clothing. To stiffen the shelf, I installed 1” x 2” nominal size (3/4” x 1-1/2” actual size) popular boards along the top of the forward and rearward sides of the shelf and along the top of the front of the shelf. I used evenly spaced 1-1/4” long deck screws going through the holes in the pegboard to attach the popular boards to the shelf along the length of each board.
 

Attachments

  • shelf support sockets in place.jpg
    shelf support sockets in place.jpg
    170.4 KB · Views: 243
  • top of shelf.jpg
    top of shelf.jpg
    171.3 KB · Views: 248
Large Shelf above foot of bed

Because the rear top of the shelf fits flush underneath the lower lengthwise trim piece that runs front to rear on both sides of the Alaskan bottom half, and is flush against the passenger side interior wall, the lengthwise rear stiffener is attached 2” away from the rear edge and is screwed to the bottom of the pegboard shelf. Rather than permanently install it, I designed the shelf to be removable with a little work.

In addition to the rear stiffener, there are two lengthwise supports underneath the shelf that run front to rear. They are held in place by 4 repositioned single bunk bed pole sockets that came with my Alaskan, two at the front end and two opposite at each rear end. The individual sockets are positioned and centered 6” and 20-1/4” out from the face of the passenger side interior wall. I used a belt sander to round off the last 2” on the bottom of each end of these two lengthwise popular supports so they would rest snugly in the curved bunk bed sockets.
 

Attachments

  • back of shelf fits under horizontal trim.jpg
    back of shelf fits under horizontal trim.jpg
    156 KB · Views: 204
  • bottom of shelf.jpg
    bottom of shelf.jpg
    206.9 KB · Views: 209
The shelf was leveled front to rear and side to side with bubble levels, then the two lengthwise popular supports were placed up against the bottom of the shelf and the sockets were pushed up into the rounded ends and the socket’s holes were marked for drilling pilot holes. The shelf and lengthwise supports were removed then the sockets held in place, their pilot holes were drilled and their mounting screws were placed in the pilot holes and driven home.

The forward lengthwise popular support is attached to the shelf with evenly spaced 1-1/4” deck screws going through the pegboard from its upper surface (the floor of the shelf). I always first drill an adequate sized pilot hole to discourage the wood supports from cracking when driving in the deck screws.

The rear lengthwise popular support is not attached to the shelf because, if it were attached, I could not have then lifted the front end of the shelf high enough to let the ends of that support clear the tops of the two sockets to get lowered inside them. Instead, that support is put into the two sockets first. Then the rear edge of the shelf is placed under the lengthwise trim strip on the top of the passenger side interior wall and the shelf is lowered on top of the rear lengthwise support. The ends of the forward attached support fit into their sockets when the shelf is fully lowered.

To keep the front of the shelf from jumping up when traveling on a bumpy road, I drilled a new hole through the center of the forward socket near the fridge and through the wall on which it is mounted. The hole comes through the wall in the open space above the refrigerator. After placing the forward popular support in both of its sockets, I drilled a pilot hole into the rear end of the support from inside he space above the fridge. Then I drove in a deck screw to attach that forward popular support directly to the wall on which its socket is mounted.

The bottom of the shelf is 15” above the top of my bed, so there is plenty of room underneath the shelf to wiggle my toes. There is also plenty of room above the shelf to stack and store blankets, jackets, boots, small bags and other miscellaneous items.
 

Attachments

  • bottom view of shelf installed loking rearward.jpg
    bottom view of shelf installed loking rearward.jpg
    178.1 KB · Views: 210
  • finished shelf above bed.jpg
    finished shelf above bed.jpg
    171.4 KB · Views: 235
Marine grade fuse box for interior 12 volt circuits.

With four 12 volt circuits inside my Alaskan, it was time to add a fuse box. Because my 1992 Dodge W250 pickup truck uses ATC blade fuses, I decided to stick with that type of fuse for my Alaskan so a large box of spare fuses would serve both the truck and camper. Figuring I might discover additional 12 volt dc electrical needs in the future, I bought a Blue Sea Systems 6 circuit ST Blade Fuse Block with Cover and a Negative Bus for wiring convenience. Two of those circuits are available for future expansion of my Alaskan self-recharging 12 volt system.

The fuse block is Blue Sea Systems model 5025 and cost $37.46 on amazon.com. It can handle up to 32 volts, more than sufficient for my 12 volt electrical system. Its maximum operating amperage is 30 amps per circuit with a 100 amp maximum total for the whole block. It accepts either ATO or my ATC blade fuses, accepts ring terminals on its inputs for better connections, and has a clear insulating cover that keeps exposed wiring connections visible yet safe from inadvertent contact.

I installed the fuse box about 6 inches above the battery on its own shelf platform, where it is convenient to wire it to the battery and to all outgoing circuits in the camper. A removable solid panel above the battery compartment (that doubles as part of the closet floor) keeps the fuse block out of sight and out of harm’s way while leaving it readily accessible.
 

Attachments

  • fuse board mounted above battery.jpg
    fuse board mounted above battery.jpg
    196.9 KB · Views: 249
Campa Potti MT toilet and new shelf in large closet.

For emergency use I bought a compact Thetford Campa Potti MT personal toilet (SKU model 92874) that is 13.4” high by 15” wide by 16.5” deep. It holds 4.0 gallons of fresh water and 3.2 gallons of black waste water, enough for 33 flushes. Although mine is a Thetford, the same generic MT toilet is sold by Wal-Mart today under the brand name Campa Chem for $69.96.

This small toilet stores nicely inside my large closet, where I have installed a wood floor strip on its open side to keep its bottom from shifting while it is held securely in place with a cam lock 1” wide strap around its beltline. The strap ends attach to the closet’s side and rear walls through footman loops placed far enough around the toilet’s front left and right rear corners to prevent it from shifting within the tightened strap. To use, I remove the strap then remove the toilet from the closet and place it on the camper floor for privacy. In remote settings it can be used outdoors.

During last summer I kept it half full of fresh water, which worked fine. But beginning this fall I changed to and will continue to use pink RV anti-freeze all year round to avoid having it freeze during very cold weather. This portable toilet can be emptied into any household toilet or campground pit toilet, a convenient feature.

Because the toilet took up most of the available floor space in the large closet, I added a full width half-deep solid shelf just above it for storage. I removed the original pull-out clothes hanger rack that came with my Alaskan because I never used it and I was always gashing my head on it when looking inside the closet. I prefer to fold and stack my camping clothes rather than suspend them on hangers, a more common practice from the Sixties. The fuse box seen above rests underneath the removable white and gold masonite panel at the front of the closet floor.

The higher of the two sets of paired wires at the left in the closet goes to a pair of 12 volt cigarette lighter sockets mounted in the space above the refrigerator which I use to recharge my cell phone, family radios and Surface Pro 3 laptop computer.
 

Attachments

  • porta pottie and shelf in large closet.jpg
    porta pottie and shelf in large closet.jpg
    172.2 KB · Views: 280
  • twin cigarette lighter sockets above refrigerator.jpg
    twin cigarette lighter sockets above refrigerator.jpg
    171.1 KB · Views: 270
Advanced Elements Summer Solar Shower

After checking many online reviews of portable solar showers. I bought from Amazon.com the 3 gallon Advanced Elements Summer Solar Shower for $24.99 plus shipping. I haven’t used it yet so cannot report on its functionality, but it seems just the thing to have for the second or third day out during summer camping.
 
A Rocker Switch to direct Alaskan solar panel output.

I often tow my 1953 Airstream 21’ long Flying Cloud travel trailer with my Alaskan-equipped 1992 Dodge W250 Cummins Turbo Diesel 4x4 truck. And I like to boondock in my Airstream away from campgrounds and their convenient utilities. But recharging the 12 volt AGM battery in my Alaskan is a challenge when boondocking because I don’t own a portable generator. A common solution is to put a few solar panels on the roof the Airstream, but I didn’t like the idea imposing rectangular panels on its curved roof because they would impair the original unadorned appearance of this vintage travel trailer.

During an Airstream trip to Ohio this past summer, while sitting at a picnic table in a rest area gazing down at my truck and trailer, it occurred to me that I could use the two 100 watt solar panels on the roof of my Alaskan to recharge the Airstream’s 12 volt battery. I decide the best way to go about that was to be able to switch the 16 +- volt / 7 to 11 amp output feed from the two 100 watt solar panels to either (i) the solar charge controller in the Alaskan or (ii) a second identical Blue Sky Sun Charger 30 solar charge controller to be installed in the Airstream.

I found a double-pole double-throw (DPDT) illuminated marine grade rocker switch that could handle up to a 20 ampere load at 12 volts, which is more than three 100 watt solar panels like mine could produce. It is Cole Hersey Contura rocker switch part #58332-33 (the “-33” is critical to ordering the correct switch configuration) that has super bright amber indicator lights in each end of the rocker switch to indicate its current position. The center position of the rocker switch is “off”, useful for performing maintenance on the solar system wiring downstream from the switch. This DPDT rocker switch is available online from West Marine for $24.99, their Model # 14237408 (UPC # 632850630771). I mounted this switch in the Alaskan to the right of the catalytic heater, where it is close to the solar panel lead-in wiring.
 

Attachments

  • rear of catalytic heater panel.jpg
    rear of catalytic heater panel.jpg
    152.2 KB · Views: 215
  • DPDT rocker switch installed.jpg
    DPDT rocker switch installed.jpg
    201.2 KB · Views: 197
Anderson connector to connect to Airstream

To connect the solar panel output on my Dodge to the solar charge controller in my Airstream, I bought from www.alliedelec.com a few of the smallest two pole Anderson Power Product connector housings available, SB 50 in yellow rated at 50 amps (Mfg. part # 992G5-BK, Allied stock # 70162093) at $1.55 each. These were just bare housings, so you must also buy the contacts that go inside them (2 per housing), in my case for 10/12 gauge wires (Mfg. part # 5915BK high detent, Allied # 70162090) at $0.71 each. I also bought two red dust covers to protect these bare connectors (Mfg. # 134G1, Allied # 70161973) at $7.07 each, a good investment to keep the contacts clean when not attached together.

It was difficult for me to find locally in Denver any flexible 10 gauge 2 wire cable, so I ordered it online. I bought at 88 cents per foot from www.wireandcalbetogo.com 60 feet of their 110/2 SJOOW Portable Cord 300V UL/CSA (item # SJO10s2) to wire the Airstream’s solar controller to the Dodge and have 30’ left over to wire a third portable 100 watt solar panel to the Airstream when it was parked unattached to the Dodge.
 

Attachments

  • Anderson connector components.jpg
    Anderson connector components.jpg
    167.3 KB · Views: 162
  • Anderson connector bracket and plug for Dodge rear bumper.jpg
    Anderson connector bracket and plug for Dodge rear bumper.jpg
    241.6 KB · Views: 155
Mounting Anderson connector on Dodge rear bumper

With this DPDT switch and the Anderson connectors, I can now charge the 12 volt AGM battery in either my Alaskan or in my Airstream when traveling down the highway or parked together at a camp site. When away from my Airstream in my Dodge, I can attach a single 100 watt portable solar panel to the Airstream to charge its battery.

The photo below shows the Anderson connector on its bracket mounted to the rear bumper of my Dodge truck. The "C" section of the bracket wraps around the forward edge of the rear bumper then the elevator bolt goes through a hole in the bumper for a trailer ball and holds the bracket tightly in place. The red rubber cover keeps dirt and grit out of the Anderson connector when not in use.
 

Attachments

  • Anderson connector mounted on Dodge rear bumper.jpg
    Anderson connector mounted on Dodge rear bumper.jpg
    142.1 KB · Views: 142
Denver Alaskan said:
Mounting Anderson connector on Dodge rear bumper

With this DPDT switch and the Anderson connectors, I can now charge the 12 volt AGM battery in either my Alaskan or in my Airstream when traveling down the highway or parked together at a camp site. When away from my Airstream in my Dodge, I can attach a single 100 watt portable solar panel to the Airstream to charge its battery.

The photo below shows the Anderson connector on its bracket mounted to the rear bumper of my Dodge truck. The "C" section of the bracket wraps around the forward edge of the rear bumper then the elevator bolt goes through a hole in the bumper for a trailer ball and holds the bracket tightly in place. The red rubber cover keeps dirt and grit out of the Anderson connector when not in use.
Which Airstream do you have? We pull a 25 Flying Cloud FB
 
Wandering Sagebrush said:
Which Airstream do you have? We pull a 25 Flying Cloud FB
It's a 1953 Airstream, 21’ Flying Cloud s/n O-3001, the very first production Airstream trailer made in their then brand new Jackson Center, Ohio plant. I have your great, great grandfather. :)
 
Nice job upgrading your camper! Lots of work.

I'm wondering how the Sears 31M hybrid starting/storage battery is holding up

When camping do you know how much the battery discharges overnight before recharging with solar or whatever?

I noted that you have a BlueSky solar controller but I did not see a reference to a battery monitor. Do you have a battery monitor as well so you can keep track of the state of charge of the battery?

Do you camp off the grid and rely mostly on solar or do you routinely use other electrical sources?


Craig
 
ckent323 said:
Nice job upgrading your camper! Lots of work.

I'm wondering how the Sears 31M hybrid starting/storage battery is holding up

When camping do you know how much the battery discharges overnight before recharging with solar or whatever?

I noted that you have a BlueSky solar controller but I did not see a reference to a battery monitor. Do you have a battery monitor as well so you can keep track of the state of charge of the battery?

Do you camp off the grid and rely mostly on solar or do you routinely use other electrical sources? Craig
Hi Craig:

Thanks, glad you like my Alaskan improvements. The Sears Die Hard Advanced Gold model 50033 Group 31M Marine AGM battery is holding up very well after 3 years. I usually park my 1992 Dodge CTD truck in the sun, so the two 100 watt solar panels recharge the battery nearly every day, keeping it topped off.

As you noticed, I do not have a battery monitor in my 12 volt solar electrical system. I just rely on the Blue Sky Energy Sun Charger 30 Pulse Width Modulated (PWM) solar charge controller, which is set to alternately show charging amperage and battery voltage every other 5 seconds. Even with the refrigerator running (in short intervals) all night long, the only draw, the battery voltage never drops below 12.0 volts overnight. After a few hours of rising morning sun, the battery is quickly back to 12.7 volts.

The only other equipment attached to the battery are two 12 volt cigarette lighter sockets for recharging and the two very low amperage LED flexible lights. Typically only one LED stalk light is on for a few minutes when I'm preparing to go to bed, or occasionally slightly longer when I read in bed. Its electrical draw is insignificant. Charging a family radio handset, cell phone or Surface Pro 3 laptop computer during the daytime is, as a practical matter, handled by the two 100 watt solar panels rather than the battery. My 12 volt electrical needs are so small that a battery monitor is unnecessary. I have a third 100 watt solar panel that I can add to my solar panel roof array but have never felt a need for it.

My Alaskan battery is not attached to my truck's 12 volt electrical system, so it is never charged by my truck. Those two 12 volt electrical systems are wholly separate. The Alaskan battery's only source of charging are the two 100 watt solar panels. Somewhat conversely, my Alaskan Group 31M battery is the same size as my truck's single battery, so if my truck's battery ever dies while boondocking I can swap in the Alaskan battery to start the mighty Cummins engine.

I always camp "off grid", even when parked in a campground, because I have disconnected my 120 volt A.C. electrical system, removed its outside input plug and covered it with a solid plate. I'm wholly 12 volts and self-contained wherever I go. I never need and cannot plug into or use any 120 volt A.C. electricity. I'm blessed to live in Colorado and camp mostly in the Intermountain West, where the sun usually shines and the sky is not cloudy all day. :D
 
Back
Top Bottom