Accessing burner on Dometic 3-way?

NRVhawk

Advanced Member
Joined
Apr 20, 2016
Messages
65
I’m trying to access the burner on my Dometic 2193 refrigerator (1.9 cu ft 3-way), but I can’t figure out how to slide the burner out from under the flanges on the bottom of the boiler tube.

I had some trouble lighting the fridge, which is probably a problem of my own making – I took the propane tank out to weigh it to see how full it was, and after I reconnected it, I forgot to purge the air out of the line by running the range. Instead I tried lighting the fridge, which stayed lit for 10 or 15 seconds before going out.

After this the fridge wouldn’t relight using the piezo igniter. When I got it lit with a barbeque lighter (because I wasn’t sure if the igniter was the problem), the flame had a lot of yellow and sputtered. I eventually got it going with a blue flame, but I can still see some carbon deposits glowing in the burner
.
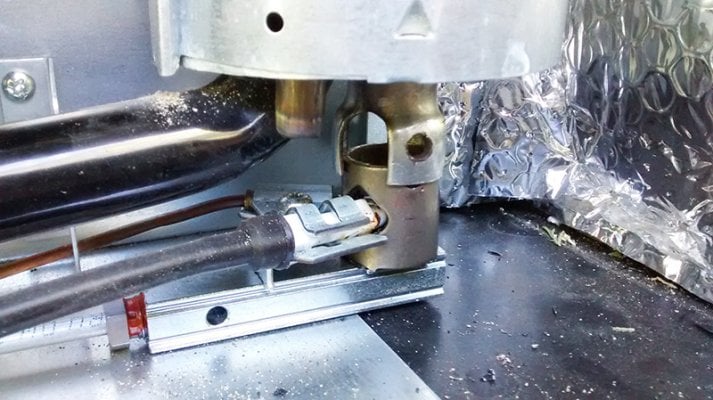
So I figured on cleaning the burner. I removed the wind screens and removed the screw holding the burner to the boiler tube flanges. The burner will then drop down, but it won’t drop down far enough - the bottom of the burner is resting on the floor of the fridge cavity, but the top of the burner is still about ¼ inch above the bottom of the three boiler tube flanges. The only way I can see to get the burner out from under the flanges is to either raise the whole boiler tube/flue assembly, or use pliers to bend the flanges (and I expect bending metal is not the solution).

What am I missing – how do you get the burner out from under the flanges?

Thanks in advance!
 
Here's the thousand word picture of the burner under the flange....
 

Attachments

  • burner pic.jpg
    burner pic.jpg
    130.6 KB · Views: 234
I think if you search "cleaning the burner of a Dometic rv refrigerator" you will get some info.
I cleaned mine and it worked great after.
I also used the "caned"dust-off to blow any soot away,but remember let it set for a while before you lite it.
Frank
 
NRV. I service mine every year. Loosen the flare nut going into the burner block and pull the line out. The jet just inside the block and looks like a little hat. Pry up on the chimney and rotate the burner block toward you and out.

cwd
 
Linking to a few possible resources for you and future readers of the thread---

Expedition portal thread -- success getting an RM2193 going again

irv2 thread -- clogged jet

RM2193 manual -- see D.2.D and D.2.E (page 11) for diagrams and cleaning recommendations (to be done once or twice a year)

WTW thread (on a Norcold) ... food for thought in posts 12 (Stan's advice), 28 (thermocouple carbon), 31 (insect blockage), 32 (oil in line), and 33 (rust)
 
Thanks for all the suggestions and links. I was able to get a pipe cleaner soaked in alcohol through the air port next to the jet, and then blow it out with compressed air, without having to pull the burner out from under the flue. It seems to be working okay for now. I'm leaving on a trip today, so we'll see how it holds up, and I'll do a more complete maintenance when I get back.

Speaking of insect blockage, that did occur to me. Where I live (southwest Virgnia), the brown stinkbugs (an invasive species) are out in force right now and crawling into every crack in the house and cars they can find. I had the vents of the fridge covered up, but they seem to get into just about anything anyway. It's certainly not impossible that one got into the burner.
 
NRVhawk said:
Thanks for all the suggestions and links. I was able to get a pipe cleaner soaked in alcohol through the air port next to the jet, and then blow it out with compressed air, without having to pull the burner out from under the flue. It seems to be working okay for now. I'm leaving on a trip today, so we'll see how it holds up, and I'll do a more complete maintenance when I get back.

Speaking of insect blockage, that did occur to me. Where I live (southwest Virgnia), the brown stinkbugs (an invasive species) are out in force right now and crawling into every crack in the house and cars they can find. I had the vents of the fridge covered up, but they seem to get into just about anything anyway. It's certainly not impossible that one got into the burner.
On my outside door and vent for the 3 way I duct taped window screen to the inside.Keeps bugs out ,haven't had any insect problems,just soot.
Frank
 
I know this post is old, but I'm guessing I'm not the only person who is benefiting from it years later.

I had the same apparent lack of clearance below the gas burner but once the gas line was disconnected (another hardship because there is not enough room to easily get a box wrench on the parts), the gas burner can be rotated out by pulling the bottom toward you while keeping the unit parallel to its installed position. You'll have to force it a bit but it will come out. Now I'm keeping my fingers crossed that I can get it back in. :rolleyes:
 
Wow, thanks for the insight. I too have the 1.9 cu ft three-way and have never been able to get the burner out. Next time I will be a bit more aggressive with it.
 
Thanks for passing on your experience. I need to do this sometime this summer, so this is very helpful.

Stereo said:
I had the same apparent lack of clearance below the gas burner but once the gas line was disconnected (another hardship because there is not enough room to easily get a box wrench on the parts), the gas burner can be rotated out by pulling the bottom toward you while keeping the unit parallel to its installed position. You'll have to force it a bit but it will come out. Now I'm keeping my fingers crossed that I can get it back in. :rolleyes:
 
I had to remove my burner tube again to readjust the electrode while adding a relighter so I'm adding some tips and photos for getting out the burner when there doesn't appear to be enough room.

Dometic RM2193 gas assembly_200802064446_200802064503.jpg

1. Turn off the gas.

2. Remove the screw that's on the flange above the burner (see arrow in next photo) to allow you to push the assembly up into the flange a bit to make it easier to get box wrenches under the assembly.

3. Using a wrench on the burner and a wrench on the nut, loosen the nut connecting the metal gas line tube to the burner tube several turns to allow you to rotate the burner without twisting the rigid gas line. There is almost no room to rotate the wrenches so a "turn" moves the nut maybe 22-degrees. If you have even less room than I, you may want to consider grinding off the backs of the wrenches to reduce their width. (I could not budge the connection at the other end of the gas line.)

DSC01689_LI_200802064716_200802065226.jpg

4. Rotate the burner as much as possible within the flange. There still may not be enough clearance.

DSC01687_200802064754_200802064800.jpg

5. Use a prybar to GENTLY lift the chimney assembly. I put a scrap piece of metal inside the lip of the door to protect the lip and then leveraged off the wood to lift underneath the big pipe that carries the ammonia. I had also tried to leverage more directly under the chimney but there wasn't much room to work. Some people have apparently had to bend the flange "wings" out a bit.

DSC01686_200802064859_200802064906.jpg

6. Use your wrenches to completely disconnect the burner. Be VERY careful not to lose the tiny orifice "cap" when disconnecting. It is held in only by pressure. Note its orientation; the orifice/hole should be innermost to the burner. The wider "brim" of the "cap" fits over the end of the gas line. Be careful when reassembling to ensure it's in the right position as you tighten the nut.

7. Complete your maintenance.

8. Reassemble but before putting the burner back under the flange, fully tighten the gas delivery nut, turn on the gas and test for leaks. Then ensure it lights and burns well.

9. Turn off the gas again and then loosen the gas line nut yet again so you can rotate the assembly back under the flange with the help of your prybar.

10. Tighten the nut and recheck for gas leaks.

11. Secure the assembly to the flange with the screw you removed in Step 2.

12. Test again. Good luck on this. For me, a successful test out of the chimney area did not necessarily translate to success once everything was reassembled, i.e. it would light first time, every time outside the chimney, but when I stuck it back under the chimney, it ceased to light or did so only sporadically. I don't know why. Something about the air-to-gas ratio inside and outside of the flange? I had to repeat, adjust the electrode, cross my fingers, and try again. It took me about four tries. What a pain! But if you're not changing out the electrode, I would guess you won't have the same issue as me.
 

New posts - WTW

Back
Top Bottom