Alaskan sits low in my truck

lost in space

Member
Joined
Apr 28, 2011
Messages
13
Location
S.F. East Bay
Hello,

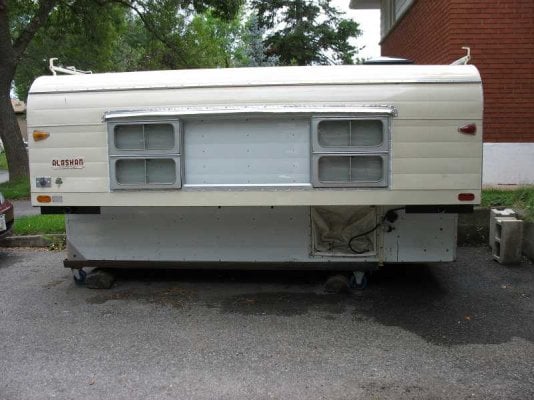
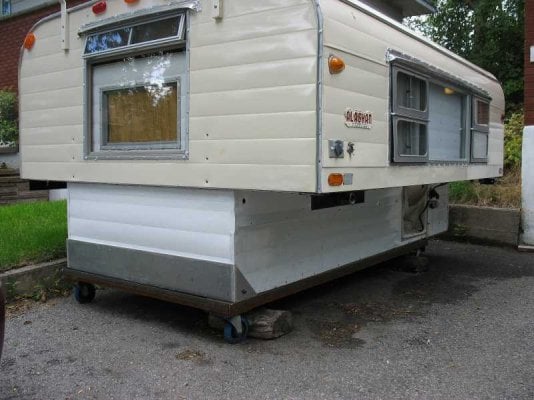
I am new to the world of truck campers and just got a 1996 Alaskan cabover. I have it on a 1997 Dodge 2500. The camper sits low in the truck, touching the tops of the side walls of the bed. Then when I open the truck door, I have about 1/2 inch max of clearance between the door and the bottom of the cabover. Is the camper sitting too low and should I put in 2 x 4's to raise it a little bit?

thanks
 
I used to do the 2x4 routine but I found that a sheet or two of 4x8 blue rigid insulation works great. It must cushion things a bit, provides 32 sq' of insulation, camper hasn't loosened at all, and easy :)
 
Welcome and congratulations on your find...

Build your frame out of 2x4's to the size of the bottom of the camper...with 1 or 2 2x4 stretchers between the sides (that way your floor is supported)...then fill the centers of the frame with the rigid insulation as suggested by Barko. Once the camper is mounted on the frame you can shim the bed walls of the truck to meet the bottom of the camper. That way there will be support under the sides of the camper when you tie it down and lessens the sway when you get on a rougher road.

If you're going to be loading and unloading the camper often you may find it convenient to attach the side shims and the frame to the camper with screws and a sheet of 1/4 ply to hold in the insulation....a little polyurethane adhesive will come in handy as well.

Have fun..
 
..then fill the centers of the frame with the rigid insulation as suggested by Barko.

Have fun..


Actually my suggestion was not 2x4's at all, just the blue insulating board. Works great for my Grandby which is probably lighter but I was surprised that the blue board didn't seem to compress and it has worked very well.
 
Actually my suggestion was not 2x4's at all, just the blue insulating board. Works great for my Grandby which is probably lighter but I was surprised that the blue board didn't seem to compress and it has worked very well.


While the insulation is a great idea, the difference in the dry weight of the Granby (795#)to a Alaskan's (dry weight of 1549#) is substantial and the Alaskan will crush foam insulation at the perimeters. Typically, factory installs of Alaskans have a frame of 2x lumber to clear the bedwall of the pickup installed on and filling the centers of the frame with the rigid insulation will give you an additional level of comfort in the camper.

Structurally, after owning one for nearly 30 years, I would build the frame of heavy Aluminum Channel and use the area for plumbing and wiring....with a propane quick release plug and an underbed propane tank.....

Don't get me wrong...the insulation is a great idea, but the problems associated with tying an older Alaskan down when using it as a slide in and out camper require a little more substantial bearing frame at the bed because we don't have the Aluminum frame for anchoring (40 year old 1/2" plywood and nailed pine frame). Consequently we have to rely partially on bearing friction at the bed level. I actually installed rubber strips on the underfloor to increase the frictional co-efficient. Slick foil faced or unfaced rigid foam decreases that co-efficient and allows the camper to move more, adding further to the reduction of the bare foam.

Hi Rusty,
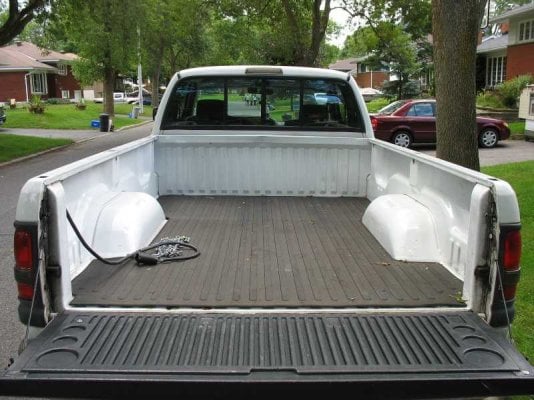
I was actually going to ask a question of what to put in the bed of my truck under my 10ft NCO, when I finally raise it into my Dodge in a few weeks. I presently have a rubber floor mat in the bed. Would that suffice, or do I need to (should I) build some kind of platform in the bed of the truck to support the camper? Thanks for the advice and pointers.
--Robert
 
Robert,

The Alaskans have the plywood floor that wasn't designed for direct contact...when trapped water gets in there it tends to rot the floors out...I think there are some pictures around here somewhere, of an Alaskan being lifted and the floor falling off...ugh. One of the tricks for keeping it as dry as possible is to install a frame of one sort or another for the camper to sit on so air will circulate around it.

Every p/u has a different bed to top of bed wall dimension so you really have to run the trial and error. I've got mine on two thicknesses of redwood plywood...the old redwood plywood...when they sprayed it with penta-chlorophenol...it won't rot....I'll rot before it will. Between the plywood strips and the bed I installed a layer of bicycle tubing as an anti skid....remember that trapped water under your matt will eat at the bed itself, especially if your in snow country where the roads get salt. You're in Canada if I remember correctly

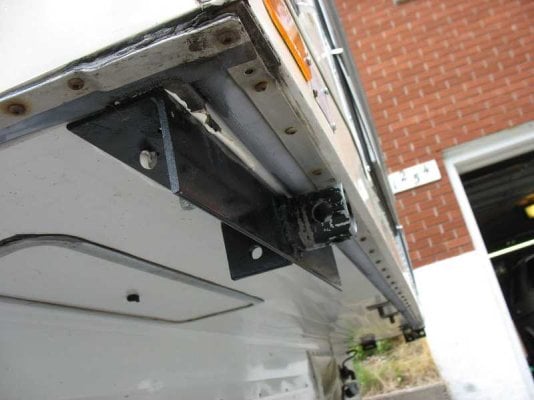
My side walls have a shim under them so when I close the derringers they don't pull the sides down and open the rear door....what we go through to keep old campers. The Atwood jack brackets have an angled brace that will rest on your bed if you don't give it a little clearance....dented sidewall tops on your bed is what happens...to avoid that you keep about 3/4 to 1" clearance. That allows the angle portion of the bracket to clear the bed...then you cut shims to fit. Depending on the jack brackets you have the clearance will vary a little bit...but 1" shims should raise you up enough to clear. Then you can get a dimension from the bottom of the camper to the bed....install them 2 feet on center and you're good to go....don't forget a couple of large rubber bumpers for the front of the camper. They'll give you a cushion and clearance when you're mounting the camper and the front of the camper won't rub on the bed of your truck....it goes through the aluminum real fast.....

Best of luck on that beauty...you're going to have a blast
 
The Alaskans have the plywood floor that wasn't designed for direct contact...when trapped water gets in there it tends to rot the floors out...I think there are some pictures around here somewhere, of an Alaskan being lifted and the floor falling off...ugh. One of the tricks for keeping it as dry as possible is to install a frame of one sort or another for the camper to sit on so air will circulate around it.

Every p/u has a different bed to top of bed wall dimension so you really have to run the trial and error. I've got mine on two thicknesses of redwood plywood...the old redwood plywood...when they sprayed it with penta-chlorophenol...it won't rot....I'll rot before it will. Between the plywood strips and the bed I installed a layer of bicycle tubing as an anti skid....remember that trapped water under your matt will eat at the bed itself, especially if your in snow country where the roads get salt. You're in Canada if I remember correctly


Thanks for the reply and advice, Rusty! (and sorry for the delay in responding back - this one slipped my attention...)

Yes, I'm in Canada, but won't be driving the truck/camper combo in the salt. My truck came with a molded liner and indeed, over 15 years enough dirt had accumulated in the rear sides of the bed to trap water and cause rusting and holes, which I had to repair. I got rid of the molded liner and got the rubber floor mat instead. I'll definitely build a plywood base as you suggested, to elevate the floor of the camper and prevent rot down there! Not sure I can get redwood in my neck of the woods, but certainly some cedar, or at the very least some pressure-treated lumber.

My side walls have a shim under them so when I close the derringers they don't pull the sides down and open the rear door....what we go through to keep old campers. The Atwood jack brackets have an angled brace that will rest on your bed if you don't give it a little clearance....dented sidewall tops on your bed is what happens...to avoid that you keep about 3/4 to 1" clearance. That allows the angle portion of the bracket to clear the bed...then you cut shims to fit. Depending on the jack brackets you have the clearance will vary a little bit...but 1" shims should raise you up enough to clear. Then you can get a dimension from the bottom of the camper to the bed....install them 2 feet on center and you're good to go....don't forget a couple of large rubber bumpers for the front of the camper. They'll give you a cushion and clearance when you're mounting the camper and the front of the camper won't rub on the bed of your truck....it goes through the aluminum real fast.....


Not sure what you mean by "derringers"? :unsure: Please enlighten me.

Silly me (truck camper neophyte!) I thought the camper was supposed to sit flush on the truck sides, so it would be resting on both the floor and the sides. Now I can see that by elevating the floor, I'll have to shim the sides as well. I had noticed the jack bracket angled brace (toward the interior) would rest on the truck side, to grounded down the two at the front, to give me a good inch clearance on each side. I'll attach the tie down hardware to the outside part (into which the jacks fit) which has holes ready-made for that. Then I'll install shims between the truck sides and camper side bottoms. And as you suggest, some rubber cushions on the front of the box to prevent the rubbing.

Best of luck on that beauty...you're going to have a blast


Thanks, I HOPE so, certainly has proved to be more work than I had bargained for, getting the camper and the truck setup. And I still need to prepare myself for the dreaded initial lift and install. Plus sort out the 12v supply (don't have truck wiring yet, nor deepcycle battery, so will need to research and think about how to best get this done. It's a learning experience in many ways!!! ;) One thing I'm pleased about is the re-caulking job I did. The camper's been sitting in the driveway and we've had some hard rain this summer, and no indication of any water ingress. Plus I've put in a new Fantastic-Fan to replace the non-functioning and beat-up 12v fan that was there.

I think once the camper is on there, it will STAY on there, and this will be my travel and camping rig. In a way, I wish I could put the camper on and off more easily (maybe comfort level will increase once I get it on there once), because having the truck to haul stuff around is very nice.

Well, weather is certainly getting cooler up here, so doesn't look like I'll be able to get all this done and have a shake-down trip this Fall. At least if I can get the camper on so I can park the truck and camper in my driveway for the winter, I'll be pleased.

In the meantime, I'm trying to do a bit of woodwork inside to repair the rather crude work the PO did to fit in a small 120v fridge, which I've taken out. In doing so, he cut out the original woodwork that the Dometic fridge fit into, so it leaves a rather gaping hole and unfinished look. Otherwise, it's pretty nice inside.

All the best.

--Robert
 

Attachments

  • alaskanbracket.jpg
    alaskanbracket.jpg
    41.6 KB · Views: 504
  • emptytruck.jpg
    emptytruck.jpg
    66.3 KB · Views: 478
  • alaskanside1.jpg
    alaskanside1.jpg
    57.2 KB · Views: 508
  • alaskancorner.jpg
    alaskancorner.jpg
    54.6 KB · Views: 603
Robert,

I have happijack tie downs and they come with screw eyes for adjusting the tension from the camper to the tie down points on the truck. The derringers are folding clamps that allow me to set one tension adjustment and have the same adjustment every time I load the camper...no adjusting the tension every time...it cuts down the loading time dramatically. I'll take a picture....

http://eastendcampers.com/tiedowns.html here's a page with fast gun derringers

they've changed the handle but you can see how they work...make quick work of tieing things down
 

New posts

Try RV LIFE Pro Free for 7 Days

  • New Ad-Free experience on this RV LIFE Community.
  • Plan the best RV Safe travel with RV LIFE Trip Wizard.
  • Navigate with our RV Safe GPS mobile app.
  • and much more...
Try RV Life Pro Today
Back
Top Bottom