Best wall anchors for interior paneling not near studs?

Maddogs

Member
Joined
Feb 13, 2023
Messages
27
Location
Southcentral WA
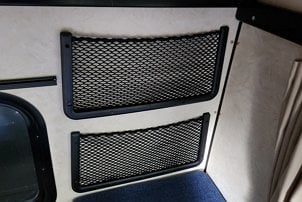
I have attached some stretch mesh pockets to the inside of our hawk for extra gear storage (less than 2#) and was not able to take advantage of putting the mounting screws into the aluminum studs. As a result the mounting screws are only going into the thin paneling and insulation. I know this is not a strong setup and I have been gentle with use of the mesh pockets myself but an 'untrained' spouse has succeeded in pulling the screws out of the wall when trying to stuff too large of items into the pockets.

Since the hard walls are insulated I know I can't use a typical expanding drywall insert. I was looking at these metal self-tapping inserts, short at 3/4" to keep from piercing the outer wall:

https://www.homedepot.com/p/Hillman-Zip-All-Steel-Hollow-Wall-Anchors-with-8-x-3-4-in-Round-Head-Combination-Sheet-Metal-Screws-4-Pack-376231/202243024

What do people here use with success?
 

Attachments

  • Mesh_Storage_Pockets_Pic.jpg
    Mesh_Storage_Pockets_Pic.jpg
    54.8 KB · Views: 52
Wall anchors work great on dry wall but but you'd end up with a good size hole if you ever remove them. I'd suggest using 3M moulding tape along with the mounting screws. Maybe add a "Fragile" warning label too.
 
How about a piece of plywood as a plate on the wall that is mounted to the frame and the mesh bags mounted to the plywood?
 
SlowernOlder said:
How about a piece of plywood as a plate on the wall that is mounted to the frame and the mesh bags mounted to the plywood?
+1 to this idea. Make the piece of plywood long/big enough to go into the frame members (have to pull the interior siding back a bit to see where those are).
 
Vic Harder said:
. . . (have to pull the interior siding back a bit to see where those are).
If you live in a colder climate condensation will first appear on the walls where the frame members are when using a non-vented heater (Mr. Buddy, et.al.). I have used this method to find where the frame is behind the wall.
 
SlowernOlder said:
How about a piece of plywood as a plate on the wall that is mounted to the frame and the mesh bags mounted to the plywood?
Great idea! As mentioned above, a good (removable) adhesive would negate the need to locate internal frame components.
 
Thanks for all the ideas folks. I had thought of the base plate idea anchored to the known alum studs right at edge of window and opposite wall and then screwing the pouches to the base as a few have mentioned but I wasn't wanting to add more weight and material initially. I have a piece of 1/2 bamboo ply leftover from camper kitchen cabinet and countertop builds that would match things or maybe I'd just get a slab of 3/8 maple ply to match the original wall material pretty close if I decide to go that route.

I've worked with the 3M VHB stuff a bunch before and if things have been stuck together awhile any paint on the wall surface will likely come off with the tape if whatever is mounted is accidentally or intentionally yanked off and I'd like to try to avoid that if possible.

I guess I can always go in stages and try the hollow door anchor or VHB tape first and if it gets pulled out go to plan B and cover it all up with the base plate idea.

Thanks all again.
 
Howdy

Can you join your pouches in a ladder like manner and suspend them from the velcro along the top of wall ?

Mucho Fuente.

David Graves
 
DavidGraves said:
Howdy

Can you join your pouches in a ladder like manner and suspend them from the velcro along the top of wall ?

Mucho Fuente.

David Graves
This works too! I managed to get pouches that had the velcro pre-installed. The con is that you have to remove to stow the roof. So, yet again, another thing to store. My solution was to pitch the pouches and carry way less crap!
 
ramblinChet said:
I would strongly recommend not to weaken the existing structure and poke holes or mount anything to the 1"x1" aluminum studs since they are only 0.030" thick from what I recall. FWC seems to have done a great job designing our camper for its intended purpose which does not include bolting anything to the interior or exterior with the exception of a few select places such as foot steps and awning. Maybe explore the possibility of relocating your pouches to those areas which have additional reinforcement?
Chet, your caution is a good reminder to stay within the designed intent of our campers. That said, there IS a 4" x 1" x 1/4" U- channel running along the top edge of the camper that is strong enough to hold awnings and other things. There is also often wood in that U (as well as some wires!!!!) The OP should be able to screw into that if they are careful about the wiring.
 
Chet, I believe the reply you might get from FWC is "they are all custom." That said, the sides are very similar up at the top, they have to be since it is that C-channel that holds up the bed cabover section.

What's preventing you from pulling back the inside panelling on the passenger side to check?
 
ramblinChet said:
That is wonderful news - I called FWC some time ago to ask the dimensions of that piece and failed to follow up.

Although I have not disassembled the passenger side or my Grandby Shell yet, this is a picture from when the drivers side was examined. Does anyone have a contact at FWC who can provide exact details regarding what is in the upper section of my passenger side and where it is? My goal is to mount brackets for an awning.

gallery_11029_1446_71806.jpg
I always asked for Brenda at FWC in Woodland. She has been very informative and helpful.
 
This is OP just updating on what I ended up up doing for the wall anchors for the accessory/misc. small item storage pouches. I used these hollow door anchors https://www.homedepot.com/p/E-Z-Ancor-Stud-Solver-40-lbs-Drywall-and-Stud-Anchors-25-Pack-25225/202055965 and so far they work great. These are fixed to the thin paneling on the front\cab side of the camper between aluminum studs. Can do test pulls on the pouch netting with a lot more force than the original thin crews only. The pouches are small and are holding only very light items like phones, headlamps, down booties etc. so not going to be taking a lot of weight.

On the recommendation to avoid poking holes in existing aluminum studs noted in later posts, I am wondering what other people do to anchor custom buildout items to shells like cabinetry if not to the aluminum frame? I have built a small kitchen cabinet next to the existing stove and heater cabinet in our hawk shell (pic) and bolted it both to the stove cabinet on the left next to it and to the bottom bench. I originally planned to anchor the thing thru the backside to existing aluminum studs but when I pulled the wood panel away and saw how thin those studs were it convinced me to find some other way.

Observant eyes will note the vertical line of holes along the right side of the small cabinet in the picture and wondering what those are for. Maybe this was not needed, but knowing I was covering up the existing cabin air intake for the heater with the cabinet placement, I left a big open hole on the inside of the new cabinet open to the existing air intake, made the drawers about an inch and a half short of the back end of the cabinet, and put those holes in to try to replicate the original air flow requirements. It appears there is plenty of venting available on the outside edges of the front heater grille so again maybe this was something I didn't need to do.

full
 
I am wondering what other people do to anchor custom buildout items to shells like cabinetry if not to the aluminum frame?”

I’m thinking about using VHB tape to adhere strips of wood that are thick enough to support brackets, etc..
 
Other people (aka, me for example) drive screws into the aluminum and don't worry too much about it. As long as you are not adding rigidity do the structure (ATC/FWC used to weld just one edge of the alum tubes so they could flex. Not sure if they are still doing that) by screwing cabinets too securely, you should be golden.
 
Back
Top Bottom