Cat Litter Toilet

Mark W. Ingalls

Contributors
Joined
Jun 19, 2007
Messages
1,248
Location
Houston, TX
I don't know about the rest of y'alls, but I've been noticing that almost everything I eat turns to crap!

:eek:

I was using a chemical toilet in the camper, but the odor, mess, and inconvenience just started getting to me. There are a few alternatives out there, e.g., the WAG bag, but don't you feel like your throwing your money down the toilet?

I decided to do something about this business...

loaded.jpg


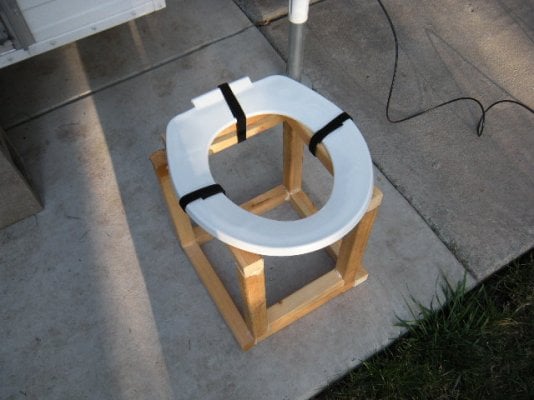
Using duct tape (but of course!), drywall screws, and cast-off plywood from an earlier couch remodel, I decided to build a "dry chemical" toilet that would allow me to completely unhook from septic systems everywhere!

The first thing I did was set my saber saw to cut at a 15 degree angle. Then I took a right-sized piece of half-inch plywood and traced the outline of a toilet seat lid onto it. I made a plunge cut on the trace with the bevel leaning toward the center of the cut.

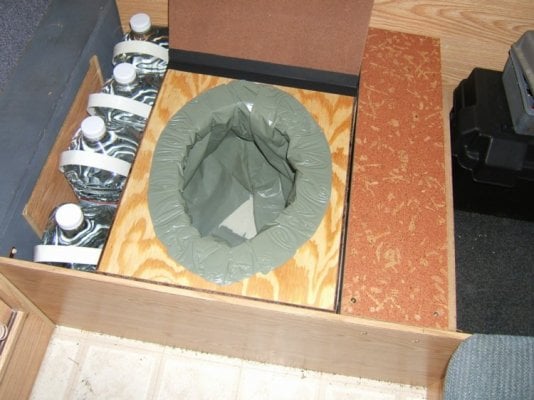
I used the resulting ellipsoidal hole in the plywood, along with a 2-1/2 inch plywood scribing 'washer' to trace a concentric ellipsoid onto the rounded piece I had just cut out.

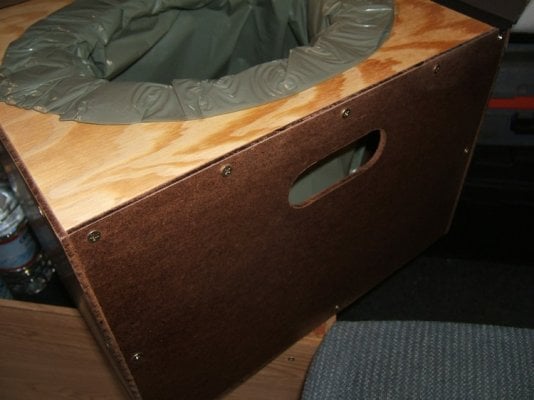
Making a second beveled plunge inside the first, I now had three pieces of plywood: a rectangular piece with an ellipsoidal hole in it, an ellipsoidal ring and an ellipsoidal lid, all nested one inside the other.

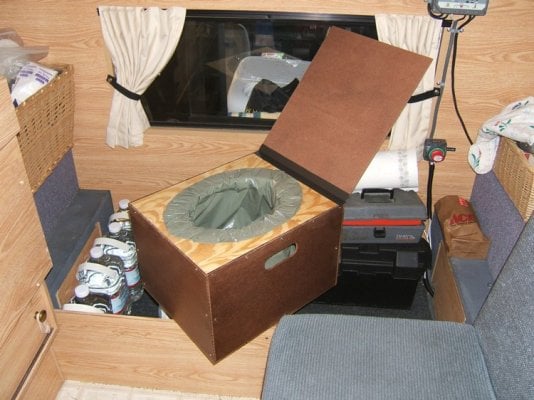
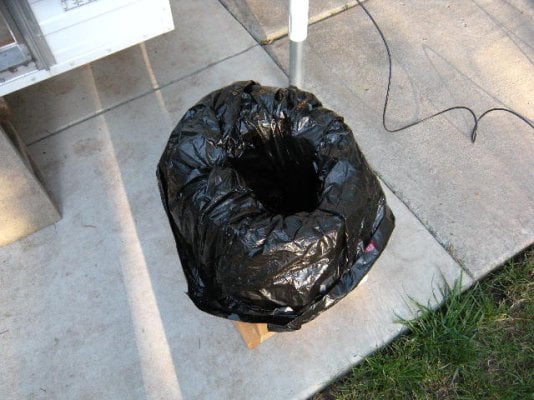
I used the duct tape to increase the thickness and width of the ring, and to provide a cushion so that I wouldn't tear the kitchen trash bag I planned to wrap around the ring in the future.

empty.JPG


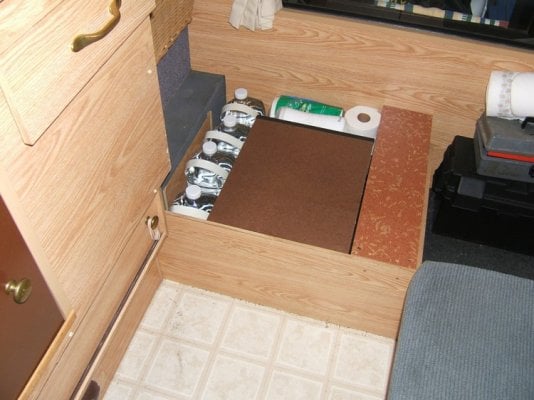
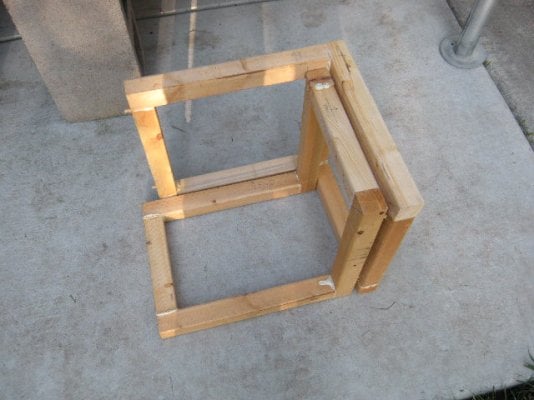
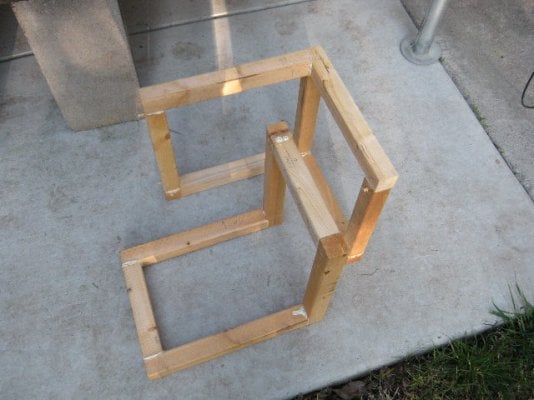
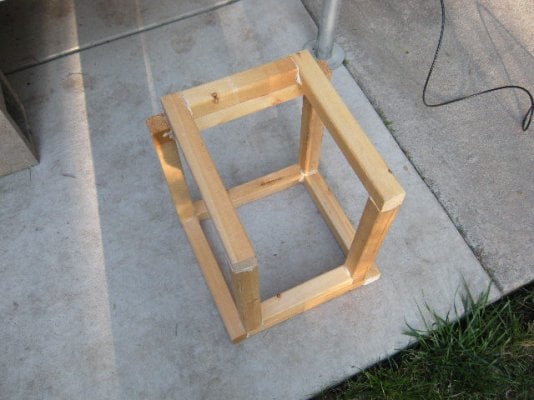
I then built a box in the usual way...
 
The box is sized so that all the consumables can be stored inside, and still allow room for a 'deposit' when necessary...

underseat_storage.JPG


In this photo, you can see there is a bag-and-a-fraction of cat litter (this cat digs A&H High Performance... :cool:)

Now to test it out...

First, you drop a bag through the ring, wrapping about half to two-thirds of the sides of the bag over the ring and down the outside. You want to make sure this much is hidden inside the box so that it will stay clean when you go to take the loaded bag out of the box:

rim.JPG


Then you want to assemble the ring || bag || box without too much air being inside the box to push the bag into the "line of fire," so to say...

ready.JPG


et voila! One cat litter toilet!
 
I know what you're thinking: "So far so good, but how about the next time I have to go? Do I have to build a whole new box, or can I just use this one over again?"

:confused:

Here is an actual un-retouched photograph of real-life scat from one of the big cats you might see in the wild some day...

first_knot.JPG


Note the single overhand knot tied just above the payload. This allows the bag to be re-folded over itself and a second knot to be tied, effectively trapping the unsightly, odious mess inside a double layer of plastic:

second_knot.JPG


You may now deposit this morsel wherever you put the other scraps of food you don't need any more.

Then, you just re-assemble the litter box and stow it away for the next time it's necessary...

stowed.JPG


I might get an elongated seat to attach to the top in the future. As you can see from the above photo, I've left plenty of room for it to fit beneath my custom couch|bed.

Phew! Now I'm feeling all pooped out!
 
Twa-let....

Mark thanks for dumping that on us.....urine my thoughts today as I think about another trip.
Good invention!!!! I use the same principle as far as the bags go in my 2.5 gal bucket with a Canadian made top seat with cover that snaps on the bucket top. I have not yet tried the cat-litter alternative to a one deuce dropped per bag usage. I can also use the bucket for bucket-ly things and I like that as the times I washed my truck on my last winters Central America trip was out of the bucket with a rag. I will definitely pick up a bag of litter for the next trip.
Brian in NM
 
I forgot to mention, Brian, that I like to camp with my autistic, mentally retarded 27 year old son, Robert, who often 'misses' a toilet seat that doesn't have an elongated bowl. When the miss occurs inside the camper, it is a relatively big event that nobody wants to attend. That was another reason to ditch the regular-sized Thetfords, Luggable Loos, etc.

I recommend the Arm & Hammer product over the other kinds of litter. (Meow!)
 
Mark,

That is great that you can take him with and he can enjoy the outdoor world with you. I have a friend who is 80 and still rides motorcycles...he has a step-daughter, 37 years old, who is severely retarded....that is why he took up sidecaring...so she could go along. Our State section of the USCA sidecar group gets togehter in Roswell once a year to hold a ride out to a state park on a lake for a picnic and we each take a young adult from the daycare center she attends...mucho gusto, my friend....they really let it all hang out and hoot and haller at the fun of it all. Very gratifying for us, that's for sure..
Brian in NM
 
Mark, After 35 years with LAUSD a good many of those years in Special Ed. I know what kind of a guy you are. Have the happiest of holidays and thanks for being a hero.
 
Mark, that is one of the coolest things i have seen on here. Great job. Add a tp and magazine holder on the side and you could sell 'em for $$$ :thumb:

You are right the porta potti bowls are made for a kid. way too short.
 
Add a tp and magazine holder on the side and you could sell 'em for $$$ :thumb:

And don't forget: YOU could wire up a heated seat!

:cool:
 
Cat Litter Toilet Rip-off

Blatantly copying almost all of Mark's design, I created one for my Grandby.

I used Mark's approach to the seat but made the sides and bottom out of 3/16" tempered hardboard with hand-hold cutouts to make it a little easier to lift in and out. I also decided to make a flap type lid for it as my wife was a little uneasy with the insert lid.

My Grandby does not have the little nook under the couch for the unit so I made mine shorter so that it fits under the settee.

I have a box of WAG bags so I am going to try them first, but I bought some cat litter too.

This is all untested because we haven't had an opportunity to "give it the business" yet.
 

Attachments

  • 1toilet.jpg
    1toilet.jpg
    133.3 KB · Views: 585
  • 2toilet.jpg
    2toilet.jpg
    121.7 KB · Views: 607
  • 3toilet.jpg
    3toilet.jpg
    92.3 KB · Views: 598
  • 4toilet.jpg
    4toilet.jpg
    116.8 KB · Views: 582
Yes, this is a cool idea :thumb: I like the flip up lid addition. When I make mine I'm thinking of using a saw dust and kitty litter mix since I always have buckets of saw dust around.
 
Let us know how it works. I don't have a cat, so I don't have any experience with the qualities that might make one compound better than the other. The stuff in the WAG bags and in the Luggable Loo bags supposedly jellifies the deposits which sounds intriguing. I don't like the idea of a lot of liquid in the bag. ~ Bob
 
gorilla glue, break-down pooper...with seat

we gave up on the porta potti. its too small or i am too big.

i wanted something other than a box. i have a hawk and it has a "pocket" that fits the porta-potti....i wanted to re-use that spot.

i had some 2 x 2 x 16 's lying around and a new little bottle of gorrilla glue. this is the brown vareity...which is waterproof.

can you build a 2 piece breakdown frame using only glue? with no screws? you bet! this thing could make it through airport security! nothing but simple butt joints here! i did use a chop saw when i cut the pieces so i have good square cuts.

the top pic shows how the two sections are oriented to fit them into the pocket.

the 2nd pic shows the frame units separated. you can make out the little pegs that mate the sections together.

the 3rd pic is the two units joined.

the 4th is the seat added...and held in place with velcro strips! it is solid!

and the last is armed and ready for use with the bag installed.

the seat gets stored in that little two inch space between the hawk's counter and the forward bulkhead.

total cost? less than 10 bucks....for the glue and a seat. i had the wood and the velcro strips.
 

Attachments

  • DSCN0421.JPG
    DSCN0421.JPG
    105.1 KB · Views: 362
  • DSCN0422.JPG
    DSCN0422.JPG
    103.8 KB · Views: 366
  • DSCN0423.JPG
    DSCN0423.JPG
    106 KB · Views: 378
  • DSCN0424.JPG
    DSCN0424.JPG
    105.1 KB · Views: 349
  • DSCN0425.JPG
    DSCN0425.JPG
    102.6 KB · Views: 354
Back
Top Bottom