Engel 12 volt refrigerator in 1966 8' NCO

Denver Alaskan

Advanced Member
Joined
Sep 27, 2013
Messages
86
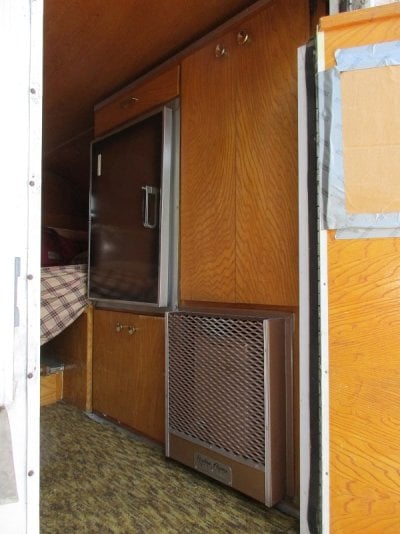
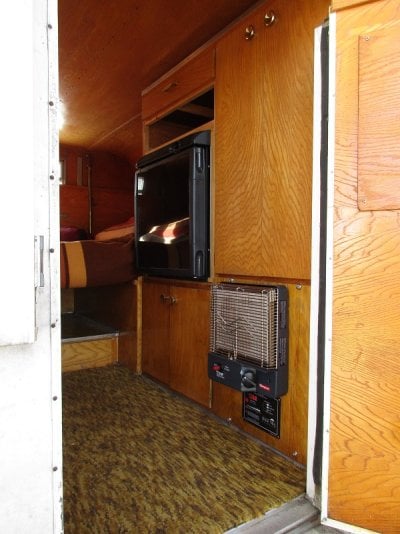
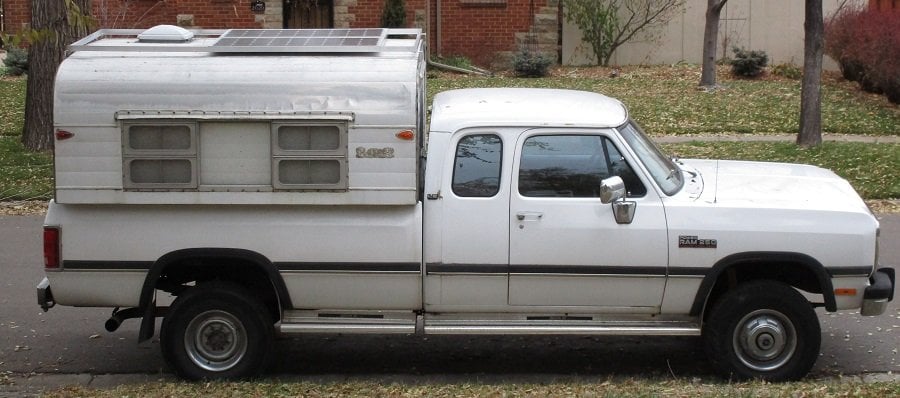
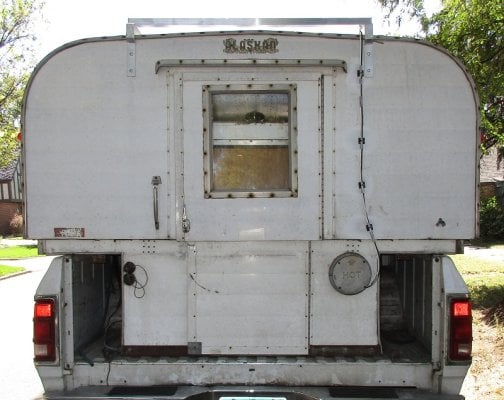
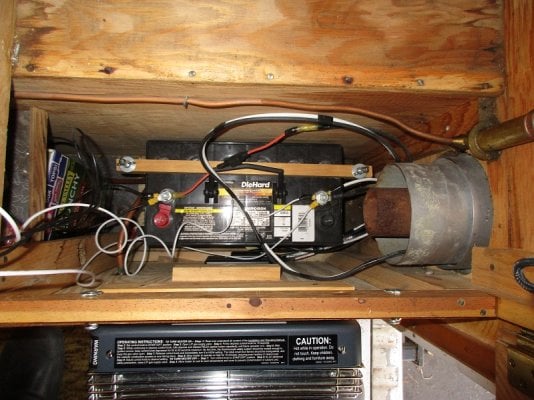
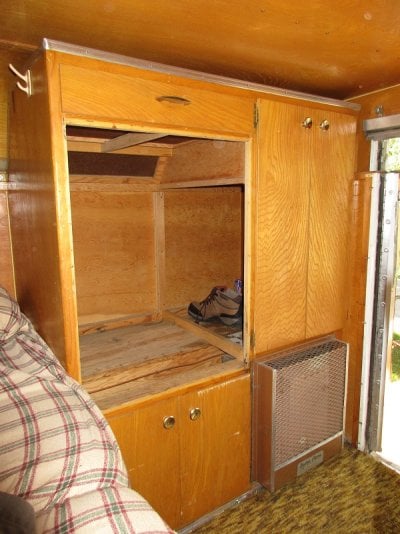
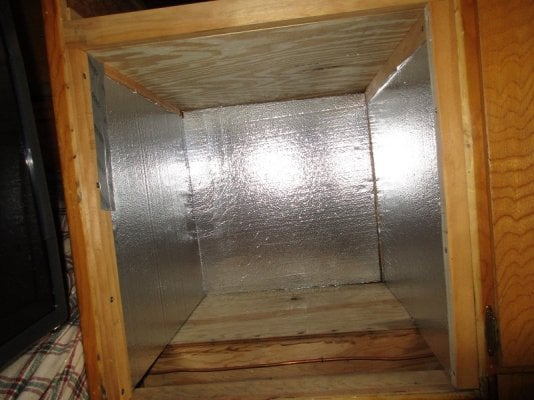
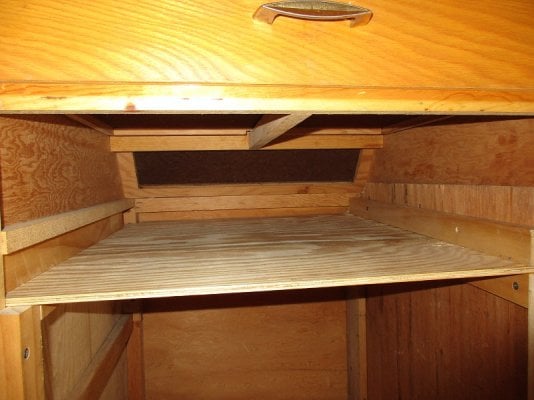
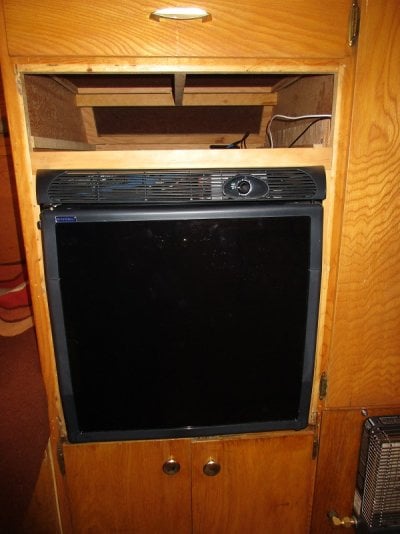
[SIZE=12pt]This past September I upgraded my 1966 8 foot long non cab-over (NCO) Alaskan camper by replacing the original ice box with a new Engel 60 quart (2.2 cu. ft.) capacity 12 volt electric built-in refrigerator, model SB 70F. To power the refrigerator, I removed the Hyrdo-Flame furnace and in its place installed a Sears Die Hard group 31M Absorbent Glass Mat (AGM) Marine battery along with two 100 watt solar panels to recharge it. [/SIZE]

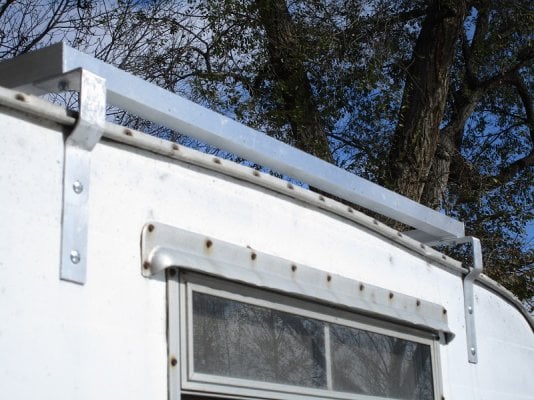
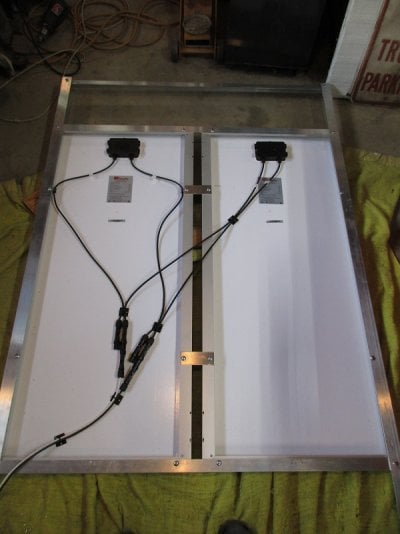
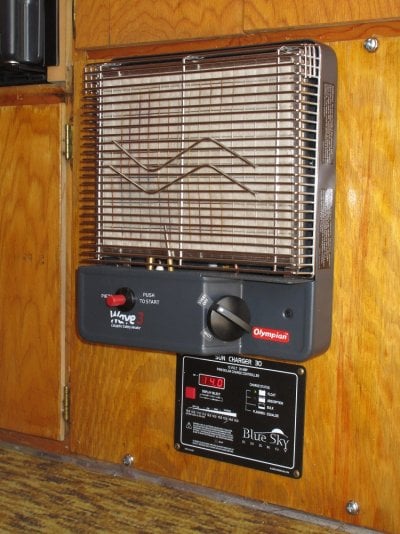
[SIZE=12pt]The solar panels are installed above the roof on a custom aluminum frame mounted to new front and rear boat rack brackets copied from originals. The solar panels electric output is regulated by a Blue Sky Sun Charger 30 Pulse Width Modulated (PWM) controller. The furnace was replaced with an Olympian Wave 3 (3000 BTU) catalytic heater. In a series of posts in this thread, I will discuss the installation in reasonable but not excruciating detail. Due to forum and photograph file size limitations, the story will be told in a series of small posts. I hope you enjoy it. [/SIZE]
 

Attachments

  • before with ice box and furnace low res.jpg
    before with ice box and furnace low res.jpg
    174.2 KB · Views: 776
  • after with new appliances installed.jpg
    after with new appliances installed.jpg
    192.8 KB · Views: 787
[SIZE=18pt]Two 100 watt solar panels[/SIZE]

[SIZE=12pt]From rough back of the envelope calculations, I determined that two 100 watt solar panels should be adequate in sunny Colorado and adjacent western states for recharging the Group 31M AGM battery that powers the Engel 12 volt refrigerator. The Engel is very efficient, using from 0.7 to 2.5 amperes per hour to operate. Once cooled down to operating temperature around 4 hours after being turned on, the Engel cycles on for a minute or two every 10 minutes or so, depending primarily on ambient temperature and the coldness setting. [/SIZE]

[SIZE=12pt]After reviewing numerous solar panels on-line, I purchased two model SF100 panels from AM Solar of Springfield, OR (www.amsolar.com) at a combined price of $279.99 plus shipping. Each panel can produce 5.55 amps at 18.0 volts under optimal laboratory conditions, 21.6 volts @ open circuit and 5.93 amps @ short circuit. I reduced the first set of specifications by 20% to approximate real world conditions. Size was also a factor. Each panel is 47.25 inches long, 21.25 inches wide and 1.38 inches high. Their combined length and width readily fits within a rectangle defined at each corner by the Alaskan’s boat rack brackets. [/SIZE]
 

Attachments

  • Side view of W250 w solar panels.jpg
    Side view of W250 w solar panels.jpg
    149.6 KB · Views: 592
[SIZE=18pt]Fabricated boat rack brackets[/SIZE]

[SIZE=12pt]Rather than drill holes in the roof to mount the solar panels, or anchor them on the roof with feet secured with 3M double-side tape, I choose to build a suspended mounting frame because it gave me the most flexibility to change or upgrade the panel mounting system if necessary. It also used mounting points already built into the Alaskan, so no Alaskan was harmed in the process. Since my Alaskan didn’t come with the boat rack brackets, I made four of them using 1-1/2 inch wide x 1/8 inch thick x 4’ long aluminum strap cut into four 1 foot lengths then bent into shape based on measurements from a friend’s original boat rack bracket. [/SIZE]

[SIZE=12pt]I drilled the two mounting holes in the bracket (that uses the carriage bolts which hold the hydraulic cylinders to the Alaskan’s top) so the bracket’s flat horizontal top was 1-3/4” above the roof where it was installed. This allows the solar panel frame cross members to clear the slight arch in the Alaskan’s roof. [/SIZE]
 

Attachments

  • boat rack brackets home made.jpg
    boat rack brackets home made.jpg
    230 KB · Views: 466
[SIZE=18pt]Custom solar panel frame [/SIZE]

[SIZE=12pt]After viewing various solar panel mounting methods on the internet, I chose to make the solar panel mounting frame out of stock pieces of aluminum angle for lightness, weather and rust resistance, and to compliment the Alaskan’s outer skin. [/SIZE]

[SIZE=12pt]For the front-to-rear 8’ rails I chose 1-1/2” x 1-1/2” x 1/8” x 96” long aluminum angle with the open angle facing inwards from each side to protect and strengthen the aluminum sides of the solar panels. For side-to-side cross members I used slightly smaller 1-1/4” x 1-1/4” x 1/8” aluminum angle cut to fit. The cross members were mounted on top of the bottom flange of the larger front-to-back side rails so their top edges were very close (1/8”) to the top edges of the side rails. [/SIZE]

[SIZE=12pt]I built the frame so the side rails were centered on the boat rack brackets, whose location were a given. This resulted in a clear span of 43-3/4” between the side rails, which easily accommodated the combined 42-1/2”width of the two solar panels. The extra 1-1/4” space was left between the inside edges of the solar panels for air to cool them and to help clear their tops of debris, rain and snow. The frame is assembled with machine screws and locking hex nuts so it can easily be reconfigured if necessary. [/SIZE]

[SIZE=12pt]The 96” length of the frame can accommodate two solar panels end-to-end, so if the two present 100 watt solar panels prove inadequate to recharge the battery, they can be moved forward from their present positions and a third 100 watt solar panel can be added in the rear opposite the Alaskan’s roof vent. So far a third solar panel seems unnecessary, but the space is available if later needed. Because the side rails are not a rigid vertically as I imagined, even with the solar panel bolted to them, I will add rubber bumpers at the midpoint of each side rail to keep them from flexing during travel and possibly succumbing to metal fatigue. [/SIZE]
 

Attachments

  • Solar panels in brackets on roof low res.jpg
    Solar panels in brackets on roof low res.jpg
    162.6 KB · Views: 495
[SIZE=18pt]Wiring on bottom of solar panels[/SIZE]

[SIZE=12pt]AM Solar sells nifty 1” square plastic bases for zip ties that have double-sided tape on their bottom for running and securing wires. I used these to route and hold the solar panel output wires to the bottom of the solar panels when installed on the frame. I also used them to secure the output wires as they ran down the rear of the Alaskan to enter it through the old furnace vent. These bases can be removed if necessary, but otherwise are very solid once installed. [/SIZE]

[SIZE=12pt]The two panel’s output wires were combined using waterproof MC4 branch connectors. Along the rear end the wires were attached to the side rails using looped wire clamps bolted to the frame rails. I routed the output wires through the old (otherwise unused) furnace vent and left 2-1/2’ of slack wire inside the Alaskan, which can be fed outside through the furnace vent to allow the top to be fully raised. Once I determine the number of solar panels required so their wiring can become permanent, I will run the output wires through the top of the Alaskan’s rear panel for a cleaner installation. [/SIZE]
 

Attachments

  • back of panels w wiring secured.jpg
    back of panels w wiring secured.jpg
    141.1 KB · Views: 461
  • Rear of Alaskan w mounting brackets and wiring low res.jpg
    Rear of Alaskan w mounting brackets and wiring low res.jpg
    204.7 KB · Views: 594
[SIZE=18pt]Blue Sky Sun Charger 30 PWM controller [/SIZE]

[SIZE=12pt]I determined the Blue Sky Energy Sun Charger 30 Pulse Width Modulated (PWM) solar charge controller would be adequate for my limited purposes. A slightly more efficient 30 ampere Maximum Power Point Tracking (MPPT) controller was available for $99 more, but I could get far more additional charging amperage by adding a third SF-100 watt solar panel for $155 plus shipping than I could tweak out of the two existing SF-100 watt solar panels with the slightly better MPPT controller. So I bought the more basic PWM controller from AM Solar and added a temperature compensation sensor for $30. So far I haven’t needed the third solar panel. [/SIZE]

[SIZE=12pt]The Sun Charger 30 is mounted inside the Alaskan below the catalytic heater on a wood panel that covers the large hole where the old propane furnace was installed. The controller is mounted below the catalytic heater because the heater must be installed a minimum of 4” above the floor, which left no room above it for the controller. The controller, by contrast, could be mounted anywhere. I screwed the controller to the panel then wired it before screwing the panel onto the lower right rear of the Alaskan interior. The heater sticks out further from the panel and thus protect the controller. The controller is easily readable when standing outside the Alaskan with the door open, which occurs whenever one enters or exits the Alaskan. If necessary, it can also be read indoors by getting down on one’s knees. For more details on and specifications for the controller, please visit AM Solar’s web site[/SIZE]
 

Attachments

  • Sun Charger 30 close up low res.jpg
    Sun Charger 30 close up low res.jpg
    198.7 KB · Views: 385
[SIZE=18pt]Sears Die Hard Marine AGM Battery [/SIZE]
[SIZE=18pt] [/SIZE]
[SIZE=12pt]A few years ago I had purchased a Sears model 50131 Die Hard Group 31 Platinum Marine AGM (absorbent glass mat) battery and wanted to buy another for the Alaskan. But that battery had recently been discontinued and was no longer in stock, so I bought instead a new Sears Die Hard Advanced Gold model 50033 Group 31M Marine AGM battery. The 50033 has 725 cold cranking amps (CCA), mostly irrelevant to running a 2.5 ampere refrigerator, but more importantly has a Reserve Capacity of 185 minutes and a 20 AH rating of 105 minutes, slightly better than the 100 minute AH rating for the discontinued model 50131. And at $199 it cost $80 less than the 50131. However, this new model 50033 battery still does not yet appear on Sears’s web site so I cannot learn much more about it. So far it has performed just fine. [/SIZE]

[SIZE=12pt]The new Group 31M model 50033 battery is 13” long, 6.8” wide (or deep) and 9.5” high. It easily fits into the lower storage cabinet space along each bottom side of the Alaskan, with an inch to spare depth wise. I installed my battery behind the new wood panel where the old furnace used to be. It is held in place by stops at each end made from 1’ x 2” wood and is held down tightly by a wood brace lengthwise across the top secured by wing nuts on threaded rods front and rear. It sits right behind the charge controller to minimize wire lengths[/SIZE]
 

Attachments

  • Sears battery installed low res.jpg
    Sears battery installed low res.jpg
    232.9 KB · Views: 552
[SIZE=18pt]Olympian Wave 3 catalytic heater. [/SIZE]

[SIZE=12pt]A 1500 to 3000 BTU Wave 3 catalytic propane heater replaced the old Hydro Flame propane furnace. I use a Wave 8 (8000 BTU) catalytic heater in my vintage Airstream travel trailer and really like it. Both heaters are over 99% efficient and heat primarily by radiation and secondarily by convection of cabin air. The old Hydro Flame furnace vent is open to the outdoors and the Alaskan’s perimeter weather seals all need replacing, so there is plenty of fresh intake air to run the heater safely. After the perimeter seals are replaced and the solar panel wires moved to a new tighter entry point, I need only open the roof vent ¼” to have adequate air flow for safe heater operation.[/SIZE]
 

Attachments

  • Olympian low res.jpg
    Olympian low res.jpg
    329.8 KB · Views: 344
[SIZE=18pt]Baby upright propane tanks [/SIZE]

[SIZE=12pt]I had purchased a used but decent 8’ long low side (19-1/2” tall) utility body to replace the pickup body on my 1992 Dodge W250 truck. Beside abundant additional locked storage, another benefit of the utility body is that one can store one or two replaceable 20 pound propane tanks and a regulator out of sight in a locked rear compartment and easily run a propane line from them inside the Alaskan. But the utility body I bought would have to be sand-blasted and painted before being installed on my Dodge, a costly proposition. Thankfully I came up with an alternative to using 20 pound propane tanks that can be swapped empty-for-full at most large grocery stores.[/SIZE]

[SIZE=12pt]My favorite Denver propane dealer, AAA Propane in Wheat Ridge, CO, stocks and sells smaller 11 pound propane tanks that are about half the size of the 20 pounders and are about 18” tall. Because my Alaskan is not centered in my pickup bed, the gap between it and the sidewalls is greater on the passenger side than the driver side. These small 11 pound tanks fit into the empty space there between the Alaskan’s lower half and the pickup body inside panel. [/SIZE]

[SIZE=12pt]I traced the round raised bottoms of both small propane tanks onto a plywood board and cut out those circles to have recessed that hold the tank bottoms in place. I screwed the plywood into the pickup bed floor. Next I installed 3 footman loops onto the interior side panel of the pickup bed to the rear, center and front of the two tanks. After removing the “S” hooks from both end of the ratchet strap, I placed the closed end of the long 1” wide strap onto the front footman loop and screwed the footman loop to the pickup bed side panel. Next I threaded the strap through the middle footman loop centered between the two tanks. I mounted the loop for the short strap on the ratchet end in the rearmost footman loop so the ratchet assembly was readily accessible from the rear of the truck. Tightening the ratchet strap keeps both propane tanks tight against the pickup bed interior panel. [/SIZE]

[SIZE=12pt]The regulator is a small single tank regulator I attach to the rearmost propane tank. The second forward tank is a spare full tank. When the rear tank becomes empty, I’ll place it in the truck’s cab as a reminder to fill it at the next propane dealer I see and hook up the full spare tank to the regulator. After filling, the former empty tank will become the full spare tank stored in the forward position. Because the Alaskan’s propane inlet hose was on the other (driver) side of the Alaskan, I ran a long rubber propane hose across the rear of the truck just above the rear step bumper to connect the regulated tank to the propane inlet hose. The only propane appliances inside the Alaskan are the Wave 3 catalytic heater and the original 3 burner propane stove top, so I expect the two 11 pound propane tanks to be sufficient for long term use while camping or exploring. [/SIZE]
 

Attachments

  • Propane tank strapped in.jpg
    Propane tank strapped in.jpg
    164.1 KB · Views: 424
  • Propane tank plywood base.jpg
    Propane tank plywood base.jpg
    170.9 KB · Views: 419
[SIZE=18pt]Engel 12 volt refrigerator model SB70F[/SIZE]

[SIZE=12pt]The Engel SB70F is a 12 volt (DC only) 60 quart capacity electric refrigerator. Size matters in an Alaskan. After removing the original ice box, the remaining opening for a refrigerator was 26” high x 20-1/2” wide x 24” deep. Due to the sloped rear top of the empty ice box compartment, a very deep refrigerator could not stand as tall at its rear as on its front, so I had to select a refrigerator that was shorter than 26 inches. The Engel’s exterior dimensions are 19.9” wide, 20.9” tall and 23.1” deep. It‘s built-in dimensions are 18.5” wide X 20.5” tall X 20.7” deep. It easily fits into the empty ice box space. [/SIZE]

[SIZE=12pt]The Engle uses a swing motor for the compressor. It has received favorable reviews online, sipping energy although a few people noted a low hum when operating. The swing motor/compressor is very efficient, drawing a maximum of only 2.5 amperes per hour when operating and usually running well under that maximum. Its efficiency ranges from drawing only 0.6 amps per hour in a 77º ambient temperature while running only 25% of the time, to drawing 1.2 amps per hours in a 95º ambient temperature running 40% of the time, to drawing its maximum 2.5 amps per hour in a 113º or higher ambient temperature when running 100% of the time. Since I plan to camp mostly at higher elevations in the dry Rocky Mountain West with lower ambient temperatures, these performance figures are very acceptable for my 200 watt solar system. [/SIZE]

[SIZE=12pt]During the hottest summer months the sun is higher overhead in the sky and the days are longer, beaming more photovoltaic energy down on the solar panels to recharge the battery longer during the hottest season of heaviest draws. So far my 200 watt solar system has proved itself more than adequate. During the last week of September 2015, the two 100 watt solar panels kept the Sears battery fully charged while I was out jeeping in central Colorado. The Engel control knob was set at 3.5 out of 5 positions and kept the food and beer inside very cold while also making ice in the small freezer compartment. [/SIZE]
[SIZE=12pt] [/SIZE]
[SIZE=12pt]To increase cooling retention, both sides and the back of the refrigerator compartment were filled with reflective coated foam board cut to fit in place. The space above and below the Engel was not insulated because they must be kept open for ventilation air flow. I installed a shelf across the top of the refrigerator compartment to create a roof below and a cubby hole above for storage. Two cigarette lighter type 12 volt electrical outlets are wired there for recharging my cell phone and laptop from the battery. A small raised lip across the front of the cubbyhole prevents things from sliding out when traveling. [/SIZE]
 

Attachments

  • ice box removed low res.jpg
    ice box removed low res.jpg
    214.1 KB · Views: 525
  • foamboard insulation in fridge compartment low res.jpg
    foamboard insulation in fridge compartment low res.jpg
    197.2 KB · Views: 509
[SIZE=18pt]Engel SB70F installation[/SIZE]

[SIZE=12pt]Wiring, installing and screwing the Engel in its space was easy and straightforward. When my head is beside it while laying down on the bed, I can hear the deep rumble when awake, but it never woke me up once asleep. When my head is at the opposite end of the bed, next to the sink, the low rumble is barely noticeable at all. You have to strain to hear it in this later sleeping position. [/SIZE]

[SIZE=12pt]I’m very pleased with the off-the-grid performance of my Engel refrigerator and the 200 watt photovoltaic solar panel system that keeps it running 24 hours a day. [/SIZE]
 

Attachments

  • new ceiling to refrigerator compartment low res.jpg
    new ceiling to refrigerator compartment low res.jpg
    182.3 KB · Views: 357
  • Engel installed with cubbyhole above low res.jpg
    Engel installed with cubbyhole above low res.jpg
    164.6 KB · Views: 389
[SIZE=18pt]Other uses for the 12 volt electrical system [/SIZE]

[SIZE=12pt]When camping or exploring I prefer to live outdoors as much as possible, so I use the Alaskan like an over-the-road trucker might use the sleeper compartment on his 18 wheeler, only for sleeping and storing food. So I never raise the top as I don’t need the extra headroom; I love it lowered because it makes me feel as snug as a bug in a rug. [/SIZE]

[SIZE=12pt]When sitting up in bed with the Alaskan top in its lowered position, I had often hit my head on original 5” tall 110 volt AC kitchen light that was centered above the dinette. So I removed it and replaced with a much thinner 12 volt LED round light sold for RVs. The new LED light is not yet wired into my 12 volt electrical system but I may, or may not, get around to doing to that next spring. Frankly, the new LED ceiling light is not really needed as I use a small 12 volt magnetic puck flashlight from Harbor Freight as my interior light while getting ready for bed. It is more than sufficient, and I no longer conk my head on the old kitchen light’s glass globe. [/SIZE]
[SIZE=12pt] [/SIZE]
[SIZE=12pt]Eventually I may also rewire the 110 volt AC cone lamp on the left rear top wall above the stove top for 12 volts. But again, I’m in no hurry because I haven’t yet seen any real need for light from that source. The Harbor Freight magnetic punk LED flashlight are cheap and easy to use. Unlike a fixed light source, they can be moved to wherever light is needed, a real benefit. Simple is good. [/SIZE]
 

Attachments

  • 12 volt LED ceiling lamp.jpg
    12 volt LED ceiling lamp.jpg
    209.3 KB · Views: 224
when you get tired of bumping your head...take a couple strokes on the pump and pin the top up part way up...just enough to clear the noggin

I'm watching the electrical threads...I've got a couple panels waiting to be installed this winter on the new CO
 
Rusty:

Thanks for your suggestion to raise the top just a bit to its lowest position for more headroom. But I forgot to mention that with the more flush LED ceiling light replacement I no longer bump my head on it. Being 5' 6", I've also always been able to sit up on the edge of the (dinette made into a) bed without my head hitting the ceiling. So all is comfortable.

I used 10/2 stranded wire to connect the two 100 watt solar panels to the Blue Sky Sun Charger 30 PWM controller. I could not find stranded wire in that paired gauge locally in Denver so I ordered it from AM solar, who has it made to order for some of their smaller solar panel installations.
 
After driving around a while, I became concerned that the inherent flex in the two aluminum angle side rails over the 8 foot long clear span might eventually weaken their metal around the drilled holes, causing them or the solar panels to become detached somehow. So to minimize flexing up and down while underway at speed, I installed two rubber bumpers midway on each side to put a slight positive arch into each side rail to prevent it from vibrating up and down. A friend who works on trucks gave me these rubber bumpers. Each one is 2-1/2 inches in diameter across its bottom base, 2-3/8 inches in diameter across its rounded top, and 1 inch high. The center is hollowed out about 1/2 inch deep, leaving 1/2 inch of material across the entire base. There is a 7/16 inch wide hole in its bottom.

To get the necessary height to put a slight positive arch in the side rails, I stacked two bumpers one on top of the other, both upside down so the 2-1/2 bases were at the top of each bumper. I placed a 2-1/2 inch diameter large washer above the upper bumper mostly to keep the sun off it, but that seems unnecessary as the bumpers are mounted mostly underneath the side rail and solar panels, out of direct sunshine.

The bumpers appear to be doing their job as the side rails no longer flex when shaken vertically from near their rear ends. So far the bumpers have not pounded round indentations into the aluminum camper top where they touch it. So it appear this dampening solution works. Here are two photos of the bumpers, as acquired and installed. Enjoy!
 

Attachments

  • rubber bumper as acquired.jpg
    rubber bumper as acquired.jpg
    233.3 KB · Views: 207
  • rubber bumpers midway on side rails.jpg
    rubber bumpers midway on side rails.jpg
    225.8 KB · Views: 212
Denver Alaskan - I really want to thank you very much for the time and effort you've put into describing your heating, electrical, and refridgerator additions to your camper. I'm just beginning my summer project of rebuilding or refinishing my "new" early-model, 8 foot Alaskan camper and this information is invaluable to me.

I appreciate the level of detail (and the photos) that you've included in your descriptions.

Thank you!
 
Back
Top Bottom