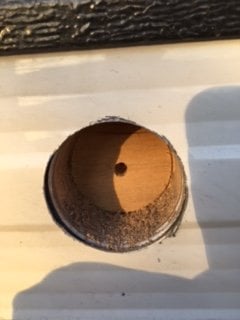
well, yesterday was the best weather we seen in a few weeks thanks to so cal rain this year. so before I tore into some pacificos and bbq I decided to relocate my noco ac port to the rear of camper outside. so I can lock up the camper while being plugged into the noco dual bank charger. I originally installed it in the little box compartment inside where I installed the 12v and usb ports. but I did not like leaving the door open for 8 to 10 hours. its amazing how many layers are on these campers. ans how well built they are.
You are using an out of date browser. It may not display this or other websites correctly.
You should upgrade or use an alternative browser.
You should upgrade or use an alternative browser.
external ac port install
- Thread starter tree
- Start date
CougarCouple
Senior Member
Good job tree.
Russ
Russ
Yukon
Senior Member
Congratulations. Kind of scary when you first start drilling big holes. Chris
ya, it freaked me out at first. but I researched the heck out of that location. and test drilled. I knew the wiring went the other direction. just didn't want to drill though a piece of frame. it looks ugly in the pics. but after the sealant dried it looks fine. and works great. im glad I did it.
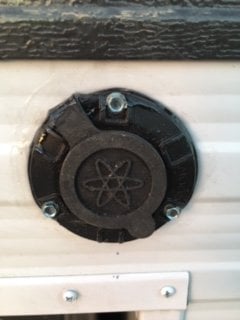
That looks like a NOCO 15 amp port. Don't most FWC come with a 30 amp port? I'm looking at the Marinco ones... yike$$$$
Vic,
I am planning a Marino 30 amp (I have one in the "archives" anyway) The way they mount from the outside requires some sort of box or surround that attaches to something solid (frame or brackets to cabinet?) A faceplate with appropriate hole attached to the box and against the inside of the aluminum skin for an attach point that is solid.
I would certainly be interested in any ideas or how you manage if you do go the Marino route. Btw, Defender Indusries in the states has some of the best prices for marine stuff I have seen. Service and shipping first rate as well. No affiliation with them but have bought quite a bit of stuff for boats there. Might be worth a look.
cheers
This is the one I am looking at. It just requires a round hole and 4 screws. Ideally into something more than thin sheet metal.BrianW said:Vic,
I am planning a Marino 30 amp (I have one in the "archives" anyway) The way they mount from the outside requires some sort of box or surround that attaches to something solid (frame or brackets to cabinet?) A faceplate with appropriate hole attached to the box and against the inside of the aluminum skin for an attach point that is solid.
I would certainly be interested in any ideas or how you manage if you do go the Marino route. Btw, Defender Indusries in the states has some of the best prices for marine stuff I have seen. Service and shipping first rate as well. No affiliation with them but have bought quite a bit of stuff for boats there. Might be worth a look.
cheers
http://www.defender.com/product3.jsp?path=-1|328|2290035|2290039&id=52601
Still over $80 USD, even on sale.
billharr
Senior Member
Stainless is nice but you have an aluminum camper. I purchased mine from FWC when I did my build. 30 amp twist lock, plastic and can be bought under $20.00 I located my hole where the heater vent was, I moved the heater. For the heater I build a frame of 1" sq alum tube, secured everything with pop rivets.Vic Harder said:This is the one I am looking at. It just requires a round hole and 4 screws. Ideally into something more than thin sheet metal.
http://www.defender.com/product3.jsp?path=-1|328|2290035|2290039&id=52601
Still over $80 USD, even on sale.

This is the bracket I made for my water fill, same idea. Do not have a pic of the heater bracket I made.

Tree,
I realized after posting that I had hi-jacked your install thread. My apologies for that. How thick was the wall of the camper where you installed your AC port? (It's not obvious from the pic but that is on the rear wall, yes?)
My plan is for the side wall, driver's side. Theory being a nice bright yellow cable sticking out on that side would be visible getting behind the wheel or in the mirror and make it a little more difficult to drive away while plugged in. Just a theory......
I am for the moment trying to not tear the interior out any more than I have to. Would rather not pull the liner out on that side to install the port. Takes some nerve to drill a hole that size thru the unknown - nice job you did there!
Vic,
Yeah the stainless is $$$$. I have a plastic one so that will do. I like the fact that the marine receptacles are completely water tight even plugged in. A little peace of mind I guess. And yes, the issue with those is getting a solid backing immediately behind the aluminum skin to attach to....
cheers
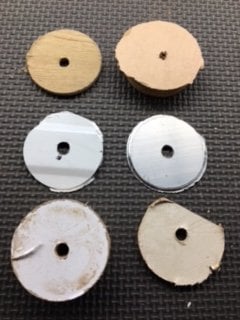
no worries, thread is for info. its at least 2 inch total. i can take better pics. my hawk shell did not come with ac port. a palomino i looked at did in the same price range. but i was dead set on FWC. the port works great. amp is fine. i only have a noco charger plugged into it. nothing else. zamp inverter does the other jobs. i miss my honda 2000 genny. but dont need it yet with noco and solar. but at least with an external ac port now i can run a generator at night if needed for heater ect.BrianW said:Tree,
I realized after posting that I had hi-jacked your install thread. My apologies for that. How thick was the wall of the camper where you installed your AC port? (It's not obvious from the pic but that is on the rear wall, yes?)
My plan is for the side wall, driver's side. Theory being a nice bright yellow cable sticking out on that side would be visible getting behind the wheel or in the mirror and make it a little more difficult to drive away while plugged in. Just a theory......
I am for the moment trying to not tear the interior out any more than I have to. Would rather not pull the liner out on that side to install the port. Takes some nerve to drill a hole that size thru the unknown - nice job you did there!
Vic,
Yeah the stainless is $$$$. I have a plastic one so that will do. I like the fact that the marine receptacles are completely water tight even plugged in. A little peace of mind I guess. And yes, the issue with those is getting a solid backing immediately behind the aluminum skin to attach to....
cheers
Tree,
Thanks for the info - 2" wall thickness sounds like a lot! (well built). I measured the thickness of the side wall at the battery box vent as best I could and it was more like 1" if memoory serves - will have to double check that for sure.
My plan is for a charger and one outlet for a portable ARB fridge/freezer. It runs on ac or 12v dc so might as well have both available while plugged in, right? After all, how hard could it be to run a single ac circuit......... (I say that knowing full well that I will find out )
Brian
BrianW said:Tree,
I realized after posting that I had hi-jacked your install thread. My apologies for that. How thick was the wall of the camper where you installed your AC port? (It's not obvious from the pic but that is on the rear wall, yes?)
My plan is for the side wall, driver's side. Theory being a nice bright yellow cable sticking out on that side would be visible getting behind the wheel or in the mirror and make it a little more difficult to drive away while plugged in. Just a theory......
I am for the moment trying to not tear the interior out any more than I have to. Would rather not pull the liner out on that side to install the port. Takes some nerve to drill a hole that size thru the unknown - nice job you did there!
Vic,
Yeah the stainless is $$$$. I have a plastic one so that will do. I like the fact that the marine receptacles are completely water tight even plugged in. A little peace of mind I guess. And yes, the issue with those is getting a solid backing immediately behind the aluminum skin to attach to....
cheers

Bill,billharr said:Stainless is nice but you have an aluminum camper. I purchased mine from FWC when I did my build. 30 amp twist lock, plastic and can be bought under $20.00 I located my hole where the heater vent was, I moved the heater. For the heater I build a frame of 1" sq alum tube, secured everything with pop rivets.
I saw that pic in your thread and wondered about the source! But that link you posted above goes to an article on lane splitting. Have you got another link?
Vic
billharr
Senior Member
Lane splitting is a good thing. But this is the link you wanted. http://www.etrailer.com/RV-Wiring/Epicord/277-000137.html
Thanks for the pic tree - definitely pushing 2". The Marinco plug has the wire exiting the rear of the inlet at a right angle (parallel to the wall surface) at about 1 1/2"..... I may not get to recycle the port after all. If the side wall is the same, that is.
B
B
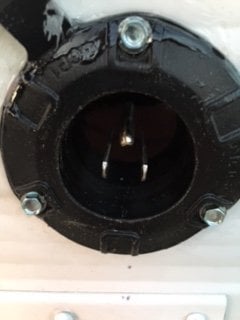
noco has the wire at a sharp angle as well. had to use a 1/2 drill bit on the inside to hog out a path for the cable. and im thinking the thickness from front flange to the cable is 1 1/2 as well for the noco. after drilling a path above, the cable cleared, and I was able to get the lid on that compartment with no issues.Thanks for the pic tree - definitely pushing 2". The Marinco plug has the wire exiting the rear of the inlet at a right angle (parallel to the wall surface) at about 1 1/2"..... I may not get to recycle the port after all. If the side wall is the same, that is.
B
mods so far to date, mods to come
1. onboard charger 1. rear rack
2. inverter 2. side awning
3. ac port 3. front rack with lightbar
4. 12volt port 4. rugged radio base setup
5. rear flood light 5. rv/marine stereo
6. reflectix thermal lining 6. air condition?
7. led exterior and interior lights
8. power panel
1. onboard charger 1. rear rack
2. inverter 2. side awning
3. ac port 3. front rack with lightbar
4. 12volt port 4. rugged radio base setup
5. rear flood light 5. rv/marine stereo
6. reflectix thermal lining 6. air condition?
7. led exterior and interior lights
8. power panel
Where exactly did you drill the 2" hole? Was it just to the right of the door? How far from the door or from the right edge of the camper? How far from the bottom of the camper? My purpose is to plug in the AC to a outside source with the Noco electrical fitting.
Thanks in advance for your reply.
Thanks in advance for your reply.
Best bet is to pull off the inside siding and take a look at what you have to work around. Either that or drill 1/16" holes to get a "feel" for the layout.
Similar threads - WTW
- bkf6363
- Four Wheel Camper Discussions
- Replies: 9
- Views: 644
- Jon R
- Four Wheel Camper Discussions
- Replies: 8
- Views: 557
- Hiker9
- Four Wheel Camper Discussions
- Replies: 6
- Views: 464