Eyebolt Source

Hi Guys,
Newbie here. I purchased my new Eagle in July and have had lots of enjoyment since.

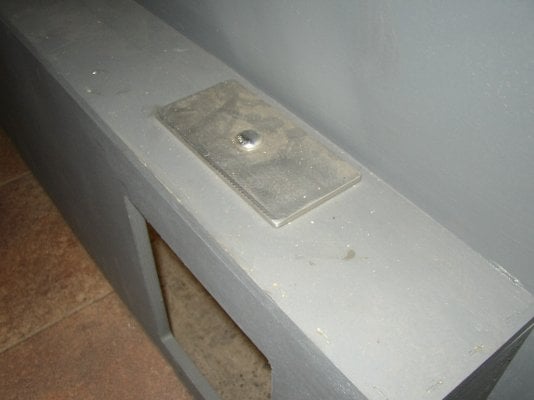
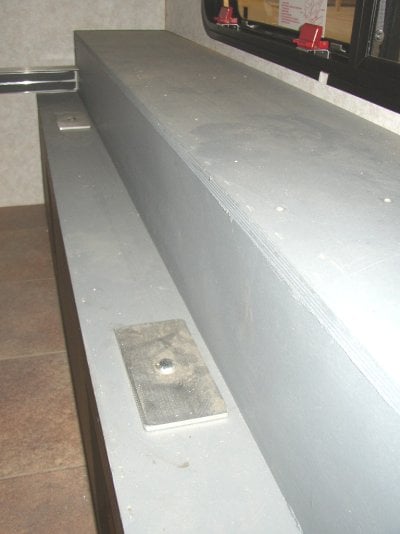
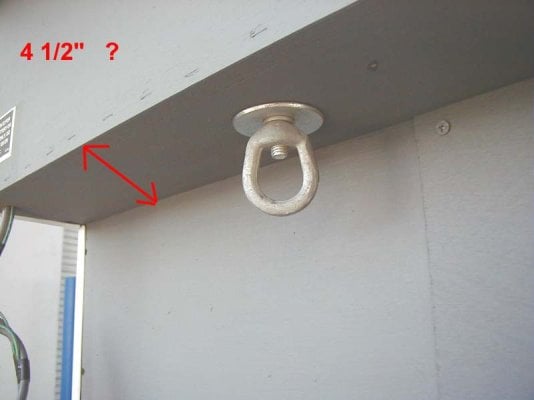
Just food for thought on the aluminum camper frame flex and tie down bolts. Has anyone watched while jacking up their camper see how much the camper flexes? Mine does about 3/8" before one jack leaves the ground and then watch how much an empty pickup bed flexes when driven through a ditch diagonally, maybe 2-3" or even more? My point is the camper frame sheeted with plywood is not going to flex all that much and the pickup will. So, something has to give and it will always be the weakest link. Personally, I think that mounting the tie down bolts in plywood makes sense with it being much easier to repair than replacing bent up aluminum tubing in the camper. Some sort of tie downs on one end or the other of the camper that would allow an inch or so of movement would be the ticket. A lot of big trucks, usually tank trucks, are bolted solid in the rear around the suspension and some springs or something in the front to allow frame movement under the rigid tank.

Headed up the Mt. Baker for three days this morning :)

Happy camping
 
Received my plates from Terry at FWC. He sent the plates and bolts only. I am looking into doing this repair soon, and was wondering what everyone was doing with the plate protruding upwards into the finish wood. It looks to me that the finish wood lies flat on the area of repair. ??
 
Hey there

I'm not sure what problem you were having ?

Did an eye nut in the camper base break ?

Or are you just "beefing up" the existing eye nuts in the camper base ?

Just let me know how I can help?

Would be glad to help walk you through it with details and pictures.

:)

Thanks !


.
 

Attachments

  • Eye Nut # 11.JPG
    Eye Nut # 11.JPG
    137.7 KB · Views: 177
  • Eye Nut # 15.JPG
    Eye Nut # 15.JPG
    166.4 KB · Views: 194
  • eye nut.jpg
    eye nut.jpg
    28.7 KB · Views: 179
Stan,
Thanks for your response. I am looking at beefing up the existing holes. When the turnbuckles are tighten it starts to pulls the "elevator" bolt through and you hear wood start crunching...I am using 4 spring loaded turnbuckles at the moment to the jack bracket.
...Camper is a 07 Grandby.
 
Got the plates installed today. Pretty easy job. However I am still stumped on what everyone is doing with the bolt heads that are on the couch side. The long narrow piece of wood won't lie flat now that the plates and rounded bolt heads are there...what to do?
 
Brian,

I made my own support plate a couple years back. I ended up routering out the bottom side of the wood that sat over the plate and bolt head. When I was done everything sat flush with no issues. I will look to see if have any pics.
-Chris
 
Brian,

I made my own support plate a couple years back. I ended up routering out the bottom side of the wood that sat over the plate and bolt head. When I was done everything sat flush with no issues. I will look to see if have any pics.
-Chris


Chris,
Thanks for your response. I did exactly what U said to do. Routed out the wood so it would lay flat. I used a dremel tool to do this. Worked out good. Overall an easy job. Thanks again.....Now what to do with this leaky pass thru window..?
 
What year did FWC add the metal backing? I have an '08.


Ok, I was poking around an I see that my 08 Hawk has aluminum plates. The bolt head feels like it's one of those elevator bolts. I can't really see it very well.

BTW, my turnbuckles seem to stay tight, with only a small amount of movement on one of them, since I added a nylock wingnut to the RH thread side of each 'buckle.
 
Unfortunately I have to revive this topic. Just came back from a trip and noticed I snaped another eyebolt this time on the driver side and at first glance it looks like the access will be more difficult. Before I start pulling up the carpet thought I would get some advice, anyone had to replace your eyebolt on the driver side. What the best way to not destroy the carpet??

I replaced both eyebolts on the passenger side, piece of cake, no access issues. But on the driver side of the camper it's difficult to tell exactly where the bolt is located under the carpet and cabinets and I dont want to damage anything before I start. Now my rant...FWC SHOULD have used high quality bolts in the first place, Ive already replaced all 4 turnbuckles and had to get a thicker mounting bar after bending the original from FWC. In other words every piece of equipement used to attach my camper to the truck has had to be replaced because they probably save 20 bucks or so.
 
I have replaced the driver side front elevator bolt and it wasn't to big of a pain. I used a screw driver and some needle nose pliers to pull the staples and lift the carpet to access the bolt, once replaced I was able to re-staple the carpet. Fortunately I have not yet broken the drivers side rear which i think would be a problem due to the cabinetry.

I think TT broke his drivers side rear bolt on our recent Baja trip so I will be watching patiently to see how he tackles it. Not sure where it sits on his Ranger.
 
Bummer. I had to replace the bolt on the front driver side on my '08 Eagle. I'm with you on the rant about the bolt quality. I bought my replacement from McMaster-Carr.

By pressing down hard I could feel where the bolt head was under the carpet. I used a sharp knife (a boxcutter would probably work better) to make a small slit in the carpet that was smaller than the head of the bolt, and gradually widened it until I could get the bolt through. I then covered the hole in the carpet with a large washer and put in the new bolt. The bolt head is now above the carpet, but it looks nice and neat.

I did try to pull up the carpet, but since it is glued, I gave up on that.

Haven't tried to access the bolt on the driver's side rear. That one is still in one piece (so far).
 
Problem solved! Just pushed up on the bolt from the bottom outside and was able to see exactly where the bolt is on the inside. A few screws removed from the bottom cabinet allowed access to the bolts directly. Replaced with high grade 8. Hopefully good for a while.


Unfortunately I have to revive this topic. Just came back from a trip and noticed I snaped another eyebolt this time on the driver side and at first glance it looks like the access will be more difficult. Before I start pulling up the carpet thought I would get some advice, anyone had to replace your eyebolt on the driver side. What the best way to not destroy the carpet??

I replaced both eyebolts on the passenger side, piece of cake, no access issues. But on the driver side of the camper it's difficult to tell exactly where the bolt is located under the carpet and cabinets and I dont want to damage anything before I start. Now my rant...FWC SHOULD have used high quality bolts in the first place, Ive already replaced all 4 turnbuckles and had to get a thicker mounting bar after bending the original from FWC. In other words every piece of equipement used to attach my camper to the truck has had to be replaced because they probably save 20 bucks or so.
 
The older FWC's did not have the aluminum backing plates we are using now.

All of the new FWC's have the aluminum backing plates installed.

:)

After installing the aluminum backing plates, the old style elevator bolts we were using became the weak point.

It was rare for the camper eye nut to snap off, but it happened from time to time.

Now that we are using the aluminum backing plates and the stronger bolts, I have not heard of any probelms.

So far, so good.

:)


This customer has a good description on an easy fix ...

EYE BOLT REPAIR THREAD


.


.


Hi Stan,

On my 2007 Eagle Shell, I have the old style elevator bolt on the rear and the new style bot on the front. This is just on the driver side.

IMG_0048.jpg
 
Back
Top Bottom