Grandby Resto-Mod on M101A3

sgiandubh

Member
Joined
Jul 8, 2013
Messages
29
Location
Tijeras, NM
Hi, Folks,

First off, thanks to all that have inspired me to get a FWC; both with tales of splendid adventures and with build/mod threads. We have done the tent camping thing for many years and in our never ending pursuit of comfort off the beaten path, we have ended up with a 12x12 Cabela's XWT outfitter tent, cots and a catalytic heater. While this setup works well, it is quite bulky and I have tired of setting up and taking down a large tent for weekend outings. The bulk was not an issue when I had my quad cab Dodge 2500, but I have since downsized to a double cab Tacoma so space is at a premium. Rooftop tents intrigued me for a while, but with a toddler and a wife who is fond of the heater, a pop-up camper seemed the best solution. FWC rose to the top as one of the makes to seek out. However, as you well know, campers that fit the Tacoma-sized trucks are few and far between on the used market. Given that I already had an M101A3 military trailer, (albeit 12 hours away at my brother-in-law's house) it seemed a plausible plan to find an older full-sized model and build to suit with the trailer in mind as a means to transport it. As a result, I had been casually looking at older FWCs for the past year or so. When a 1982 Grandby popped up 1.5 hours from me, for $500 I couldn't resist.

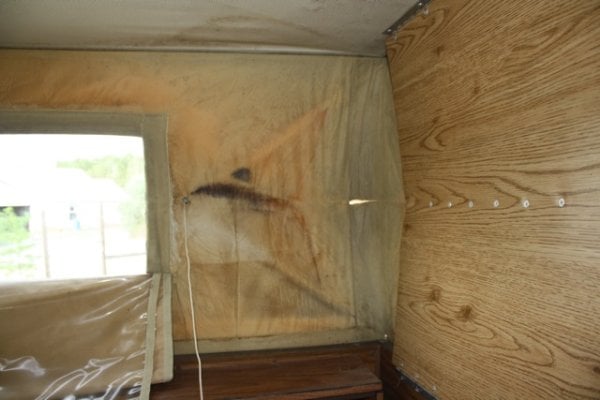
The seller was upfront about the canvas being toast, and the camper had clearly been well-used from the CL pictures. There was also mold on the lift panels which did not bode well for their condition. Yet, I was not to be deterred. So I grabbed up the Daughter, and we headed out. The camper was not in stellar condition, but after an inspection I figured it to be in good enough shape my purposes and for being 30 years old. So I gave the man his money and I was the proud owner of a 1982 Grandby, serial number 16397.

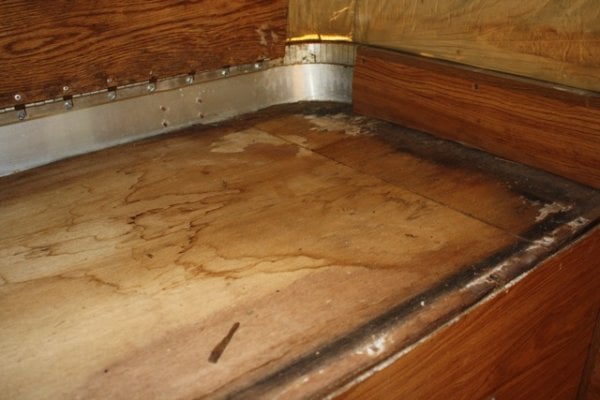
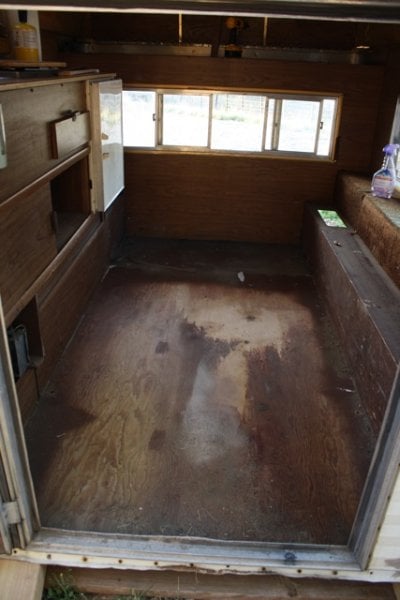
Here it is when we got it home.
IMG_1171.jpg
IMG_1172.jpg
IMG_2831.jpg


Initially, the plan was to order new canvas, give the camper a thourough cleaning and put it to use....

IMG_1174.jpg
 
Wow, a truly vintage Grandby. But... what am I seeing in that last pic? Is that the camper's floor laying there on the ground, or am I just hallucinating? I'll assume you'll be telling us more as you proceed with this hopefully fun project. Congrats on your procurement.
 
Thanks Rico! So far it has been quite a fun project. The deeper I dug trying to rid the camper of the musty/moldy smell, and general dirtiness, I found more and more evidence dictating a full on rebuild. Here's some pics of what drove the full on removal of everything but select siding.

IMG_2835.jpg
 
A couple more.
 

Attachments

  • IMG_2840.jpg
    IMG_2840.jpg
    74.4 KB · Views: 259
  • IMG_2843.jpg
    IMG_2843.jpg
    83.5 KB · Views: 272
  • IMG_2853.jpg
    IMG_2853.jpg
    77.5 KB · Views: 268
Turns out, aside from the rampant mold and decaying wood, the front supports underneath the window were all broken at the welds. Yes, the camper has turned out to be a bit more than I bargained for, but I think in the end it will be worth it. Besides, its a lot of fun to plan and work on given that I am essentially starting from a frame.

IMG_2863.jpg

I repaired the broken welds using L brackets. I am not sure if this is the strongest approach, but I saw this method used on another rebuild so I gave it a shot. I also plan to use 1/4" birch plywood on the walls and screw it to the aluminum uprights to stabilize the front wall.

IMG_2901.jpg
 
Looking good. You are a brave soul. It will be interesting to watch you bring this one back from the dead.
 
takesiteasy, thanks for the kind word... It is possible that I am more foolhardy than brave at this point. After completely dismantling the camper, the only thing that I have been able to salvage is the furnace, the frame, three of the windows and the interlocking siding. The front window was a casualty of the drive home courtesy of a rock kicked up by my truck. The magnitude of the project is slightly lost on me as I have long harbored a fascination with resurrecting the derelict.

I have not decided if I will reuse the stove and the sink that came with the camper or source a sink/stove combo. That would allow me to save some counter space as I plan to expand the over cab bed to 54" (full size).

Completed floor pack. Making progress....
IMG_1176.jpg
 
Like many other things that I planned to salvage, the roof had seen better days. I ended up stripping it down to the frame. I'm glad that I did because the mold was pervasive. Also, major cracks in the metal were hidden by globs of sealant.

IMG_2910.jpg
IMG_2911.jpg
IMG_2920.jpg
IMG_2925.jpg
 
Thanks Frank, it will be a huge project. I essentially bought a frame and a furnace for my money, but hey, a man's got to have a hobby right? I just checked out your blog. Great pics. Motivates me to get this thing finished up so I can get out and explore! Your images of trout fishing for cutthroats reminded me of my childhood fishing for sea-run cutthroat in Puget Sound and for rainbows in the streams of Washington State. None of the fish that I caught were near that big though!

Tim
 
Made some progress on the camper. I was able to get a local place to make me some aluminum panels that matched the front and the back sections. I had them make me a new roof as well. It wasn't until I got the metal home that I realized that they had made the roof ribs to go the short way instead of the long ways. Oops. So.... two seams instead of one. I think I am still going to run it and see how it works out. They also didn't have a roller to make the 1" up and 1" down panel, so I got 1" up and 2" down. I'm pretty excited to get it on. Just waiting on the headliner and I can put the roof section back together.

New metal!
IMG_2935.jpg

I am torn on whether or not to put a window back in the front of the camper. The original window suffered a broken pane from the drive back from the seller. That made me think that deleting the front window was the way to go. That is also where my daughter will have her bed so not having to black out the window for nap time would be a bonus. But....I don't really like the idea of not being able to see out all sides of the camper. And once on the trailer, the window should be up high enough that it would be out of harms way.

New panel on the front.
IMG_2936.jpg

New lower panels in the back.
IMG_2937.jpg
 
sgiandubh said:
Thanks Frank, it will be a huge project. I essentially bought a frame and a furnace for my money, but hey, a man's got to have a hobby right? I just checked out your blog. Great pics. Motivates me to get this thing finished up so I can get out and explore! Your images of trout fishing for cutthroats reminded me of my childhood fishing for sea-run cutthroat in Puget Sound and for rainbows in the streams of Washington State. None of the fish that I caught were near that big though!

Tim
Tim Thanks for the good words about my fish ,BUT you have to realize when you fish at Heenan Lk.almost all the fish are big.It's a Ca.DFG hatchery lake.
Looking forward to all your project photos.You might check out the posts by brandon he poster his work on a project like yours.
Frank
 
Frank, thanks for the link to the Brandon's build thread. Too bad that it looks like he sold the project. I would have loved to see it finished out.

Second coat of poly on the new lift panels.
IMG_2961.jpg
 
Wow, this is how I handled my Granby FWC rebuild: Sgiandubh I lack the time and skills to tackle your project but I'm impressed!


I am writing this in hopes of helping out a few of the owners of older FWC units like I am.

Last summer I bought a very well used FWC Granby for a very reasonable cost. I knew that it would need work but figured that it was an affordable way to try out the concept of the light slide in camper and my spouse agreed. Previously we have owned an E350 4x4, and then a rugged Coleman pop-up trailer but wanted something that got better fuel economy than the van and allowed for breaking camp faster than the trailer.

At any rate I ended up with a camping rig that I liked but needed new side fabric, a new folding panel in front and the headliner was water stained and just a little ghetto. The other major issue was that the Utah winters had destroyed the rear door.

After a road trip last fall we agreed that we really like the slide in camper concept and to look into repairing the old Granby and ne ones are sadly too pricey for us.

I shopped around the SLC valley for someone to replace the side fabric and soon realized that I needed to talk to the factories as the FWC design is unique enough to be too difficult for a local RV shop to repair.

Contacted both FWC and ATC (both are in Sacramento) and here is what I learned:
· FWC while very helpful and professional on the phone really didn’t seem interested in my project. I live about 650 miles from the factory and didn’t want to drop the camper off and return 2 weeks later, which was their offer.

· ATC told me to schedule the drop off day 6 weeks out and they could do the job in 3 days. Jeff was very welcoming to my many questions and asked a few of his own to help me feel like my unit was worth spending a few thousand $ on.

· Pricing was surprisingly different from the two factories. FWC asked $1960 for replacing the side fabric ATC asked $1200. Folding panel replacement was also quite a lot more at FWC. The replacement rear door was $100 less with ATC.

In the end I chose ATC for the project and was completely impressed with the results. I dropped off the camper at their small factory at 9 AM last Tuesday and met the guys. Jeff, Marty and the rest of the crew were all friendly and totally get-r-done. Before I left at 10 AM, the old fabric was cut out and the guys were dismantling the roof. A couple hours later Jeff called me recommending that we replace the 23 yr old tin roof as it was already off and pretty beat up. He quoted me an extremely reasonable price on the new tin, a second vent, and a Yakima track system, which I opted for. He also informed me that it looked good for them to be done with the camper by Wednesday close of business.

By 2 PM Wednesday Jeff informed me that the camper would be done by 5pm. Remember this project was for both folding panels, new roof tin, new side fabric (with Velcro for the cold weather kit), new roof vent, Yakima track and a rear door!

On the whole the quality is what I expected from a factory job and the promptness was amazing. I picked it up and paid the agreed upon price with only a couple up-charges for the new tin and Yakima track. I had expected a litany of incidental charges but there were none.

The managers Jeff and Marty still get hands on with every camper thru the door and manage to be both available to answer questions on the phone and keep tabs on the quality control of the product by being on the factory floor.

As for us, my wife and I are stoked to have a dry comfy camper that has set us back a fraction of what a new one would have. Yes my interior is dated and no the ATC door does not match the FWC off white color but those are minor details for me.

I am sure that I would have been just as pleased with the job that FWC would have done but they were unable to make it work with my time table and just their rough quote was $1000 over the cost I paid ATC and their quote didn’t include new tin or the Yakima tracks.

I realize that this is a shameless plug for ATC but thought I’d share my experience as I was quite impressed.
TOR
 
Well.... I'm making some progress on the camper. I was scheduled to go to Dallas to pick up my M101 and the new axle that I ordered for it from Redneck Trailer Supply. But, my relatives ended up not being in town this weekend so I pushed that trip till next weekend. So, I got the insulation and a couple sheets of luan for the interior siding. I was initially going to go with 1/4 birch and polyurethane on the interior. After I got the lift panels cut and poly'd I decided that would be too much wood grain. Once it was paint for the interior, I decided that the extra $14 per sheet for the 1/4 birch wouldn't be worth it. I wasn't very impressed with the birch ply that I used for the lift panels; the birch layer was extremely thin and peeled easily. For my purposes, I don't think there is much difference between the Home Depot birch ply and the luan unless you are going to have exposed grain.

I ran a 12 ga circuit for the fridge, a 14 ga circuit for exterior lights in the rear and a 14 ga circuit for lights and fans in the roof. I didn't like the idea of drilling a big enough hole for the 10 ga cable for solar in my wall supports so I plan to run it inside the side liner and drop it directly into the cabinet that I will use for my electrical panel. For the places where I did drill and route the wires in the wall, I used some fuel line that I had laying about to protect the wires where they passed through the aluminum.

I decided to delete the front window as that will be where my daughter will sleep and making that area as warm as possible seemed to bias towards removing the window.

Another decision I made today was to remove the propane cabinet and use the vented door for my fridge. I don't need the propane to be inside the camper and having the extra cabinet space will be better. Also, I didn't like the idea of cutting more holes in the exterior of the camper.

A couple of pictures of todays progress.
IMG_2969.jpg
IMG_2974.jpg
IMG_2976.jpg
IMG_2977.jpg
 
Got most of the interior panels on. They are just tacked in place with finish nails now. I will secure them with pan head screws after paint.

IMG_2980.jpg
IMG_2979.jpg
IMG_2981.jpg
 
Great job on a tough project. Have you thought about tack welding the frame fixes? I can tell you're a conscientious builder and you might like that better than brackets in the long run.
 
Back
Top Bottom