Have you seen this electrical setup?

WesAlan

Member
Joined
May 16, 2022
Messages
17
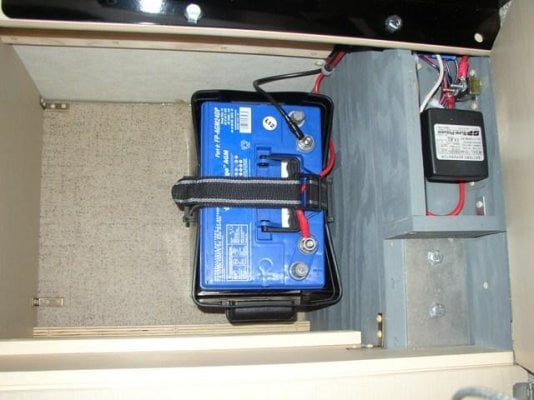
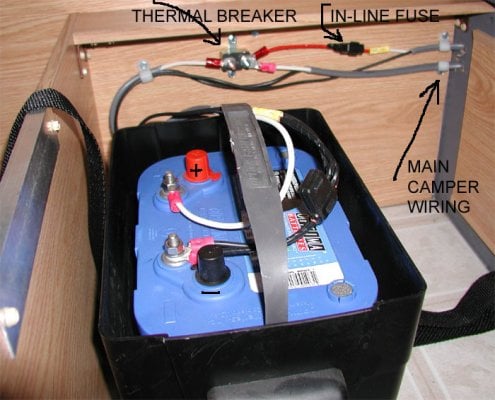
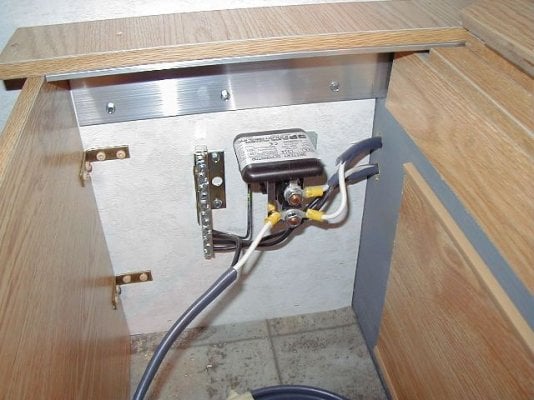
I bought my 2000 FWC Hawk a few months ago and am finally getting around to trying to properly set up electrical. The way the camper is currently set up with no battery inside the camper at all and just a 3 pin connector hanging off the front of the camper. The previous owner said he would just keep the battery in his truck and pull out and connect when needed. Could that 3 pin be fore actually connecting to my truck?

Was this a common setup previously? Just finished a ten day trip and didn’t even bring the battery and relied off a few battery packs and solar lights but with winter coming I will need to have it dialed to run the furnace.

Does anyone have information on this setup, why FWC set it up this way or is this something a previous owner did?

Thanks!
 
FWC typically uses a 3-wire Attwood trolling motor connector to connect the camper electrical system to the truck battery. So two of those connections should terminate somewhere in the camper (wherever the battery would most likely be placed). They would usually be connected to a fuse and battery separator before connecting to the camper battery. The third wire, which is usually green, connects to the camper running lights and is often spliced into the tail light circuit.

If you are thinking about adding a battery and connecting it to the truck, you should consider ditching the Attwood connector and switch to an Anderson connector and also upgrade the wiring from the factory 10 AWG to 4 or 6 AWG if you want reliable charging from the alternator.
 
That was common in the day before everyone had solar and compressor fridges. Mine didn't come with a battery. Worked okay if all you did was run lights and the fan. Not so great for running the heater. Its why I don't have an ACR or similar.
 
Wes, the 3 pin plug is very common, and it usually connects to a female receptacle that is mounted to the interior bed wall. My guess is you have a 12VDC line for lights & equipment, a ground, and power for clearance lights. The plug “probably” is an Atwood trolling motor connector.

Can you tell if there has ever been a camper battery?
 
As others have said, that is a typical older setup. If you want to go full on with electrical/solar/fridge/furnace and such, we are here to help you figure out what you need and how to do it. Welcome to the forum!
 
FWC typically uses a 3-wire Attwood trolling motor connector to connect the camper electrical system to the truck battery. So two of those connections should terminate somewhere in the camper (wherever the battery would most likely be placed). They would usually be connected to a fuse and battery separator before connecting to the camper battery. The third wire, which is usually green, connects to the camper running lights and is often spliced into the tail light circuit.

If you are thinking about adding a battery and connecting it to the truck, you should consider ditching the Attwood connector and switch to an Anderson connector and also upgrade the wiring from the factory 10 AWG to 4 or 6 AWG if you want reliable charging from the alternator.


___


I agree with heinphoto. However, I would probably just leave the original 3-wire connector (with green wire) in place, if it powers the camper's marker lights from the truck's start battery. But I'd get rid of the battery seperator regardless, and replace it with something more efficient like a B2B charger. If your camper has no marker lights - I'm not sure what FWC was required to do 20 years ago, with regards to marker lights - then just remove the 3-wire connector and its wiring in the camper completely, and as mentioned, run new larger wire from the start battery to the camper with an Anderson connector if you want to install a B2B charger.

I run AWG 4 wire to my B2B charger (you could run AWG 6 as well, depending upon the charger you buy and its requirements for efficient charging). The B2B charger works well as a back up to solar or as a standalone energy source. It all depends on your energy requirements, the way you use the camper and where you tend to travel. Rich
 
Unfortunately FWC does not have any wiring or battery instructions on the old campers.

It is easy, and not easy, all at the same time.

But see if this makes sense . . .
  1. Cut the plug off the end of the exterior camper wiring.
  2. Drill a hole, the size of the wire, in the wooden camper base, on the other side of where you want to put the new camper batteries.
  3. Push that wire inside the camper, strip back the ends of the 2 wires, install an in-line fuse, and crimp on terminals on the end of the wires to be able to hook them to the new camper battery(s).
  4. White Camper Wire = Positive +
  5. Black Camper Wire = Negative -
  6. Drill a small hole in the wooden camper base, next to the first hole you drilled, and run a new wire from the inside camper battery(s), out that new hole you drilled, add in-line fusing, and leave some extra slack (extra wiring), and install the camper-to-truck plug on the end of that new wiring you just pushed outside.
(see random sample pictures attached)

IN ADDITION: You should also add a Battery Separator / Battery Isolator in the camper, or in the engine compartment, to keep the truck and camper batteries isolated from each other when you are parked.

Hope this helps get you started.

Stan
 

Attachments

  • AUX BATTERY 1.JPG
    AUX BATTERY 1.JPG
    44.2 KB · Views: 108
  • Aux Battery 2.jpg
    Aux Battery 2.jpg
    93.8 KB · Views: 112
  • Aux Battery 22.jpg
    Aux Battery 22.jpg
    103.4 KB · Views: 123
  • Battery Separator 1.JPG
    Battery Separator 1.JPG
    56.6 KB · Views: 123
Thank you all for the extensive replies! I will be digging into this project soon. Will update with outcome and or questions!

Also no marker lights on this hawk.
 
WesAlan said:
Thank you all for the extensive replies! I will be digging into this project soon. Will update with outcome and or questions!

Also no marker lights on this hawk.
To "properly" set up your camper for your current and future needs, I would run the fattest wires you can afford, up to 4AWG, from the Anderson Power Pole connectors (new) to the battery separator (Blue Sea ML-ACR 7622) or B2B charger (Victron 12-12 30A). That way you are future proofing your wiring.
 

New posts - WTW

Back
Top Bottom