Hot Water Tank Removal

dcabernel

New Member
Joined
Mar 25, 2019
Messages
7
Last fall I drained and blew out the water lines and Hot water tank with air pressure - or so I thought.

Had to prime the pump to get it going today. Could hear the hot water tank filling up but at some point water started gushing out of the cupboards. I pulled the cabinets apart as best I could but cannot see any of the hoses leaking. The water seems to be coming directly from under the hot water tank. Oh no!!

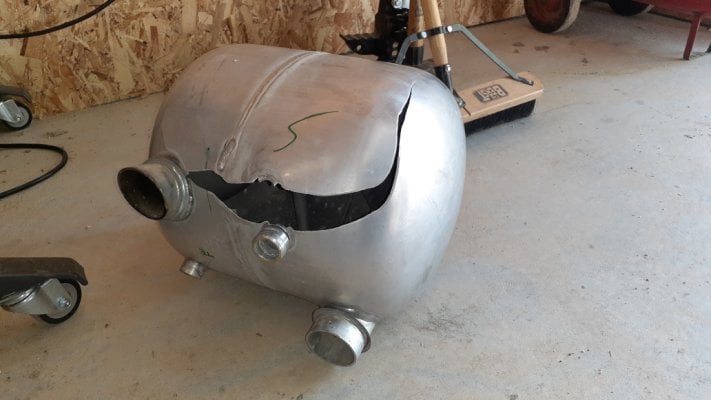
I can see the inlet to the tank and it doesn't appear to be leaking. Is it possible the tank itself is cracked from freezing? I don't see any way forward from this point but to remove the tank. How hard is it to do this? Is it just disconnect from the inside, remove the propane connection, from the outside remove the screws around the frame and pull out?

The model is a Hawk circa 2014.

Thanks for any help.
 
It is indeed possible the tank is cracked. Your post reminded me I had a photo of a cracked one. The photo orientation is confusing but that's the only one I have...

AtwoodWaterHeaterTankSplit.JPG

There are a number of videos on YouTube on replacing a water heater. The one below seems pretty comprehensive and specifically addresses replacing the inner tank. It's an Atwood water heater and would likely be very similar to yours. However you might want to look for other videos for your specific model. FWC installed Suburban water heaters for a few years but I believe they had switched back to Atwoods well before the 2014 model year.


If you or a buddy happen to have an inspection camera you may want to remove the drain plug or perhaps the pressure-relief valve and take a look.
.
 
I replaced my 2011 Hawk WH a few years ago and it turned out to be easier than I expected. At least one of the connections was better accessed once I'd removed the face screws and I could move the unit slightly. Then the whole thing slid out cleanly. Going in with the new one I used sealing putty tape (specific for that use from an RV dealer) on the perimeter under the flange and there were no leaks. Checking for leaks in the flange was tricky but but leak testing on the plumbing was straightforward. With everything dry I hit the exterior with garden hose water and then used pieces of newspaper slid into various impossible to see places and removed it looking for water on it. No leaks. My nightmare scenario is a slow and undetected leak causing mold. The service manager at FWC told me it was water leaks that sometimes "takes the camper out" so checking diligently is important, I think. Good luck with the project!
 
Thanks, very useful info.

I do have an endoscope but didn't see any fractures. It's hard to manoeuvre the camera to everywhere though.

Charging up the scope, will try again tommorow.

Video is excellent. Still miffed I didn't drain properly. I now recall that it froze and I put the furnace on in the camper to get it melt. I was getting water out of the hot water tank but maybe the damage was already done. :mad:
 
Yep it's cracked up high. The clue was the Styrofoam insulation at top left was bulged and cracked. Felt around and cut my finger on the exposed edge.

Just ordered a new tank (Atwood). Good times! Will post picture when I remove it to add to the archives.

Thanks for help again.
 
dcabernel said:
Yep it's cracked up high. The clue was the Styrofoam insulation at top left was bulged and cracked. Felt around and cut my finger on the exposed edge.

Just ordered a new tank (Atwood). Good times! Will post picture when I remove it to add to the archives.

Thanks for help again.
 
Yes, I did change it this last weekend. It wasn't too bad to change especially following the video above. The only major difference is in the video the tank was optionally electrically heated so that whole part didn't apply.

Taking the fittings off the old tank was difficult as they were really tight. I think the size is 21mm and I don't have that wrench. I ended up filing one down so I could use a 13/16 in. I also didn't have a Plex tool to put back the pipes to the fittings, so borrowed one from a friend. I also couldn't get the press fit rings on the tank off with tin snips; I ended up using a dremel tool to cut them off. The new ones took a lot of persuasion to get on as well.

Attached is a picture of the tank. I might print this and put it up in my garage to remind me of my stupidity and hopefully it won't happen again. There was a bit of mould under the tank and quite a bit of cutlery from before I had a cover to put over that drawer. Other than that there were no surprises. After hooking up there were no leaks and the heater fired up immediately. :)

I recently bought a Mig welder and haven't used it much. As a practice exercise, I may try to weld the tank back together. We'll see if it's possible....
 

Attachments

  • 20200808_134254_Small.jpg
    20200808_134254_Small.jpg
    217.2 KB · Views: 145
Back
Top Bottom