Installing Isotherm 65 in 2011 Eagle

buckland

Senior Member
Site Team
Joined
Jul 26, 2011
Messages
3,105
Location
New England
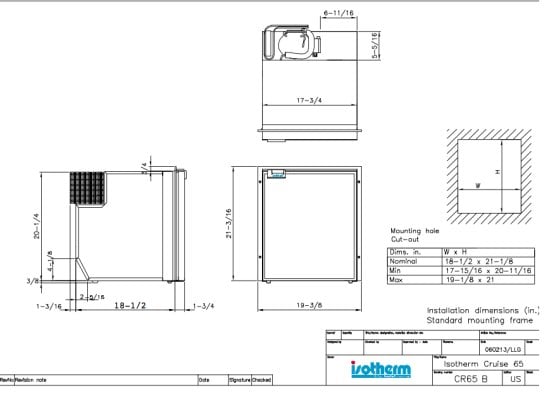
I have read what I think is all that I could find on fridges here but have not found some info needed. I contacted FWC and received an email back with approximate measures for cutting the two vent holes in the side (fridge back) wall. This is a slightly nerve wracking venture as the old saying goes measure twice cut once... more like 5 times measure!

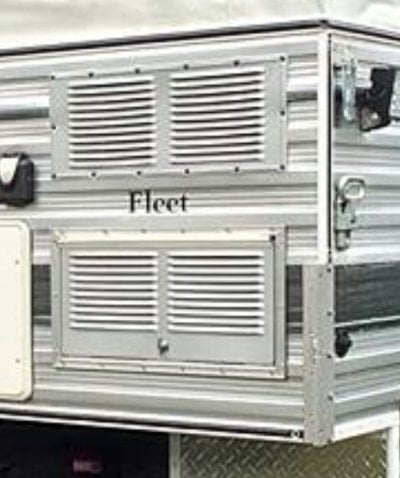
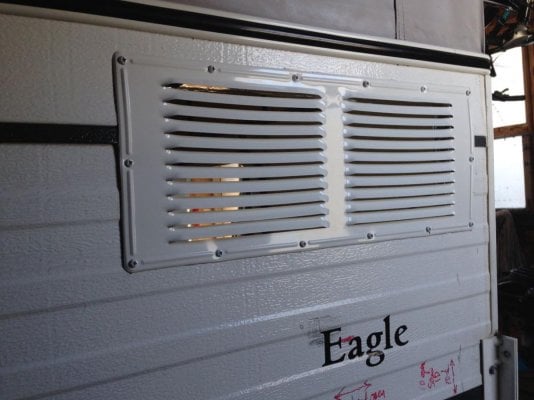
One big question to start: As this is a DC fridge with the compressor on the top... should the vents be switched? Meaning the access vent on top and the non opening one on the bottom? Or does it matter. I bought the vents from FWC and was confused why I got one with access as it is for a DC fridge.

Has anyone put in a DC fridge after purchase (Shell) on top of the Propane box on the drivers side rear in either an Eagle or Fleet? If so any pointers/advice.

I am assuming (? !) that the frame tubing for the camper models would be standard so that the fridges installed would be the same for installing the vents? I ask this for two reasons: as the access vent is a different dimension then the non-access vent ...I was not sure if the aluminum tube frame around these openings is set to fit that configuration or not.

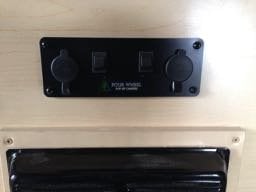
Presently (when I bought from FWC) I had an Engel 27 mounted on the top of the Propane box. Worked great (I recently sold it). So the area is ready for me to build a cabinet/counter. The two electric outlets, one double DC sockets and a 110 AC double plug. I plan on moving them to the front of the cabinet above the heater box (lots of room to mount) this is also beneath the sink These same plugs were beneath the sink on the side... not worried about water).

Here is part of what FWC sent:

From the rear to center is 12”
From the bottom up to the center is 10”.
The opening is approx. 11” tall by 20 ½” wide.
From the center of the bottom vent opening to the center of the top(if you choose to add the upper) is 14”.
The top opening is 8 ½” tall by 20 ½” wide.

Today is sun is out and 45º !!!! so I am jumping on this good work weather!
 

Attachments

  • Isotherm 65.jpg
    Isotherm 65.jpg
    142 KB · Views: 215
  • Vent.jpg
    Vent.jpg
    228.8 KB · Views: 147
Same as mine. Does it matter? Probably not. Other than wiring it up theres not much need to access the fridge.
 
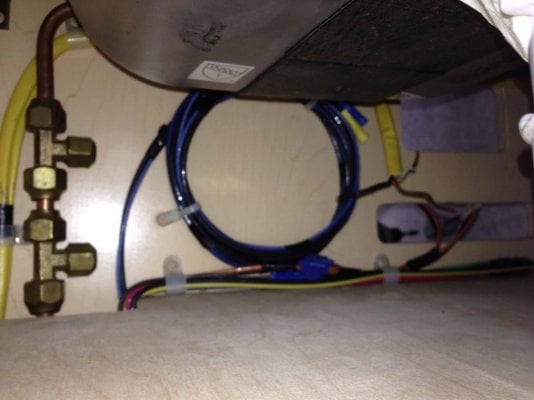
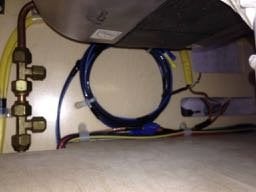
Gotcha... so with no need to access the area just put them in as in photo above. Now then... them there wires in the below photo...taken under sink ..there is a coil of wire left at install ....I assume it was wired for a DC fridge? There are 3 wires... but and 2 black(?) ...but wouldn't ya know it the coil is screwed to the wall and the clip's screws are behind the gas pipe! Man plans God laughs. Y'all think those would be the DC fridge wires? Hate to bust some knuckles getting them loose and discover they aren't the ones! If they are the right ones I need to find out what ones is power, neg, ground.
 

Attachments

  • IMG_2017.jpg
    IMG_2017.jpg
    77.5 KB · Views: 147
Most likely they are. Yep, just checked mine. Black is ground, blue positive but double check that.
 
Check the wire color at the fuse panel. That could be a nice confirmation if it is the same as the coiled wire.

I'm assuming your ISOTHERM is very similar to my TruckFridge130, except for size. The compressor/fan is mounted top right when looking at it from the "where is the beer" position at the front of the fridge, right?

IF so, adding a second vent lower on the side won't help much. On my TF, the fan blows the air INTO the camper, and it needs to find a way around the fridge to vent. That's why the mounting instructions say to make sure there is room under the fridge for air to flow.

I went them one better, and installed a 140mm fan on the inside of the camper, pulling air across the coils.

All this in a 2005 Hawk Shell.

You can see the inside fan in this pic
full


This is the side of the fridge before mounting into cabinet

full


And this is what that wall looked like before I cut a hole out for the vent
full


full

After cutting hole


I ended up just buying a cold air return vent from HomeDepot and cutting it in half. 8" x 8"
Sorry, no pic right now of how that looks from the outside.
 
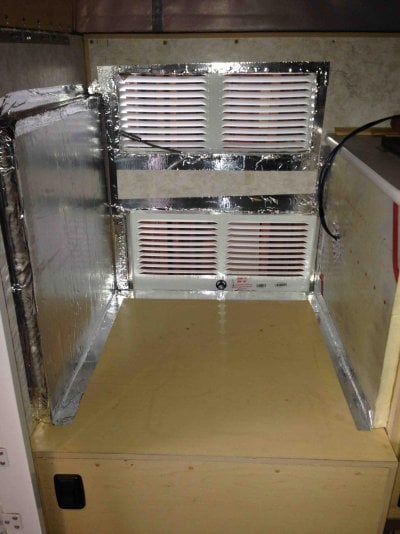
Hey there Vic. Thank you for taking the time with the photos and suggesting looking in at the fuse box. I have been lucky and have had no electrical issues so haven't even looked at the fuse box yet! When I asked FWC Terry said in his opinion he'd put both vents in. as you said for hot at top going out and cool air coming in bottom. I have the two so might as well. I won't add a fan (though I read the whole thread about adding two).. Like to learn stuff and I did appreciate how heater sealed the opening with aluminum tape and insulated the side for sound. I will do just that as well. 1" aluminum cover hard foam insulation should do the trick.
It will be a nice day today (50!) so I will get out to the garage and start the project. I have both a jig saw with metal blade as well as a saws-all with same. I assume one cuts from the outside in to keep the aluminum siding from chattering? I will practice cut in the center first!
 
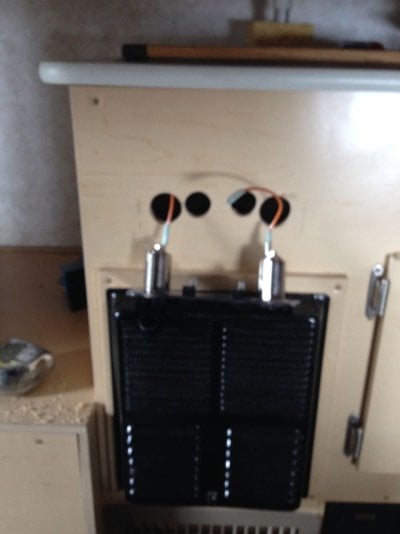
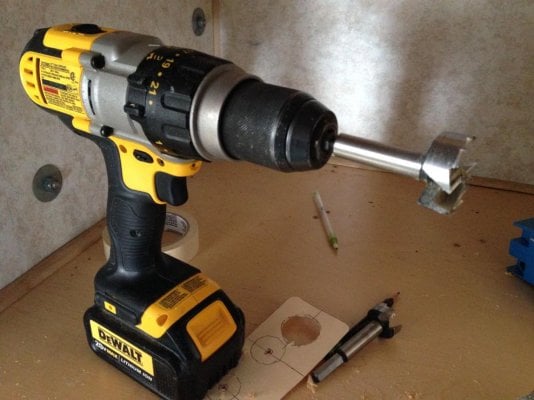
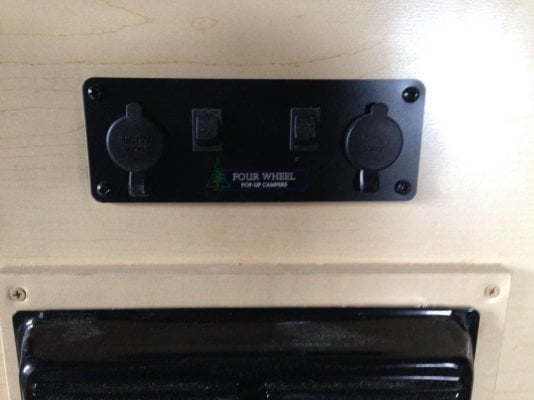
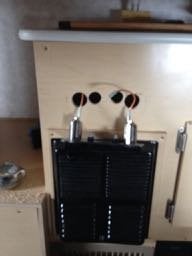
I agree and if I ever felt a need to it can be done later. This morning I got at those rascal wires tucked in there. I am just capping the 110 AC wires as I already have another 2 plugs by the water tank light gauge. The DC sockets I moved to the front. Forstner bits are very nice for cutting holes if one knows the exact spots... less work than cutting a rectangular hole and it cuts with a smooth edge. So I traced the DC panel and found the centers of the 4 parts that needed to go through the cabinet and made a template with cardboard. Marked my spots and drilled. It worked... so mounted the plate and plugged in wires ...tested ok. Here's a few blurry shots of that.
 

Attachments

  • IMG_2023 (1).jpg
    IMG_2023 (1).jpg
    74.9 KB · Views: 160
  • IMG_2025 (1).jpg
    IMG_2025 (1).jpg
    117.5 KB · Views: 142
  • IMG_2026 (1).jpg
    IMG_2026 (1).jpg
    71 KB · Views: 129
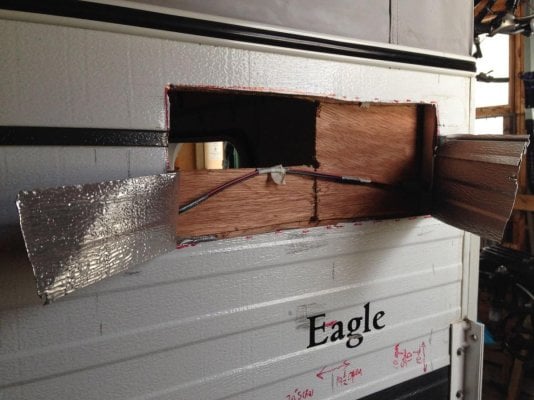
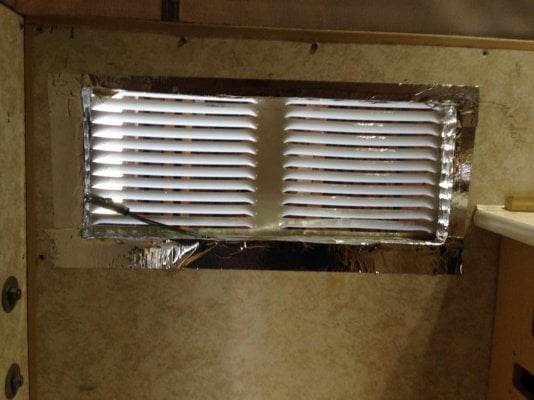
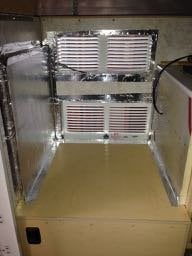
A few more hours and one Ballentine Ale later..... I got into it after fussing as I do about thinking it through 3 times.... I decided to do the top first and then the bottom... the reason being I took a peek through the inside wall after taking off molding and screws for inside paneling just enough to get a light in there... sure enough there was no insulation there but there were three wires... to the life of me I can't figure out why they would be there as there is a 3" section between the upper and lower vent that would be perfect to run those wires.... Anyway it is what it is so... I had to make the cuts gingerly by taping the wires one way and cutting, then moving and re-taping etc... last cut in corner with a drywall saw and a tin snips. Not my prettiest work but once that was out I felt it was Ballentine Time to celebrate (stopped working as I never do beer and saws....bad idea)
So the top one is done ...used aluminum tape as I learned from the other thread... and also butyl tape 1/2" around the outside vent when I screwed it in place. One down and one to go.
I am a tad concerned as I can not see into the lower area of the wall but I can see there is foam insulation which gives me hope there are no hidden wires through which I could saw. I will start again on Wednesday as the temps tomorrow are in the 30's with rain and back to 50 (hallelujah) Wed. I will say I am sad that FWC put the "Eagle" sticker right where I have to cut for the lower..... maybe I can get them to send me old stock!
 

Attachments

  • IMG_2027.jpg
    IMG_2027.jpg
    126.4 KB · Views: 122
  • IMG_2028.jpg
    IMG_2028.jpg
    107.9 KB · Views: 132
  • IMG_2029.jpg
    IMG_2029.jpg
    111.5 KB · Views: 128
That is a huge vent for the tiny compressor/fan in the fridge. How about using just the one you have and putting a second fan in that space to help draw air over the coils? I really don't see how having a second (lower) vent will do much?

I would not worry TOO much about cutting wires (if you have the main power shut off). In the event you do cut one, you can always splice them again. Easy to hide and if done right, no downside. Much bigger deal is mangling the siding, 'cause you can't hide the evidence!
 
I have an Isotherm 85 and there is no need for two vents. I have one vent with a computer fan that I only run when it's 90+ degrees. The compressor refrigerators are incredibly efficient.

nkzRaMhVL4m8Qbh1eL1Oln0DsBbGgI_O-bUNdJJ817XeLDSrRvWTkIb1Bzj5DeI4TBQGBphWj4cLmVn1296zzjSYmASfZ-32nrJKwTcBsWpksOPwR3p7yawCbJB6HsnLNo0mf7YCmykl-ZZl_ec9zT04VgMJilavZmZUlbsef-WxH7pUbI2XrSBzK4SCi2j335H77c5jQp2Dkab3SBQYyuhULsaJslpPtpJlYHvjaVbi5e7XylvRMs7-v52UgI9cQkSOAVwCFKaIm8FKxZlS3K_gAAHM-v1svJoWtuueRPHicLg-fqJ9qFIQ5h25Ow2RyMH-ckKBuxXZpKG50S0N-aTDr3nk_2mxGaX8wvYoLI0i83ik5st6r7ikCSd88cLiUWnf62rE7vzzxZeLwRGhkMQnvTsgPB2jap60ofOf7q9iR-MEUGEgFDh8ttCrUfntjDV4Qoqq2YmqTKqoYz0Y6k2O9zxULOPdZdj5FMy53rOSFMBDfCUlnPwtc8NQirdvVBIzYwPygwROrZvfSZDpvqJc9t95adsDdcqaVKjF71iP8fSs_NGKo4urNMcXeYVuAJ58Fr-4GZhtD0SqsqMDXqckGnNHS7Gf6QQS1zqs_7PB86HH2J6q=w1426-h950-no


XkPVO1-1oukRRhMyqUnnyhHxk_C8BIc_7l3JUusV3Tqf2Ly0pkl-F2_dnF5jr7JRKU5Tglsp8H3SLcm3ucGV7R1xEEbYtIvcOB0cgBdY1r0YEbYSPByD2kxJv_kv-p8JGMhSJq7yS1G1kncOz-1u2Qbn0cvQFxOGmamKd-DTwHChZczqgsT6Nw7z_qK0vZXAbgcmP6_Gk2u2cmXiANsHjl16asvwF_dZckud1rCJE5yBl-NYHSLdhN-wwu_vj_U14iEA7gdkzYPkaNXbNPg2etptrHu2OV4wxKoDP1tf6gb_GstuIwb2gvm-mr33W-_6Qab4q71QU3nlit5q7BgjBMbn1P0bXZj5fX5IbV7AJfknU3zQ_7gBMF8uueg9xn0SW7wRX0ADxAYrK_yiU3nn2jaG4kp9i-Uc1bfY-iwttNi4h8Bpc73qFUye6asDA2tKFX984hdNS8uU_5GNoOlmtA8EP12EcWhzkGor_ZTkybCzFMZQuLyoenGu8o4pwDrG5B7TuUP3742JJH_DlYCfJzVW5gSj5xwG7AbDdY3Xs2h2Cijqw_kudod01SyZTs02THIvwMbKbkTqO-ewmOJY4y0fyVNACFvzmbHd9Xgg9suyHKzCNKNL=w634-h950-no


_qMbGCYU6MNBo2LACEqR-kVyHevB5bIovkcSr2T33tPUEyvFhjDbq8IN3HNGR2ndgE4WjxZkFDWcsdZ2_5J3ztZKqkV44gWXKeB__28w2QIL_psOaDnAx89PLQk1SYjITG9FSaaWHCsQHT6QLoBXlozltlFTRud3ufjKJCln4ufw2xvZu6XC8G-gn_4fxmifX3PlUnJ3OW1c2HJ4MZj_hhtQWBMqk4HKBi977NvFO8Hvo7TVzYybwtk6G-EOYFi_KQlO_we7hPjCTlE8Vne3ZN2c7r9D4CjmYjf5yrIsmvKB3yYtNNk9WNXrb-LGsjstRY1grhKphUcoOZFWr-BmvGkwKZPXkHbkOQn1tuxFZyIt2uWowDgWAwaNG60VEhpJdwEOo50Pi_aYd0lfLVIsekD85OaBYEKgl4yONyS4KHjofqIgM0Iq0JTywUYnv2tqfnhhGMDX3-bsZjxBpTXO9PXOpmE5jWaUzO0aHSxFnhjOTTeytgfoZxIi1hooLy3d1NmP1rgH69F3ylTE1QSOuZ52MK2jRPKgRHKwrOJFw06UHEijQGngXvuoCeP3EUEBhHSaRF6ahTCigu8QKYVWHe4UhF04XzIDXaZTi50NBwgcuyjM=w713-h950-no
 
What they heck... I bought two vents ...so I'll put in two vents...that way no clutter in the garage. The job is done... though now with the experience I could have done a better job the second time around... life ...20-20 hindsight.
I can live with the results though it just seems weird to have that open space where rain while driving must get in (?).... wasps or some malevolent rodent.... the rain is what worries me a bit but if others have it like this I guess I can rest easy.

I have not started the counter part as I have to drive 150 miles round trip to a Veneer Ply supplier. I am going with Red Oak veneered balsam fir 1/2", with a Golden Oak stain and marine varnish. But framing the space comes first.

I am curious though. I sent an mail to FWC but Terry must be wicked busy. I have 3 wires in a coil. Two thick Blue and Black and a thin black. My Isotherm has a Black and Red. I assume Red to Blue and Black to Black.... but what is the thin black for?

I would love to see a finished photo of someones Isotherm 65 or similar as to how flush it sits to the front of the base.
 

Attachments

  • Prep Isotherm 65.jpg
    Prep Isotherm 65.jpg
    196.9 KB · Views: 118
Buckland,

Not sure if these will help.

The wires before I started.
kYCNL81JbkzdhqdzzVg--IkaBmwj-EglRD8mlKRp7UtYuXMs0hcMEkWiPQPkt-nlw9j9xPtJVDEobPoUzbYF4Xm3Bvuyqs7UOJyNNV59aa3zP4-isgEfdpwMKleeQ1Fm5OdyuGdOmNrU-ruez5Bq6NhEOsWc4qDQpJXeV8_UZGryP0gGFBwHkwlpHsIJOPc8L6WjyGkbcJiFZYofDcbz4m_dcVNxoipPBuM8hJYEu8kqaejGYuLeJ-x5k8s6wYxUPUqCKNrFlBFBmWJLA3KzrJ8ov_Y9kpAOo3FJPM82tI-ll1X0Pmhc39DSArJQoTFNA_I0cmPXw9rHxGwKj8K31Gp6E9-kD_Ng03pjPClXYwkWepFsHwjvzy0yg_geCQkxQ_sORu-Rz8SKI6XJhPKfceFz7HUI7RJIU3ABHKvvJ2L4RIE-r0ObFazOzgkfUWYKrGnhUxTvKB-i_89EddKBSWaf4f21jA0BN3C51aezbZkS0ppTuDtB1p-OFBsoila4bXkvNT7GZWA0NOBC4ixqGQ6EYhH8vAq5d92uvkeK0BkQQ8bZHE1J5RIKNrOMYd4VsmbgCIGF51uXvX29UOUbJ3OskcLWcxLmOSdhWl2fqvwDyNjFHN74=w731-h974-no

qedq7SqwujatKqgPZp1a2sMu0ZYUIV0IGWIrwVRuVWnMtBKbsUa6PBQLmKDPGEBVhVruX-luw8-YOg5h8Jeii1Kkx9P7K0wpa6K6_Uv7FwchpGNFwsALeo3MS38qeHdgqSJJNb1ZgLZiXbw-_FWwdwXrot6tTmauwStn2mRzSptBD-trOgLVUJsJTJOe6yhzbaW0vPtrsmfAUp-X9P6jfKmU7c3DgGUVlAyeRqwlyWIZbsy1V2PMEF9zFgeprCBT-azJm7No066ptTSvvaZbywAhyTxIypssQuchnJQjoOg_m3iLGjipuFTJfHud5w8iJeK_v4QopR8H_r7PreZGcXLhG1XpZBA8b1UEx4joYD6Yh04vyuRsK_l2B48qvoEZKm5SEZwo3Vg6FMtRNmqrOUhwh1SeRm8uL5khdEnh5z2OaurjEnNkZxzLGfkDGaKKZKCucXJNWeMKuMPFPDSXBHJRLeAb81-oWbk_kQGST84IfqGW5bPlzBezCL3Ct4ljNHsdOhloJ3RglzIDi-45Ltf7ar_yonRDJV-jMPecnk7obxoLbwceuxCReBHwsjMh_h7ppFAliJWWE3UnVrSH89cHbitJ18JBg_KziWuweaeVt8-jseUK=w1462-h974-no


My Isotherm was a 120/12 volt model. Note the two sets of wires.
UhoCywSpU9JdH7H3WHXnkqKbdgQqpOQ3-WSlb6wT3F_GMJQFHT0a1cn43vFwcEmjQR9FH4iBn7SQHSZqGKGgDxq07H40z8PwMduEE4PBLA6DE7MjdhwU0LZbTb5DbN476alGWVnkHeHJfMPM8cKnnbuJXlIUrN367z5bTF2cOUW4QD5OdaqKXEymN6_nKSe_Z7102OXbNJlDvEt45_1SRrO2NQ9y5m5WTeq3X80fSomadZzgKB3TKcWAW8LleWBmOB6QC7BS0BNKd33qfC7fmFr6eS_C1ELLy-pzBF-PtslhrmapGwaTRKxctnQImWz8d3AZo8YC4zvJ-T7_ie3ErK3cUBwqcrnlx-DAQAaeT8IF2RKXefKuDJ1e8LRMVAe8S-lZJUhVj3k8FfQdN_Ec3B_ObEDhZrhzcV66dMzDl27oumyDflX1Kjdu7N4k9IfZbRwaUsijDyuBUO9SwZ95T840ux-52LYAU-FDqKzKZNRU1QYN9b-9V-tqy2dnMvQAqq1rUwZEVDRuy9pt49T32GnIx3epgItsZrp7CKv5AGE5owT9TacQ2atv5jiYDWKpsimrwxC3GSnmN_08t88Bf6QTLxiOqS0pmgHt9DASAbsMCCChc1gz=w731-h974-no


Where the 120 plug is plugged in behind the upper left drawer.
IXGPXWiofjsSkESLHGyj47Rgbtv3OnOsW_YMAbOeqKySD0mUcjHE0k8riXZWg8JVTn7eVmwV8C3fd5FLBSdaI7s38dVJ5urmfhTaAUfI60ziuTJAAUpx68cN32A2zeaGpXyiuvnY6pmV_UHbJ8FWD1BtDygKndRCM-saue9AcYtbGrXhAvXtoyiIT7a9nohUQoLqY9xoU3pMp3zyeMbO8liIQ0AomjxV9nwQ6UzPivNfS7coB0xA7i_vi9BYTxuoesG0QycQi4KVU_ebvKPfeq26lhkkpx01A_CzP27JCgx2WuH7AO6h37s9jWo84tcqRfxAdrErQ6PFjtC7R6dhyueMiVdXtfeiR47_KVperNPsg2-ux9Jh8hKAWkEjb_PrlJ2HszaHd5NufsA69faIPnGIRQCbkEnA3_xH4uIH4_e0hK_FFnKuC4st6EtCiL3n2tE10w-z8YQdRIszFTdWAXVnPO-4Rh3zwaHmVs1b4Y9YfB-CzoS00umN1ZQ3_kixFIUb1ZZfIkij2clQnZ3FDET8JySgm0mS-2xIHO6Jgpt-IMb01vg2GwGgPWtJeANJ8lomMsc3vFTH83mC8MrSLMM44qZ0F8Nr1LQgqFDebVi92McA=w170-h227-no


After the install
V93HsJa_LOCDWPGYKuKlmFvg8_5UpKva-9Ell3RW92CPZI4ZcCFbsjlcySXS0M9-uB-aN7yuP2BPiRXaQOrJ9jb6oqH99fJpRKHbvUhA2rjukc-ZkfAtrFlJchZyuUfmwpl4lFW1PCxerHOhdlfGwkxbpFOiPiHMqW6bS0tzp7u0ozaSYo-DU3j3NOEh86PVAoKEDiW_tcDp0QYKTwzhB2TmJImoj6-joxTnpJYAdPlfF7pbUnEcNYC2UQAsPh5cHXckDV0eHf_Vt7NqGj3CT4EQNtCKafIiKOifDB6CQZoDe3E8uCVAdegX_9EjhSrQUMKwABqUqGXp_s8ugMnI4pmxJeVOgWKuUbTCav0NG7n2JYafWUTsrzUBjvPpUzawfTrj6UZBr6FEysrUmWwWfa8e-DFxDWEw0qe48xuomzH8CqXoIny1F6-rKu7NFqmqSd448soNH1IhJPkW0QVzzA72MFnXmF9IyjZ2-9UUQTqmIKdKz5HsSV81mAk5GynSUEcAj-33IWsspYgWyDRQCMish99tn9k_WYxz4ylrTCtGypzt4WTwxahmfY465ifVSixLMW1Auq66Nf30sDVAF8KbR-mVOYB5Iry4DRktjQYT8Ylh_e4D=w1462-h974-no
 
BTW, I wanted my refrig to fit tight and not have any slop between it and the cabinet sides or rear so I added a ton of rigid insulation. Note how much is attached to the lower rear. The other benefit is the insulation it provides too. Since the install and many of miles down bumpy roads it hasn't moved at all and has kept my food and ice cream very cold!

mvjO8ZSo-OvXHc_274xWyapPgw6IUix-0ag0azYQMiAdwXjJVqyyX1BVmOVPtMELgKpu8q469BOaIuH-wE9LyK880uR0FEFkSZOOKpo4b1tDZ5ZzUnCXgyzRv-iJasWrV59L2tuO2CCuDqRqJ3IjD5xo4L7cWrZUv6aC6bEigm5OTNoIc18N_azlnFgmxwMyyXUWyt_G_xHsntnJF65JHJNsyTKVf2gOs86NhHIIF4Gdzj2muU-NDNLwME8a3eB1tEWhfNMQR_KxlYZJRh4ch1ZPVx8XdjEzfadInTu0c8B39-mCuZglHL9cYcQ3QcU0I6Y4oCSLo4vpgK9tRN2wHs7Xn9UFqZFjBAANQseZH6UUiGC-NEKLswAcOxrqcmWLqCxdW5Uai3nDaoKnvFW09CdIte0qwFekraJbODi3txwe0TusuAI5VE7oOxzwYDJyBqCxokV6wulilX05fjBeqJIPGQjvSH7kv4-G80_sijgXN2SrOcOZ7iA6is5vo843s2eiBuQxHgG__CkeX652gVD-7KW356Wej4eQS3BtX650Uktaqrxvzal9RFHeiSQlr0Tle2_8tG9TDPgydmlSW_GntDjlxMn7dipXDDbzylCQTSu9=w731-h974-no
 
Thanks for the shots. Was wondering if you had the fridge sitting on the 4 rubber feet or if you slightly elevated it up off the feet and screwed the metal trim to keep it off the base (reduce vibration noise?)... if not... I will say i am impressed with how the vertical piece by the sink has a plastic white molding strip for water. ..was that purchased or already there?
What material did you use for the top above fridge counter?

Nice work.
 
Buckland,

The refrig is sitting on it's rubber feet. I don't think you could raise it up and have it suspended by the screws in the face of it. They wouldn't hold it for too long. Also, the rubber feet keep it from sliding. There's no noise or vibration at all.

I did though put a piece of foam underneath the refrig. I simply cut the holes for the rubber feet and added as I slid it into place.

The counter tops and trims were installed by FWC.

Here's a couple other picts of the kitchen area. Notice I had an ice box originally when I bought it.

M-DsHqmJonVZrVKzDVq8u1XFYcsYtVWuFMjmtwtUJqxNoRgeuZ9XXp5cGxTPsZg5zSavsAjxcjb_xHvjkJGw8Oa9bi2OKk-BSxWUzG_EUSbu8QaiftY39PeXNRL5tet8prmAqQfci7XS8MkAOcZzKvBE9sYvO1DWpj8vEyc-oaPg7sJSYKXjsYGfD67LV1RaEeV9eXomYKMmVTMeaN3JOARlcY6CuYBIHxHUvX_6dxjD4Fmu5S8N2JXsO7nFcu3O6XMdBcPYOYzDCvjJon5wmJsJayOIenl8-AYgWIJSzCqyE1HOf90b0tbU4OWXsTQkMYAkzjldTQRRkjyG5avv39bQRuh1aNh_Wg71pRfJAu1u33LazQ6gV8sweSnP3MPg5lp16_h_Q2JPzyqbFBgKWG6vhWD_pBa0f-kOJgatHmbECRPOYKxTZ4G-oo7h4-Jv7YFGjaMsJn5UucK4tj7tdnU1IpcLOudmIkdgTnQGX14i4ImR6APEROLW4PS32sZ9gHkrY0JYJJFujwAxSVwJONE3UPwU1j-CSw5O2WjuJ73icNQeWuW-Z6JquBO2ANblL3wzO_kefb8Dqb-E-zGfNxQ8banbzK7bWQR2GcW0iS-0-Uou5SXv=w1426-h950-no


1UksY_x1tyu1T5xNC6_9fXNBehZXv4phe_ayoD8L-HxwVMClqJkb30NPUhVHW2h5NmGM97CnNo8Mv3Fb94lgMTa23fctzUBiWPNYFsj56tkRaNVThPynyEa-gahNagj_bKawsh22wcaCFO-mEzkdil102QtRu3z8P7huZokf3A1NDOcaFo1Lb5oiJ2hJqut0FOf4cDqTKqbxwCAAnHZtUmUd2LrFsz9PVoO7am7DqlsGqqwPhZz8MmuQr2lTi3CUuxKKXXucjBwP972pfBO-1gzyHiRh8umX206kn6zppRzs_LLyV_EJKjhQ92lTTxPSMHj3rlD2yPUuYexWdSBs4RaJeQSZh3x9vpTHOlz2hiMWcDOqSBHExH-ZvNIIPG9upmAEUxaA4tH017HgY0nKu674mhetMtBLQmsPOXuDh8cUN9zXib2eT8b1hkyKb6ss-q5FSMI_ZUcSsaqP21LSsgo2viUNtzKf4_dZsakAgSt2IJmOXhjitckt24x6GIWY6E3ZrMRMR_XRY1HHdkuawEFh4DxosyjAs06n5xtZXkKb5RMDjPxJL0tUg_PpVjBhAQycx2aH_FqYZvCaNDgabNC3GIIWU91FpP_Gnb-skIqB3rc_0CcE=w1426-h950-no


WmEAq169nRtxN0QIpR1Fwiaz93pMzeHdcU9-5NmVwj9vAM3JEGo_KzIxe9MuaaASglVrqRTVtH-Vf0bAGGuwXlrn07iHkvXJeEEs3Sw07phb-UlCVLWNLJjPFRskUx200eqx4GNHAr_Yef165zHun-BOXMNiLXBgdwvjPm-wAZ02TS68z81S99TQU-C26fKgtMKhKMxw83ruQhPAx3TK2urKB_hc_Z2o_6GxoLaXGupT_jp2cT1XOhRgZCou3HY3vcDkJRL3_KgKA-jZy7e27RaYZ7hz_1eW5pVt2oCQH9mBn6FrH2GR6d0MrQXf7MEmrBBMJF7wXBuvaLC34NoSq9I0wd-nWpWzlqd14s6GOiBC7tucPbKoWcU9oog-2vTkGlLfEjL0jHhzbe1hIO97vvgZwQyT1atJKMmJJzNAGstca35bSQTngu2IEdueFPgfT17vVfZX1fGJtFje8nTAO3iT_XGbtYsQwECR3R8oNbxyUWdTR-KZPf7bHcuG1mm5fJHYt7XNO3ud6ztEsh7KlrThZahXzQYug8Xk-igP9d5E1JtZ3moQ-J-CKY3_lKhcoDYg6N_erAVnitLvpQhjps0kvnNRJTC9NieqES5aOnDBUY_Z6G_e=w634-h950-no


XsxvrteVQbRHNArRWeC4sRMjGsgkumzRfnQWPX6dWmP-pxfKq0P-AmroaBTUMkh0FW8EVKc35mWLkpnlk5fPgI9-QYg0YOVCGJZWL2Um40iKx5_ZgSOdtPO2Mj47aRkzloajtQ6H6b-wMikGN8hQEm2xObs_eMPK6cp9c9l7bZB6rJSPm_X1opr1N25Lg_zHUyRXky7wPAulUFt9oWx7XYYWu_CiTZUsQI7apjm2myvEuhOkd44OTHM4v3Bb3Ncw8myFzUS3cRMzsUN148UAvhS56t8VXkDAwmIb7hsAk61ZcqTnBHDYT_EWhH4vbXXpjbOQNLJ6GoXpaPKQvYAceWe8H3IFIKTwqOK8XZFRv525Re_jIro4MLc46zFt8_WDitVHUxDOQlmTq_loyK7nm1tUcl184Ya1-ZAnSQNtvKKlA-htcpWiQNdS-hYapOjiggnGMgKpyooaU3t2ce0xzMAxBBrJClFglCFlZ_yhluC_P8MSS-Jxi2ziX4N1zLQmJGoN9YAO1oUMfRb239h4ViV-2bBeSJmkVpeqB0ZHb9ag7CTX3CL6KjT8qUqyXb0cm9i5OHfBHtuMA4CQOfvT3RhpZ4gWdB4HHTVqnPKqIyHaGG9Dbwno=w1426-h950-no

GRXNk9xrYu5HULn7O1w_Ym6B-DyXwcA3UhR0MA9s7YdS4oHS544LS4_cTUWbXaCS2E9zsSVc9MYLRJCp66PshOkxyYHWKKPiE3OiHehRbYxm97jbeArsyOj6jyEbLhUDSW1-9EGknK6AGunge2q4HwicIzhVOSirWr4lUMBn4RlNaGwpKoAYSQW7P2VWMa6bKvVIJ6nhN5nBynAPkXxFUwl48SK28ybJH7r2trMfFgmp-asN7xzDD4lYVjODSH3qAKEX4lkw0mEpnQCul5eBUjdZhFjadSqJM6yKI07iZ0u6tK7EWjYxMhsxf9P94JokupzxmecOk0zv-qy91RJET3puxvcKZNs-ZgeZeJDO1k_HXMRjpAacVlDu3NKHEAOSb_1oLzDghX-MsgmpFjByinIZwPlnxehx_tusFCUyJZZT4l_sV1e1a4B6BTwLrAIM2gHI7OKaDVyhfHO_UA2gZOj6p9Bn8YMNONDbPGS3pY1thXH-q8UbWXBvZ58XSu435_URwyIR1OA8Fqk1gshkxJd0O7hnU_rLlx_se1gwG0njoQbOifGIEPjBKQ5IoiriEHcwew_8dBDKuluEtqw_HExz2q22J0xr1dltvF4C0lEHZXDW=w634-h950-no
 
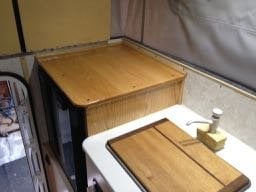
Hello again. I thought I'd post up some photos so that if anyone else is considering a similar install. Again this is a 2011 Eagle (the Fleet has same framing but is wider). It is a weird feeling slicing through the wall. Terry sent estimated measurements so I could find a center and cut out from there. I decided to put in both vents and all said I believe this was a good decision because it allows a good flow of air. After I had both holds cut (beware there are wires in the way...be sure you have the main electric knob off), I rolled the sharp aluminum edges with a burnisher...any round metal rod would do... then sealed all around with aluminum tape. I had both an AC as well as DC plugs on the side of the cabinet (where I plugged in my old Engel fridge). I relocated the DC plugs to the front of the cabinet by making a cardboard template and tracing it on the front of the cabinet. I did this because it is cleaner and easier to use a forstner bit to drill large holes rather than cutting out a rectangle...either would work. I decide I did not need 2 AC outlets in the camper so I simple capped and taped off those wires. Once the DC plate was installed I pulled the coiled wires from under the sink out through the hole left by the removal of the DC plugs. (FWC had the wires already there wired to a 15 Amp fuse in the box.

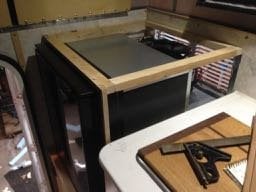
Lots of measuring for the tight fit of insulation ... I used 1 and 2 inch aluminum covered foam board all alum. taped for a water tight seal. The Isotherm 65 is up on 3/4" legs so that space beneath the fridge, when installed, got filled with door and window foam sprayed beneath. Before I did the install I also adhered mylar plastic sheet to the top of the propane box (on which the fridge sits) in case there was ever a moisture issue.

The frame was made from fir 3/4" x 1 1/2" screwed into the camper framing tubes. One need to pull back the siding to find where these are. As I love solid wood I decided I wanted solid red oak counter and edging. I planed down stock to 1/2" and found it to be lighter in weight than formica. Working with solid wood though presents the challenge of building it so that it can expand and contract with the seasonal weather. More or less properly dried red oak will expand 1/8" per foot width. The counter being shy of 2 feet I felt comfortable with as quarter inch for expansion (winter in NE is the dry season, summer humid so knowing where the wood is when you make your cuts is important.... being it dry I cut 1/4 inch less width than if I were to cut it in summer).

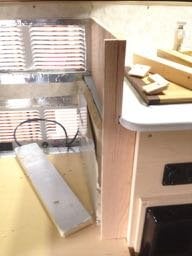
The vertical pieces was dadoed so that it overlapped the existing counter and a bead of silicon was put in there to keep counter water from getting in. The vertical piece was then screwed to the sink cabinet with screws in slots not holes...this allows the whole piece of wood to expand without cracking. The top counter was screwed in place across the front as well into the vertical piece. It too was 1/4" off the back vent wall. The other end was attached to the frame underneath with "buttons" that are in a channel cut into the frame. This allows the whole top and side to expand and contracts a unit over the seasons. The 1/2" quarter round trim molding covers this gap. All drill holes that showed were plugged with teak. Three coats of Spar varnish and a week later carnauba paste wax finished the job. It came out okay. (I did find the corner of the camper was not square and adjusted the counter).

My beer will now be cold! This fridge is extremely quiet too.
 

Attachments

  • IMG_2017.jpg
    IMG_2017.jpg
    11.5 KB · Views: 97
  • IMG_2023.jpg
    IMG_2023.jpg
    10.3 KB · Views: 97
  • IMG_2026.jpg
    IMG_2026.jpg
    9.2 KB · Views: 100
  • IMG_2041.jpg
    IMG_2041.jpg
    12.5 KB · Views: 118
  • IMG_2059.jpg
    IMG_2059.jpg
    13.9 KB · Views: 104
  • IMG_2063.jpg
    IMG_2063.jpg
    13.1 KB · Views: 110
  • IMG_2082.jpg
    IMG_2082.jpg
    12.6 KB · Views: 94
Thanks for the great information, guys. Does anyone have any wisdom on doing a similar swap, but with an absorption fridge in place? I am planning to get rid of the copper propane line for the fridge and cap it as close to the tanks as possible, but haven't checked to see how the line is joined to the rest of the propane or what kind of cap I will need. Mine will be on the passenger side of a front dinette fleet.
 

New posts - WTW

Back
Top Bottom