Jack Brackets Detaching

Ruck_and_Roll

Senior Member
Joined
Apr 29, 2019
Messages
146
Location
Grand Junction, Colorado
Hey all-

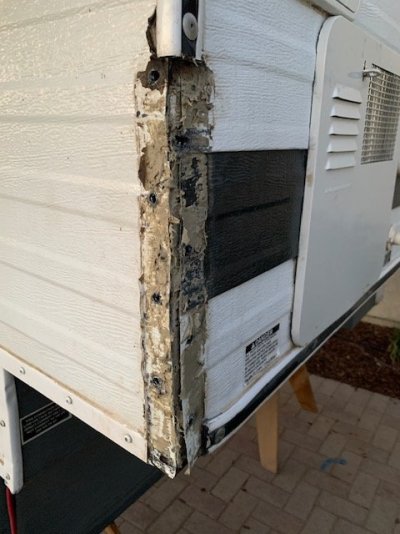
Looking for help on a new issue. I have a 2008 Hawk. I noticed a few screws loose on the jack mounting brackets which is resulting in the jacket brackets being pulled away from the camper under force. On my last time loading the camper I think had a little bit of user error and had some horizontal forces (in combination with using extension plates and casters), where the jack forces angled and weren't straight vertical, resulting in stress on the attachment points. Each of the attachment points appear to be ~1.5-2 in self tapping screws, There are 8 in total on each jacket bracket. . I've noticed some have been somewhat loose before. It seems like 4 of the screws have lost their "bite." Thinking some of of it could be due to some wood rot and wood stripping. Anyone have any ideas or suggestions? Obviously looking for a solution where I don't have to remove the outer skin or anything real intrusive. Just really looking to beef up the attachment between the jacket brackets and the camper. I am sure a new application of adhesive would be helpful as well.

Picture attached.

Best,

Luke
 

Attachments

  • IMG_9302.JPG
    IMG_9302.JPG
    66.9 KB · Views: 266
No wood in there that I'm aware of. The aluminum frame certainly could have had the holes wallowed out though.
 
Bigger screws may not hold all that well. I wonder if you could move the brackets up a bit and make new holes? Or make new holes in the brackets?
 
I'd probably try one of the epoxy aluminum repair products. The jack load would still be carried by the screw, mounts, and tubing. The aluminized repair epoxy would just take up some of the play and keep the screws from backing out. I'd look for one with a non-sagging consistency so I could get it up in the tubing, but not run down the inside of the tube.

There are several products from companies like Locktite. Here is one from a quick Google search http://www.hypoxy.com/aluminum_repair_kits.htm

I'm not impressed that FWC uses self tapping screws into thin walled aluminum tubing. Surely there is a thicker insert or backing plate?
 
You might want to look into Rivnuts. They rivet in and then use regular thread bolts.Just look up rivnuts on the internet under images if you aren’t aware what they are.
 
Howdy

Vic's suggestion to drill new holes in the bracket itself and then reinstall seems to me your best solution.

As with any work you really need to know what you are doing with this.

I have never known whether the goop behind the brackets is more of a sealant or an adhesive.

Even if it is an adhesive, it is only adhering the bracket to the outside layer of siding.

Do you live close enough to have either the FWC or ATC factory make this repair ?

It is lucky that you don't need the jack bracket functional until you remove the camper.

I would seal the holes until you decide how to proceed.

Good luck !

David Graves
 
Thank you for all of the replies and suggestions.

Since not all of them are stripped, I am going to start with what seems like the easiest solution (although may not be the most effective)- a few bigger screws. If that doesn't work, I think the redrill or the rivnuts would be the next step.

I like the idea of the aluminum epoxy.

Unfortunately, I don't live near either of the factories....and David, you're right, not entirely excited about working with aluminum tubing and seems a little over my head.
 
Another thought.

Clean everything entirely before you even start !

You may need to find out from FWC what the goop was in order to remove it thoroughly.

Then decide on what new goop to use.

It may be that a combination of larger screws in existing holes ALONG with Vics idea of new screws also.

The screws provide a sheer strength when the jack lifts camper but they also help the goop to provide a friction surface attachment of the bracket to the camper body.....

Do you know the basic concept of pilot hole drilling etc. ?

Take your time and use your brain....and it should work out well.

We are all rooting for you.
 
More on jack brackets....

This was my experience extracting the screws, stripping and refinishing the brackets and re-mounting them on my 01 Hawk in 2015. (Note: my brackets didn't have any sealant. That's how FWC did it at the time.)

What screws for jack brackets?

In 2010, Stan posted info and photos about the old one-piece brackets (like mine) and the newer two-piece ones. Also- note the photo of the older and newer screws. I believe the newer-style screws are ITWBuildEx Part number 1155000. (I'm providing that info for the specifications, i.e. tensile strength, thread, coating, etc. Note that this may or may not be what FWC currently uses. And it may not be what they use on all bracket variants.

Stan's 2010 jack brackets post in 'Rusty Brackets' thread

In 2016, wuck did this interesting post on using rivnuts to mount the brackets on his 04 Hawk...

wuck's rivnut post from his 'My 04 Hawk' thread

And in this December 2019 post, wuck tells us how the rivnuts he installed three years previous are doing...

wuck's rivnut update in the 'I have a screw loose' thread
 
A little update here....

-Good luck funding self tapping screws bigger than what is already on there...went to multiple hardware stores. You certainly can find something longer, but if you're looking for larger diameter, you're local Home Depot/Lowes/True Value won't have it....
-Ended up using a slightly thicker lag screw (same length) and that seemed to do the trick, so I think I can avoid redrill and/or plus/riv nut for now....
-Talked to FWC, and the gooey stuff is apparently Butyl tape. Certainly doesn't look like tape, but hey, this is what butyl tape may look like after 13 years.
-On further investigation, the corner bracket actually seems to have gotten bent/warped slightly. I am sure these are circa 2008, and it is the "2 part" type, so I don't think I have any chance of fitting of the bracket flush against the camper unless I replace.

Thanks again,

Luke
 
Project Update.....COMPLETE. The bigger lag screws did not hold. So I decided to go ahead and do the Rivnut idea.

Special thanks to wuck (Pat), he really gave me great insight into the Rivnut project and was VERY helpful.

I decided to use the same tool, the Astro 1442. Unfortunately, my experience wasn't as good as wuck's and I found that the mandrel pieces stripped rather easily, allowing you to set about 4-5 nuts before the mandrel failed. Thankfully they are going to take a look at it for warranty.

Steps.
1. Remove brackets clean off existing gunk.
2. Peel back aluminum skin to see what you are working with. My aluminum tubing seemed to be in a little better shape than Wuck's so I think mine was a little easier project.
3. I started with 1/4 rivnuts to start and slightly enlarged the pre-existing holes to fit a rivnut. Practiced on a scrap piece of metal. I decided to replace all 9 existing holes with rivnuts. I used a reamer and a dremel tool to make as even surface as possible for a good set. I got about 4-5 set and then my tool failed. I did improvise and you can set rivnuts manually using a socket wrench. (I wouldn't recommend this either). Difficult to get a good, even set and had a few rivnuts start spinning. (I'm on the lookout for a better tool). Had to remove a few so I had to upsize, and ended up placing a few 5/16s and M8 size rivnuts. I'm glad I started small with 1/4 inch.
4. Also had to realign a few holes (and drill new holes into the bracket). Once of the factory anchor points was actually in the wood frame, not the tubing.
5. Finally, I reset new butyl tape and got the brackets realigned. It is very sturdy and seems fairly bomb proof. No problems at all using jacks. For the bolts I used 1.25 inch flange bolts. I have a few other screws popping on a few other brackets. I'm going to hold off on that until the brackets seem weak.

Best,

Luke
 
Aside from helping the OP solve their issue, it’s important to note for the occasional poster who wants to put casters on their jacks or jack on a significant slope that this is the potential consequence (in addition to the more immediate possible consequence).
 
Jon R said:
Aside from helping the OP solve their issue, it’s important to note for the occasional poster who wants to put casters on their jacks or jack on a significant slope that this is the potential consequence (in addition to the more immediate possible consequence).
I would say that putting castors under the jacks on any surface, sloping or not, is a bad idea. Any sudden stop can damage the jack mounts. Stan Kennedy (FWC) posted this advice some time ago.
 
I fully agree. My point was that, if a person used casters i despite the contrary advice, and even if that person is careful and lucky and does not bend their jacks or brackets or worse, the side loads over the long term may still loosen up the fasteners holding the brackets to the frame.
 
I noticed that 3 of my bracket screws (all from different brackets) were loose when I put the camper on this spring. Called FWC and they said to just go up one size on the screws. As mentioned, could not find locally. I did find 5/16"x2" long self tapping screws on Amazon:

https://www.amazon.com/dp/B00GYJ52B8?psc=1&ref=ppx_yo2_dt_b_product_details

I put them in and they seemed snug and I was able to tighten up. Ordered more to have on hand if more of the others loosen. Not sure how they'll hold up, but if they hold up another 13 yrs (2008 Eagle) I'll be happy :)
 
Yes, do not use CASTERS! When I bought my FWC, they were on the jacks and advertised to me as an upgrade and reportedly a dealer had said "they work really well."


Jon R said:
I fully agree. My point was that, if a person used casters i despite the contrary advice, and even if that person is careful and lucky and does not bend their jacks or brackets or worse, the side loads over the long term may still loosen up the fasteners holding the brackets to the frame.
 

Latest posts

Back
Top Bottom