You are using an out of date browser. It may not display this or other websites correctly.
You should upgrade or use an alternative browser.
You should upgrade or use an alternative browser.
looking for "THE" folding step stool...
- Thread starter Tomas Tierra
- Start date
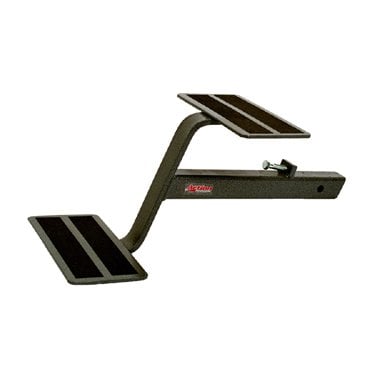
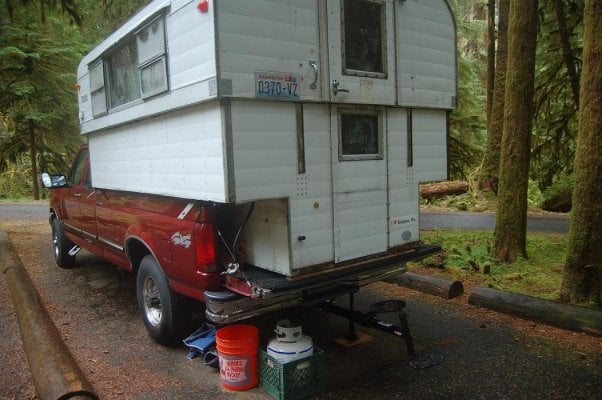
sorry for the late post. i just bought the coolest step for the back of my truck. i'm excited not to use the step stool anymore.
wes
wes - What is this/brand/model? Where'd you get it?
wes
wes - What is this/brand/model? Where'd you get it?
caseboy
Senior Member
i found it by searching truck camper step in google images. i'll try to attach the web page.i had to make a 18inch extension for my reciever as my camper is a ten footer.
wes
http://www.central4wd.com/category.aspx?page=id%7C61371
wes
http://www.central4wd.com/category.aspx?page=id%7C61371
i found it by searching truck camper step in google images. i'll try to attach the web page.i had to make a 18inch extension for my reciever as my camper is a ten footer.
wes
http://www.central4w...page=id%7C61371
Ok, thanks!
wes
http://www.central4w...page=id%7C61371
Ok, thanks!
BobM
Senior Member
- Joined
- Nov 2, 2011
- Messages
- 730
I just ordered this Bully step @ Amazon which had it for the best price of $22.50:

Here's a video to show how it works.

Here's a video to show how it works.
caseboy
Senior Member
that's a great step also,but i needed a two step to get my fat___ up into the camper.
this forum is great for sharing ideas. i'm so glad i joined.
wes
this forum is great for sharing ideas. i'm so glad i joined.
wes
BobM
Senior Member
- Joined
- Nov 2, 2011
- Messages
- 730
I had to lose weight because I only have a half ton truck 
chnlisle
Post Master
I had to lose weight because I only have a half ton truck 
Now you know why I have a 3/4 ton.
Now you know why I have a 3/4 ton.
BobM
Senior Member
- Joined
- Nov 2, 2011
- Messages
- 730
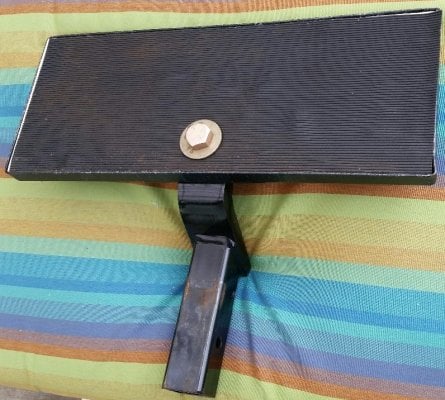
Well I got my hitch step and it's really sweet. Here's some photos:
Normal setting for driving:

Short setting for step:

Extended setting for step. I like this setting so you can use the bumper as a second step:

Example of a different angle setting. There's notches on both sides

I got this on Amazon for $22.50
Normal setting for driving:

Short setting for step:

Extended setting for step. I like this setting so you can use the bumper as a second step:

Example of a different angle setting. There's notches on both sides

I got this on Amazon for $22.50
Well I got my hitch step and it's really sweet. Here's some photos:
I got this on Amazon for $22.50
Do the rims around the holes provide plenty of traction? Like, if it was wet, you wouldn't slip on it?
I got this on Amazon for $22.50
Do the rims around the holes provide plenty of traction? Like, if it was wet, you wouldn't slip on it?
BobM
Senior Member
- Joined
- Nov 2, 2011
- Messages
- 730
Do the rims around the holes provide plenty of traction? Like, if it was wet, you wouldn't slip on it?
I think so but will need to test for that.
I think so but will need to test for that.
ntsqd
Custom User Title
FWIW those rims are called "coining" but all of the desert racers out there will call it "dimpling." They're usually done for two reasons, either to strengthen a sheet with holes in it or as a traction aid. In this case I'd say probably both reasons.
It is quite remarkable how much stiffer a flat sheet of holes will get when the holes are "dimpled." Somewhere out there is a Utoob video demonstration of this effect. Though there are dedicated, and sometimes quite expensive, dies made for coining/dimpling a friend uses old bearing race matched sets with a draw bolt to achieve the same thing.
It is quite remarkable how much stiffer a flat sheet of holes will get when the holes are "dimpled." Somewhere out there is a Utoob video demonstration of this effect. Though there are dedicated, and sometimes quite expensive, dies made for coining/dimpling a friend uses old bearing race matched sets with a draw bolt to achieve the same thing.
BobM
Senior Member
- Joined
- Nov 2, 2011
- Messages
- 730
I did throw some water on it and it was a little slippier but I felt surefooted.
caseboy
Senior Member
ntsqd
Custom User Title
Am curious about your travel stowage, do you leave it in place or remove it? I've been removing what I built (partly because I've yet to drill a hole for a pin and partly because it's a hangy-down part), but haven't been happy with any storage methods/ideas that I've had.
caseboy
Senior Member
i've only used it once. i just layed it in the camper so it would be first thing out and last thing in when packing up. i suppose i could leave the 18 inch extension in as it doesnt go past the tailgate.the step may hit ground if i take a steep curb or ramp since it sits way out there.i haven't tried to wedge it in the space between camper and truckbed,i might try that.
wes
wes
ntsqd
Custom User Title
We now have a slightly beat up small portion of cabinet courtesy of the step and Hole in the Rock road's washboard. I'm thinking of using a cut-off portion of trailer hitch socket oriented vertically on the soon to be built spare carrier with a pinch bolt to keep it from ratting.
MountainSufi
Senior Member
- Joined
- Oct 15, 2018
- Messages
- 126
That Cosco 2 step is what I've got also. You don't any top rail above. Just hacksaw it off leaving a few inches above. Then take off the rubber bumpers on the feet (they leave black skid marks). At your local Ace find plastic things for bar ends (I remember 7/8 inch???); 6 of them. My local Ace didn't have them, but did order what I wanted. Very Sturdy, and it fits perfectly flat on the floor of my 2017 Fleet side dinette.
PackRat
Senior Member
I prefer the step unit that attaches to the truck 2" receiver tow-set up for a couple reasons:
1) you never know if you will be on PAVED level ground so the setp unit may be lower than the truck bed and have a high step required
2) if you have ever had one of those plastic or el cheapo aluminum framed step unit collapse with you or your wife on it, that could end your trip at the ER or simple make it nigh unto impossible to get in/out of your rig
3) most of the available receiver step units are so small that at night, in poor light you are risking life an limb getting in and out (leave alcohol out of the equation for a second).
4) if you have balance issues good luck with ANY step unit that does not include a safety hand rail that is not OSHA approved (that would be Oh Schiess...He's Airborne!).
I started with some 1"x1" angle iron and a center plate that is 3/16" thick. I used painted plywood for the inset step itself and glued on some grooved rubber matting. I drilled it for a bolt to attach it to the receiver hitch (still need to change that bolt to a carriage bolt) and find a section of copper pipe as a bushing between the bolt and the hole in the receiver ball mount.
You can mount the step on the UP or the DOWN side of your receiver hitch ball mount depending on what works for you. You can also make a SECOND unit that also bolts to that same carriage bolt so you have a lower first step if you are older than dirt like I feel these days of your wife wants an easier access. I'm going to add reflective tape to the steps so you don't kill yourself tripping over the step units also.
Attachments
Similar threads
- ramblinChet
- Trip Reports
- Replies: 7
- Views: 2K
- Sedro F. Woolley
- Gear Exchange
- Replies: 3
- Views: 989
- LosAngeles
- Truck Campers
- Replies: 11
- Views: 1K
- Old Crow
- Camping & Outdoor Gear
- Replies: 0
- Views: 699
New posts
-
-
-
-
-
-
-
-
Coolers - When You Need Something to Watch
- Latest: Sagebrush Reconnoiterer
-
Try RV LIFE Pro Free for 7 Days
- New Ad-Free experience on this RV LIFE Community.
- Plan the best RV Safe travel with RV LIFE Trip Wizard.
- Navigate with our RV Safe GPS mobile app.
- and much more...


