Jack
Senior Member
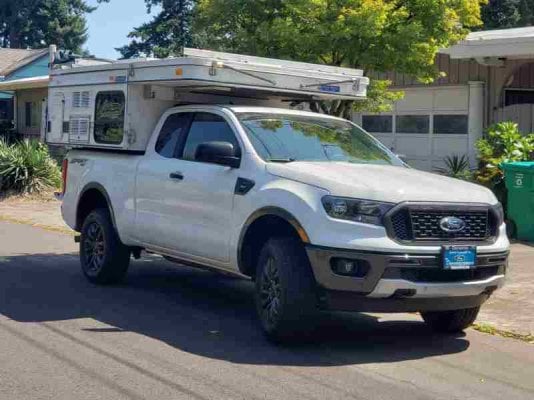
Our Fleet is now on our 2019 Ford Ranger. gkebdrick has a lot of good information in posts on his thread at http://www.wanderthewest.com/forum/topic/18241-new-ford-ranger-fwc-fleet-installation/?hl=%2Bford+%2Branger but since I did much of the installation, I wanted to lay the details out in a new post with pictures.
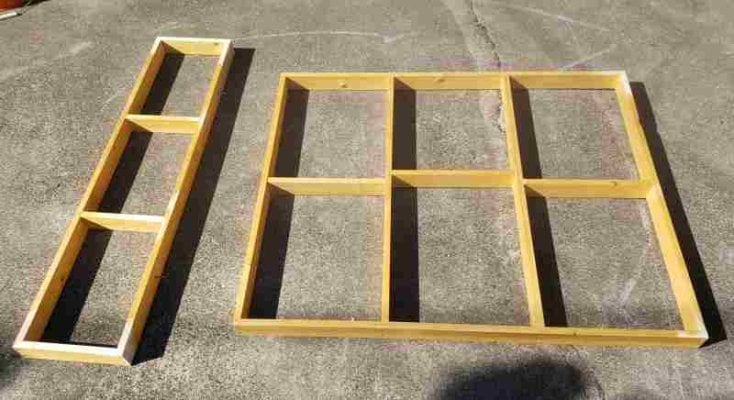
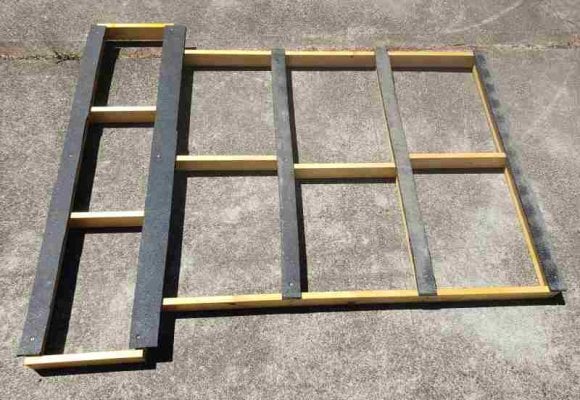
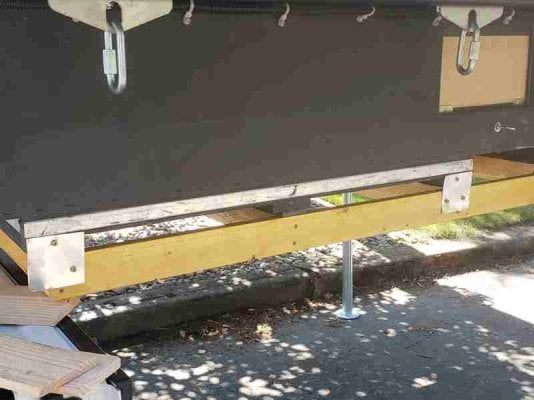
First, you need to raise the Fleet a minimum of 3 1/8” off the bed to get ½” clearance above the sides, which FWC says is the minimum. I built a frame out of 1” x 3” (3/4” x 2 ¾”) fir with 3/8” hard rubber pad to raise the fleet, which thus met the minimum. The cross pieces line up with Fleet’s cross pieces. The cross piece at the very front and back of the Fleet do not need to be supported. I chose to build an open frame of 1 x 3 because I wanted to keep weight down. See pictures. I’m not sure all Fleets and other campers have the same dimensions, so measure before you cut. Also, I hear some campers may have their tie-down plates in different positions. Check with FWC. Next time the camper is off, I’ll update with my Fleet measurements – or perhaps someone can post them.
I had the bolts anchored to the bed by 10/40 Overland (Jeff Martin is great to work with).
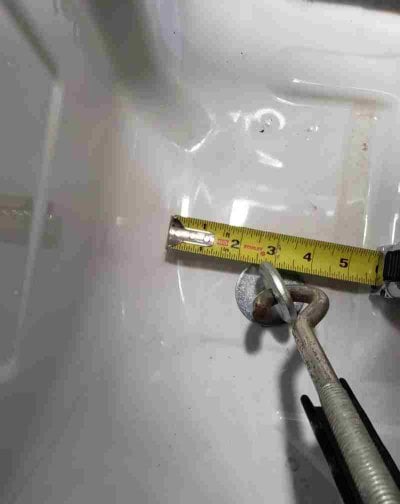
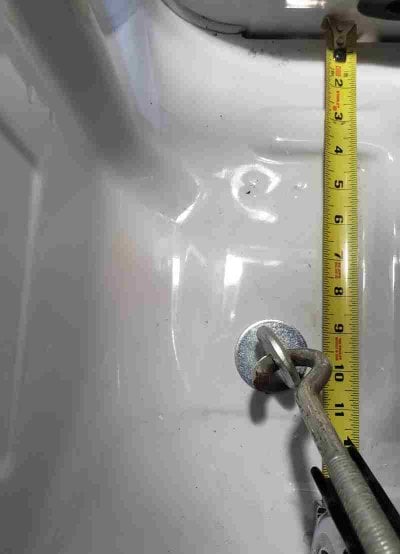
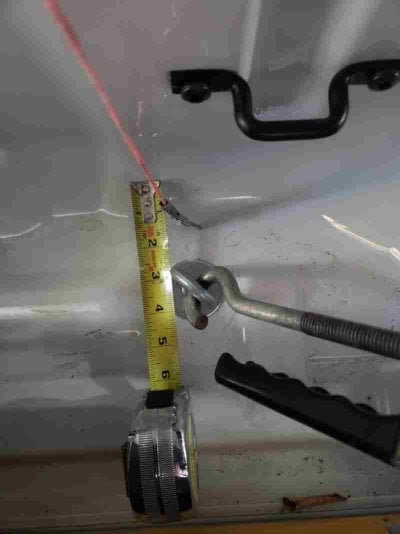
here in Portland OR and it took about ½ hour and was relatively easy to work under the bed. Using the offset in the anchor plate, they were able to mount the eyebolts very close to the bed cross bars. I neglected to measure eyebolt locations before I put the Fleet on, but the pictures with a tape measure should be accurate enough. I’ll try to add under bed pictures in an update.
Before putting the camper on, remove the antenna on top of the cab – it just unscrews. This did not seem to affect radio reception and Sirius – and probably not Ford’s telemetry. You will also need to remove the black tailgate latch loops from each side at the back of the bed. They stick out too far for the Fleet clear.
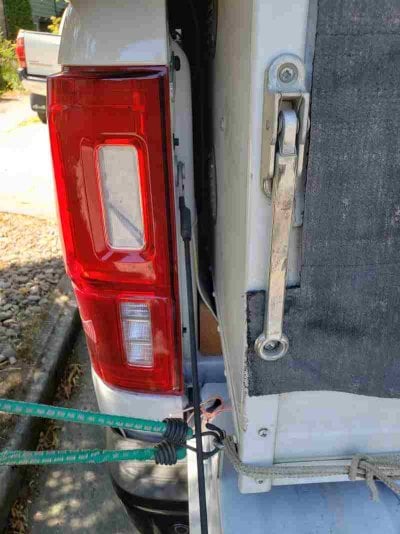
The Ranger bed is about an inch narrower at the tailgate opening than the 2005 Tacoma bed that we previously had the Fleet on, but there is still an inch clearance on each side at the opening. BUT you have to remove the tailgate latch clips.
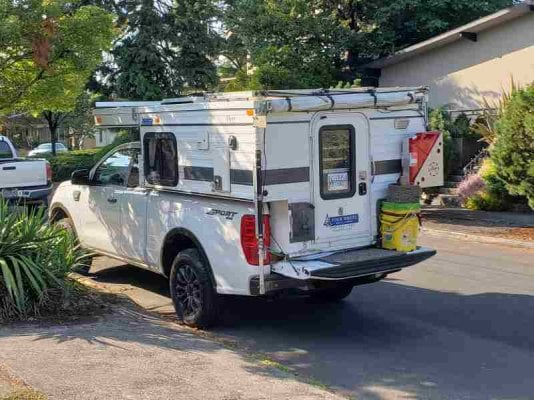
Like we did on the Tacoma, we left the tailgate down. It makes a very nice final step into the Fleet, and a great place to anchor our grey water bucket, leveling 2x4s, an second gas can, etc., while on the road. In development for the Ranger is a stick-on backup camera mirror. It’s available for the Tacoma, F150, and a bunch of other trucks: https://www.amazon.com/Tailgate-Mirror-Backup-Camera-Accessory/dp/B07QF1HB62
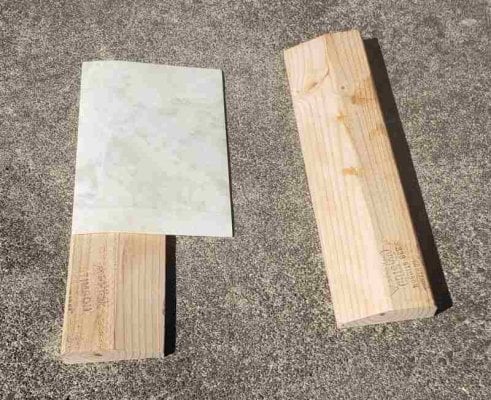
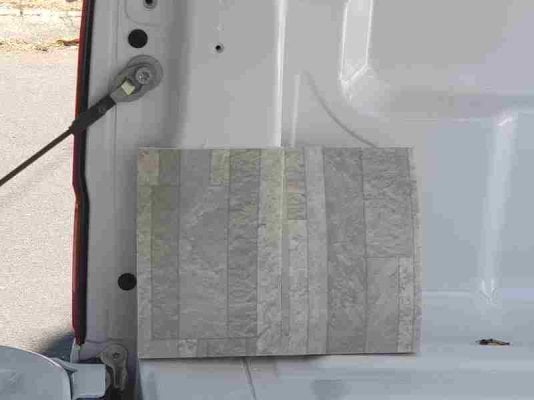
Inspired by the guides on the Tacoma anchor bars, I tried to emulate them. Unfortunately, I built the frame to the dimensions of the Fleet cross boards, which are an inch short of the sides of the Fleet in the back. Next time I have the camper off, I will make new guide pieces. They are covered with a few free vinyl floor samples from Home Depot.
Air-Lift has air bags for the Ranger (Kit 55234), so we went with them as Firestone does not. They have an anti-jounce cone in them that is also supposed to protect them against air loss in the bag. Installation is pretty straight forward, and the only holes to be drilled are for the air hoses next to the license plate. I had the work done but was there while they did it. Unless you are young and agile, you really want a lift that can bring the wheel up to chest height and can also allow you to remove the wheel.
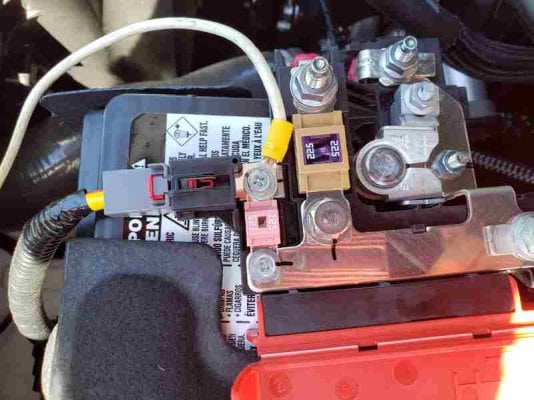
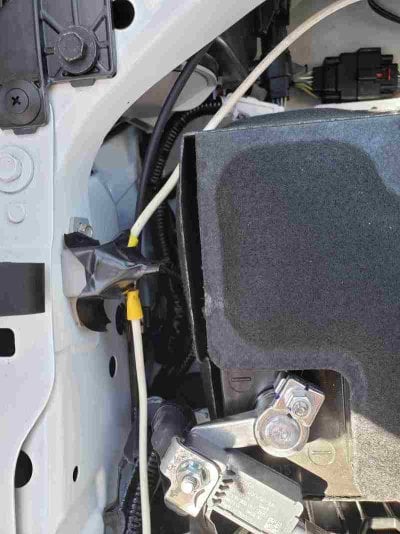
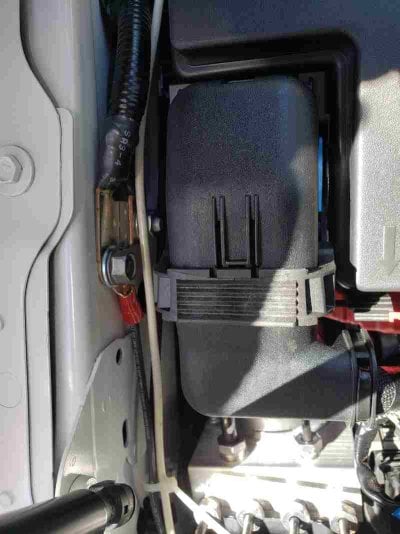
Pictures show the wiring. The wire is 10 gauge braided (preferred over solid wire) and the attachment points to the Ranger electrical system are important. Do not connect the ground to the battery, but instead where the battery ground connects to the chassis. Of course, be careful when connecting to the positive terminal – make sure your wrench makes no contact with the chassis (or disconnect the ground terminal on the battery first). I chose not to mount the Fleet cable connector in the bed but, using cable ties, mounted it under the truck. The bed mounted connector in the Tacoma for our previous Eagle was a real PIA to connect. We had the new connecter in the same location on our Tacoma for 4 years and no problems. Use cable ties to secure the wire from the battery to the connector. FWC provides a 30 Amp resetting fuse with their install kit (or get it on Amazon – it comes with a plastic cover). The fuse is taped over with electrical tape in the picture: https://www.amazon.com/RKURCK-Circuit-Automatic-Automotive-Protective/dp/B07LBNFZGK/ref=sr_1_1?keywords=30a+resetting+fuse&qid=1564681722&s=automotive&sr=1-1).
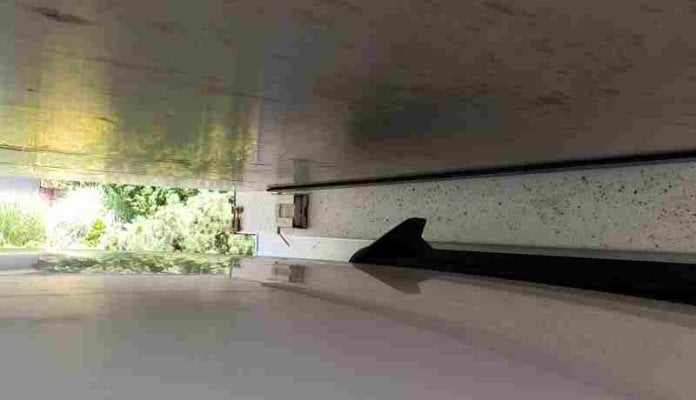
The front of the camper overhang comes within 7 to 8 inches of the top of the windshield, which pretty much precludes mounting a fairing on a roof rack bar. On the other hand, the slope of the windshield may be sufficient for air to move smoothly up over the camper.
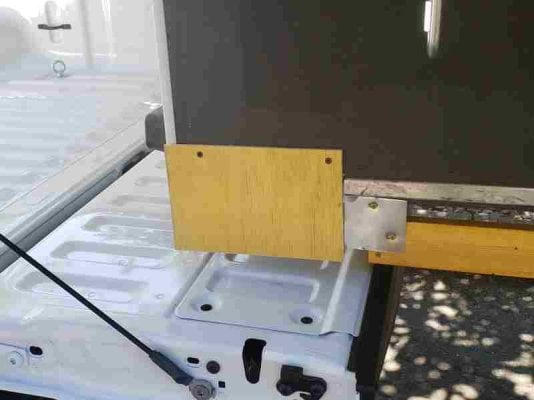
Because there is no bed liner like in the Tacoma, there is a lot of storage room between the outside of the camper and the side of the bed walls with access through the turnbuckle openings. If you use this space, I strongly recommend that anything you put there is in a stuff sack clipped to the turnbuckles. Our experience with the Tacoma was that stuff in this area moves around and can get wedged between the camper and the bed. The picture of the frame attached to the camper shows a panel meant to keep any loose object from getting under the front of the camper.
This extra room also means that Derringer Fast Guns easily fit. A proper selection of different size easy-links makes for easy fitting. Adjust the Derringers once after travelling over a rough road and that’s it. I check them about twice a year, but have not had to readjust them.
Loaded for a trip (20 gal water, full propane, food. lots of our stuff, and a full fuel tank but no driver or passenger), the Fleet and Ranger weigh 6500 lbs (OR leaves their scales on even when the weigh station is closed). A lot cheaper than a truck stop scale.
First, you need to raise the Fleet a minimum of 3 1/8” off the bed to get ½” clearance above the sides, which FWC says is the minimum. I built a frame out of 1” x 3” (3/4” x 2 ¾”) fir with 3/8” hard rubber pad to raise the fleet, which thus met the minimum. The cross pieces line up with Fleet’s cross pieces. The cross piece at the very front and back of the Fleet do not need to be supported. I chose to build an open frame of 1 x 3 because I wanted to keep weight down. See pictures. I’m not sure all Fleets and other campers have the same dimensions, so measure before you cut. Also, I hear some campers may have their tie-down plates in different positions. Check with FWC. Next time the camper is off, I’ll update with my Fleet measurements – or perhaps someone can post them.
I had the bolts anchored to the bed by 10/40 Overland (Jeff Martin is great to work with).
here in Portland OR and it took about ½ hour and was relatively easy to work under the bed. Using the offset in the anchor plate, they were able to mount the eyebolts very close to the bed cross bars. I neglected to measure eyebolt locations before I put the Fleet on, but the pictures with a tape measure should be accurate enough. I’ll try to add under bed pictures in an update.
Before putting the camper on, remove the antenna on top of the cab – it just unscrews. This did not seem to affect radio reception and Sirius – and probably not Ford’s telemetry. You will also need to remove the black tailgate latch loops from each side at the back of the bed. They stick out too far for the Fleet clear.
The Ranger bed is about an inch narrower at the tailgate opening than the 2005 Tacoma bed that we previously had the Fleet on, but there is still an inch clearance on each side at the opening. BUT you have to remove the tailgate latch clips.
Like we did on the Tacoma, we left the tailgate down. It makes a very nice final step into the Fleet, and a great place to anchor our grey water bucket, leveling 2x4s, an second gas can, etc., while on the road. In development for the Ranger is a stick-on backup camera mirror. It’s available for the Tacoma, F150, and a bunch of other trucks: https://www.amazon.com/Tailgate-Mirror-Backup-Camera-Accessory/dp/B07QF1HB62
Inspired by the guides on the Tacoma anchor bars, I tried to emulate them. Unfortunately, I built the frame to the dimensions of the Fleet cross boards, which are an inch short of the sides of the Fleet in the back. Next time I have the camper off, I will make new guide pieces. They are covered with a few free vinyl floor samples from Home Depot.
Air-Lift has air bags for the Ranger (Kit 55234), so we went with them as Firestone does not. They have an anti-jounce cone in them that is also supposed to protect them against air loss in the bag. Installation is pretty straight forward, and the only holes to be drilled are for the air hoses next to the license plate. I had the work done but was there while they did it. Unless you are young and agile, you really want a lift that can bring the wheel up to chest height and can also allow you to remove the wheel.
Pictures show the wiring. The wire is 10 gauge braided (preferred over solid wire) and the attachment points to the Ranger electrical system are important. Do not connect the ground to the battery, but instead where the battery ground connects to the chassis. Of course, be careful when connecting to the positive terminal – make sure your wrench makes no contact with the chassis (or disconnect the ground terminal on the battery first). I chose not to mount the Fleet cable connector in the bed but, using cable ties, mounted it under the truck. The bed mounted connector in the Tacoma for our previous Eagle was a real PIA to connect. We had the new connecter in the same location on our Tacoma for 4 years and no problems. Use cable ties to secure the wire from the battery to the connector. FWC provides a 30 Amp resetting fuse with their install kit (or get it on Amazon – it comes with a plastic cover). The fuse is taped over with electrical tape in the picture: https://www.amazon.com/RKURCK-Circuit-Automatic-Automotive-Protective/dp/B07LBNFZGK/ref=sr_1_1?keywords=30a+resetting+fuse&qid=1564681722&s=automotive&sr=1-1).
The front of the camper overhang comes within 7 to 8 inches of the top of the windshield, which pretty much precludes mounting a fairing on a roof rack bar. On the other hand, the slope of the windshield may be sufficient for air to move smoothly up over the camper.
Because there is no bed liner like in the Tacoma, there is a lot of storage room between the outside of the camper and the side of the bed walls with access through the turnbuckle openings. If you use this space, I strongly recommend that anything you put there is in a stuff sack clipped to the turnbuckles. Our experience with the Tacoma was that stuff in this area moves around and can get wedged between the camper and the bed. The picture of the frame attached to the camper shows a panel meant to keep any loose object from getting under the front of the camper.
This extra room also means that Derringer Fast Guns easily fit. A proper selection of different size easy-links makes for easy fitting. Adjust the Derringers once after travelling over a rough road and that’s it. I check them about twice a year, but have not had to readjust them.
Loaded for a trip (20 gal water, full propane, food. lots of our stuff, and a full fuel tank but no driver or passenger), the Fleet and Ranger weigh 6500 lbs (OR leaves their scales on even when the weigh station is closed). A lot cheaper than a truck stop scale.
Attachments
-
 Frame 1.jpg29.2 KB · Views: 330
 -
 Frame 2.jpg38.4 KB · Views: 411
 -
 Frame Attach.jpg27.9 KB · Views: 439
 -
 Frame Block.jpg21.2 KB · Views: 423
 -
 Front Eyebolt 1.jpg20.4 KB · Views: 417
 -
 Front Eyebolt 2.jpg24.3 KB · Views: 391
 -
 Rear Eyebolt.jpg22 KB · Views: 431
 -
 Rear Clearance.jpg43.4 KB · Views: 435
 -
 Side Guides.jpg53.8 KB · Views: 421
 -
 Side Guide Mounted.jpg17.5 KB · Views: 392
 -
 Battery.jpg35.9 KB · Views: 415
 -
 Fuse 30 A.jpg44.5 KB · Views: 428
 -
 Ground Connection.jpg41.5 KB · Views: 414
 -
 Cab Roof.jpg14.9 KB · Views: 359