New 1976 8ft CO owner

and.....you can get tickeys for overweight....regardless of your special accommodations to carry the load...

In Canada....they use the GVWR on the doorjamb....and all the talking in the world won't convince them otherwise

Packrat's right...figure your load and buy the appropriate truck.......

in the states...if your truck is riding properly, seldom will you get pulled over for overweight....not so in Canada...and they can weigh separate axles easily
 
I'm pretty adamant about staying within rated weight limits of my pickups. That silver F-350 with the Lance 995 and trailer with Jeep put the truck at just under its 14000lb GVWR. Great rig and never had any problems but just too big for what I want to do going forward. The smaller, lighter setup will allow a wider range of travels and more fun to boot.

Believe it or not but the old C20 has an impressive payload capacity. A good 3000 pounds. I doubt I'll get near that with a trip ready 8ft CO Alaskan. Right now the C20 does sag at the rear more than it should. About 5 weeks ago I went through and replaced all of the rear suspension components with new parts. Unfortunately the vendor sent the wrong springs . I'm still fighting with them about this to get the correct ones.

As Packrat said, there won't be any weight issues with the new Ford.
 
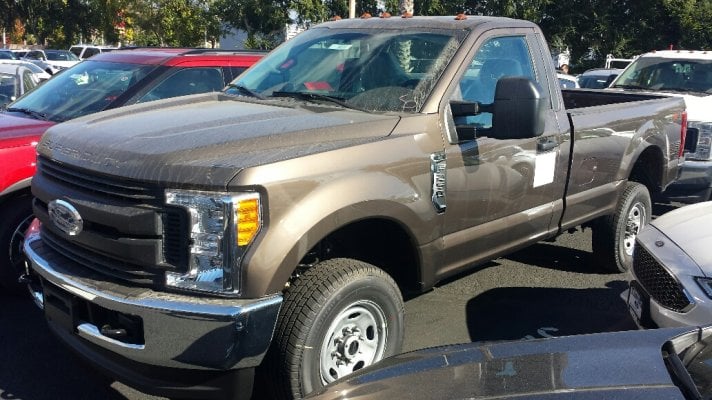
The new F250 finally arrived at the dealer. It is filthy from sitting at the transporters lot and still needs to go through pre-delivery inspection and detail. I pick it up Saturday.

It is really tall. I may need extensions for my jacks to load the Alaskan.

Had a bit of a mishap changing the o-ring on the left front piston. I put too much pressure on the jack with the top at the end of its travel and put a split at the bottom of the rear left cylinder, causing a major leak. Need to get a replacement quick. In the meantime, continuing on with the re-seal work.
 

Attachments

  • 2017 F250.jpg
    2017 F250.jpg
    310.6 KB · Views: 80
62C20 said:
The new F250 finally arrived at the dealer. It is filthy from sitting at the transporters lot and still needs to go through pre-delivery inspection and detail. I pick it up Saturday.

It is really tall. I may need extensions for my jacks to load the Alaskan.

Had a bit of a mishap changing the o-ring on the left front piston. I put too much pressure on the jack with the top at the end of its travel and put a split at the bottom of the rear left cylinder, causing a major leak. Need to get a replacement quick. In the meantime, continuing on with the re-seal work.
all 4 of my tubes have a split.. lucky for me they're all at the top. I should get a couple a spares.
Very nice truck btw
 
I see in the SF Bay Area CL that there are PARTS available and I think that includes the hydraulics...check all the possible surrounding cities.
 
I've been taking measurements of the camper and the F-250 to see how high the platform in the truck bed will need to be.

The camper measures 43 3/4 inches from the bottom at truck bed floor to the bottom of the cab-over.

From the bottom of the camper at truck bed floor to the truck bed rail flare over is 19 1/4 inches.

On the F-250 it is 45 inches from top of bed mat to highest part at top of cab.

The F-250 bed rail is 21 inches tall.

How much cab-over to cab clearance do you guys like to see?

I'm still thinking a 4 inch platform will be sufficient for a minimum safe clearance for bottom of cab-over to top of truck cab and clearance over the bed rails.

The F-250 is very tall but it looks like the 4 jacks I bought will lift the camper high enough to get it loaded.

Also received the hydraulic cylinder from Alaskan so next couple of chores are to replace that split cylinder and start working on the Pirelli seal.
 
I placed pallets under my jacks when the truck I was loading was too high.
I don't have a CO but my old 6 pack needed an inch roof clearance to keep from rubbing.
Maybe 1 and 1/2", I forget.
Besides a bed platform I also placed some strips on the rails.
I thought 3/4" was too much play so I run some 1/2" along the top.
 
I'd suggest trying to set the camper in the truck with five or six 4x4s in the bed to see how much clearance you have on the tub sidewalls and then over the cab. Adding additional material to the final design without getting the camper up too high so you get wind howling in between cab/CO and funneling rainwater into the truck bed while allowing for some movement of the upper section while underway would be the goal...this depends on if you have a bed liner or plan on using some additional insulation to keep the camper floor as DRY as possible at all times!

The AKs were made in many places but I am not aware if the CO sections were of a different height from the floor or not.

You know the Rule: "Measure twice, cut once!" is in effect here! Not too tall, not too short....just right!
 
Brian mounts new campers with 4" bed risers for newer fords....I had set up the CO I was working on with a platform of 1x4's and 1/2" ply....3" drain pipes fit perfectly I the platform and 2 " pipe insulation slipped neatly into the ID....most of my fishing rods would have fit into 7 of those tubes taking up 1/2 of the space....and a reel drawer took the rest....the only few reels which wouldn't have fit were my penn 4/0 and 6/0 neat little storeage tubes....and 7" on the left side was for the new sink plumbing drain.....bottom line the fords take a min of 4" and that will give you 1" clearance from he cab....the bed rails are fit as necessary ...not to support but to eliminate sway
 
Thanks for the inputs I'll go with a 4 inch riser. The tape measure says this should good for cab and bed rail clearance.

Here is a question for Pirelli seal installation - Is there a procedure or proper sequence of steps in order put the seal in correctly? If not, I'm just gonna dive in.

And one more question - What tie-down technique do you like for securing camper to truck? On my camper I see evidence of it being bolted down through the floor and tied down from the outside. Just personal preference?

Got the split hydraulic cylinder successfully replaced today. I thought I was only getting a replacement cylinder but it came with a new piston also.

I had to remove the range top to access one of the cylinder securing clamps. I think I'd like to replace this unit with a two burner range top. That is all I would need and it would create a little more counter top space.

And thanks for the compliments on the truck. Everyone thought I was nuts for ordering a regular cab truck. The main reason was that I wanted the shortest wheelbase possible with an 8ft bed. It is roomy inside and makes the 62 Chevy seem almost claustrophobic.
 
If you have the original brass Pirelli retaining strips....take a look at their placement and number them with direction too. Then with a #2 pencil, go around and mark the location of all your screws.....the fewer screw holes....the fewer leaks....and these screw holes are some of the nasty culprits who cause the lower rail deterioration of the top section....if you don't pay close attention you end up with a whole new set of holes....and a lot of them.
Take a careful look at your corners and the lapping of the brass corner pieces.....one little trick after you've replaced all pieces...trim off any excess Pirelli at the outboard edge and lay a tiny seal of polyurethane caulk....then at your corners intersect the two caulk lines and pull a little material down to form a small drip of caulking....allow this to dry and cure in place....it forms a lead for water to track off at the corners without any surface tension to pull it back into the crack under the Pirelli. Your corners, and how you maintain them will determine the length of life in the frame.....more water intrusion comes from the constant dew drip at the corners than any heavy rainfall.
Use good caulking
 
Thank you for those tips Rusty. I think you are talking about the lower seal, correct?

I started with the upper seal by removing the trim piece next to the entry door and the range top. The seal looks to be nailed own to hold it in place. I'm assuming this is still the original factory seal install. I have not yet tried to remove it. I'll post a photo later.

Do we use screws for the new seal or stick with nails?
 
why are my posts not showing up???????

but edits are!!!!!

I've typed this response twice and only the edits are showing :mad:

can you tell it's not a good day

I'll edit this later and put in the full response with an edit....

Original pirelli went down the drain long ago...it deteriorates and literally falls apart in your hands.....anything to hold the pirelli in place while your installing the retainer strips...I use an electric stapler....which I just found, having left it here at my sons...yea

refinishing the trim strips (if they're ash) is easily done now...deft brushing lacquer...goes on easy and dries quick
 
Securing an Alaskan in the truck bed is done two ways, as you asked about there is the through-the-floor bolting system and the other is to simply secure the lower section where it flares out over the bed walls to either an under-frame system or to the front corner of the tub and rear bumper (or the outside of the tub wall using turnbuckles. There are plain-old turnbuckles and the ones designed for campers utilize a dampning system in them.

Since you have an 8' AK, you can close the tailgate which also acts as a "last resort" if things work loose, but let's not go there!

Both of the methods above involve drilling holes in the camper and should have strengthening gusset plates preferable above and below the plywood you are drilling through. "Fender Washers" were often used when the wood was new, but 50 years later we tend to want to spread out the surface even more so some triangular plates are a good idea.

The ones drilled out over the side of the truck are easy, you can get to them fairly well in the interior. The ones through the floor have to be aligned so they go through the AK and then the bed of the tuuck without destroying anything and be where you can bolt them tight. You have to sort out where the AK will ride in the bed so that you can use the tail gate of the truck and still not have the AK rubbing against the back of the cab or against the tub rim. The phrase, "Measure Twice, Cut Once" works here as well.

Structurally I suppose the through-the-floor method puts less stress on the side walls of the camper but if you have it set in there so it does not slide around and put stress on the mountings that is less of an issue...using a bedliner or in your situation, raising up the camper so it fits over the bed walls would allow for more movement so choose your poison here but perhaps the through-the-floor method would be preferable.
 
If you're going to be mounting and dismounting regularly...the happijack system works best...with the happijack shock/hooks and a derringer lever....you don't want the torklift system....too much for an old 1/2" ply frame
 
Thanks for the replies gentlemen. I have also settled on the happijac method but unfortunately they haven't yet come out with tie-downs for the 2017+ super duties as far as I know. I wonder what the hold up is?
 
Check the bed width compared to the 2016.....that the only thing which might affect the installation....the rear bumper attach is the same....the height won't matter......but you may need extended hooks for both front and rear due to the 4" riser install....they can be ordered it it's nice to have all parts present and accounted for
 
That's a good idea about checking the 2016 versions. I do know there is a difference in the construction of the beds between the 2017 and 2016 super dutys. I kept the bed mat from my 2016 and put it in the 2017 and I had to trim it at the front and rear to fit the different contours of the 2017 bed.
 
I don't know how the aluminum beds are going to affect the happijack install....it was drilled through the forward wall of the bed in prior versions....hopefully they'll have something for the new aluminum beds....maybe give them a call?
 

New posts

Try RV LIFE Pro Free for 7 Days

  • New Ad-Free experience on this RV LIFE Community.
  • Plan the best RV Safe travel with RV LIFE Trip Wizard.
  • Navigate with our RV Safe GPS mobile app.
  • and much more...
Try RV Life Pro Today
Back
Top Bottom