New Rear Awning Design

BlueSky

Senior Member
Joined
Jul 17, 2018
Messages
162
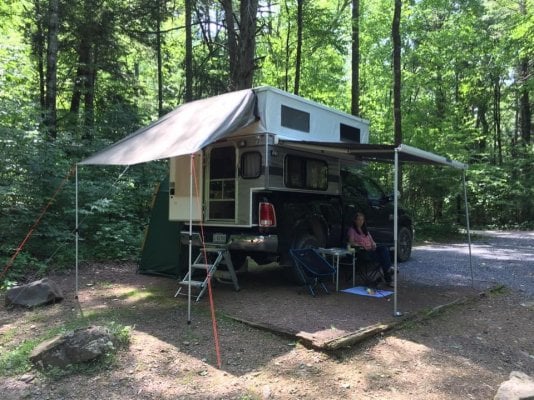
I've been working on a new rear awning design for pop-up truck campers. This design uses custom "holsters" that bolt to the jack brackets. Aluminum square tube struts are in tension with the awning fabric attached to the top of the camper with an awning rail. An aluminum round tube spans between the struts to keep them apart and keep the awning material taut...


IMG_0875-X2.jpg


.
 
Its really simple. The struts slide into these custom holsters that are bolted to the jack brackets...
Rear%20Awning%202-X2.jpg


The rip stop material has an awning rope sewn into it and this slides into the awning rail that is screwed to the top of the camper...
Rear%20Awning%208%20small.jpg


Tensioners attach the corners of the material to the ends of the struts, and you can see the round tube that serves as a cross member between the struts...
Rear%20Awning%204-X2.jpg


The whole thing could stash in a vinyl bag attached to the roof. Un-zip the bag, pull out the struts and slide them into the holsters, and pop the top. Presto, you have a rear awning.
 
I made a few extra holsters that attach to the jack brackets. Stainless steel, left and right specific. Send me a PM if interested.
Rear%20Awning%206%20small.jpg
 
Nce work!

I went a different direction and bought a Carefree of Colorado "Truckin Awn" retractable awning and mounted it over the door of our 2007 FWC Keystone.

I had to make custom aluminum brackets to bolt the legs to but it works well. I used an awning track over the camper door. The support legs and the support struts can be extended/retracted to adjust the slope of the top of the extended awning.


gallery_408_1595_514560.jpg


[sharedmedia=gallery:albums:1595]


Note; I tried twice to use the gallery image editor to rotate some of the images. After I hit save they reverted to being upside down. I gave up trying to figure out the issue after 3 tries.

So when viewing each image go to the icons below the image and you can rotate it.


https://www.carefreeofcolorado.com/products/truckin-awn/


I hope this is useful info for someone.


Craig
 
FWC had a rear awning - discontinued in 2016. We got one of the last in 2015. It is particularly useful in high sun (desrt trips) and high rain (PNW). The support bars roll up into the awning.

Ckent323's awning looks even better - easy setup / take down.
 
Hello Blue Sky

I am impressed that you developed your own design for a rear awning. We also have a stock FWC rear awning for our Grandby....when it useful, its really useful.

Two things I see in your design that might warrant further consideration:

-The support bars ride on the jack brackets...making them mighty low for banging into when coming and going......easy learning curve I guess....

-The top awning rail is attached on top of the roof instead of the rear vertical face....somehow seems a weaker attachment being on/in the roof.....awnings take a lot of energy when the wind blows.

Again, its great to see someone who is improving the camper to their needs.

David Graves
 
I have the factory rear awning which I have used several times when I brought it along. It was heavy, expensive, & bulky. There is no good place to store it in the camper when not in use. In use, it worked well but its best use may be to hang towels to dry.

I recently bought a Kelty Waypoint Car Tarp ( https://www.rei.com/product/187740/kelty-waypoint-car-tarp ). and it is cheaper lighter and compact when packed in its carry bag. I have used it only once but it worked well although I need to better attach it to the camper over the door. Definitely worth consideration.

Paul
 
DavidGraves said:
Hello Blue Sky

I am impressed that you developed your own design for a rear awning. We also have a stock FWC rear awning for our Grandby....when it useful, its really useful.

Two things I see in your design that might warrant further consideration:

-The support bars ride on the jack brackets...making them mighty low for banging into when coming and going......easy learning curve I guess....

-The top awning rail is attached on top of the roof instead of the rear vertical face....somehow seems a weaker attachment being on/in the roof.....awnings take a lot of energy when the wind blows.

Again, its great to see someone who is improving the camper to their needs.

David Graves
David,

I tried to attach over the door, but it was very low, especially at the end furthest from the camper, and the angle to the jack brackets was too acute so strength was not good. I liked it better on the pop top so it is higher of course, but also makes set up easy since after putting the struts in the holsters you just pop the top to provide tension on the material. The struts are pretty high up on my Tundra with a lift, so no problem there walking around them. I experimented with vertical poles but the strength was just not there. Much more strength with the material in tension. I think maybe a video would better show how the set-up works.
 
David, et al, If you click on the link to my gallery for the Carefree awning you will find a picture of the awning rail over the door and see that it is attached with fasteners and 3M 4200. It is plenty strong. There is an Aluminum framing member across the top of the door that the fasteners screw into.

Since one must duck to get into the camper door anyway having the top of the awning about an inch above the door works quite well once the awning support arms are extended.

It is nice to be able to go in and out in the rain with the awning in place. I also carry a tarp to cover the driver side and the back side of the awning for privacy and when the rain comes down hard. Makes a nice little protected porch.
 
BlueSky said:
I tried to attach over the door, but it was very low,
Howdy I did not mean that low but on the rear edge of the top...which is reinforced by a second layer of aluminum...as per Craigs post above...and of course careful use of 3m to bed in the awning rail is always a good thing...seals the screws etc.
 
Unless things have changed on FWC campers since my 2014 Hawk was made, there should be a Keder awning slot above the door.
( https://www.kedersolutions.com/product-category/keder-rail/awning-rail/ )

Purchase a Keder cord and have it sewn into the awning material or buy a strip of material with the Keder cord installed and sew the strip onto your awning material. The awning material with embedded Keder cord then slides into the Keder rail to hold the awning onto the camper above the door. The FWC rear awning mounted that way.
( https://www.kedersolutions.com/products/single-flap-keder/ )

No drilling holes into roof with this method and half the work is already done.
It does require periodic cleaning of the Keder rail slot as it tends to accumulate mud & dust along with the rest of the rear of the camper. A toothbrush cleans it well.

Paul
 
PaulT said:
Unless things have changed on FWC campers since my 2014 Hawk was made, there should be a Keder awning slot above the door.
( https://www.kedersolutions.com/product-category/keder-rail/awning-rail/ )
Huh?! My 2013 Fleet doesn't have a Keder slot, but does have an aluminum trough that I always thought was just to catch water flowing off the roof. But it is centered on the end of the camper, not the door, so maybe it's intended for a similar function. I does have a slot above the v-shaped trough with grooves that something could perhaps slide in (but not round for a rope or cord.)
 
The problem I ran into when trying to attach the awning to the area above the door is that, to get a good enough slope for water to drain off, the far end (away from the camper) was too low and I had to duck under it. When I attached to the roof there was a good slope and water drained off nicely and I did not have to duck under the end of the awning or the support struts. The whole thing is higher, and I did not find a stability problem. Now if all you want to do is keep a shady spot behind the camper then you would not have to have a slope. I wanted both shade and something for rain. There is a way to attach an awning rail to the top without drilling, and that would be using the existing screws that hold the existing drip edge on. In hindsight that is probably what I should have done. I did seal the screws in the top with both silicon and a length of sealing foam/tape so no leaks. All I really need now is a vinyl bag up there to hold it all so I don't have to keep it in the camper. Had I not broken my wife's sewing machine on another project I probably would have this done.

Another benefit to attaching to the top is that it shades the pop-up material and helps keep the camper a little cooler. This design would also work on the side of the camper.
 

Latest posts

Back
Top Bottom