Old Keystone New Owner

winter200

Advanced Member
Joined
Jul 29, 2007
Messages
83
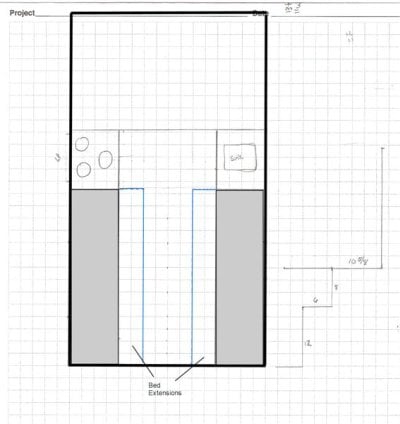
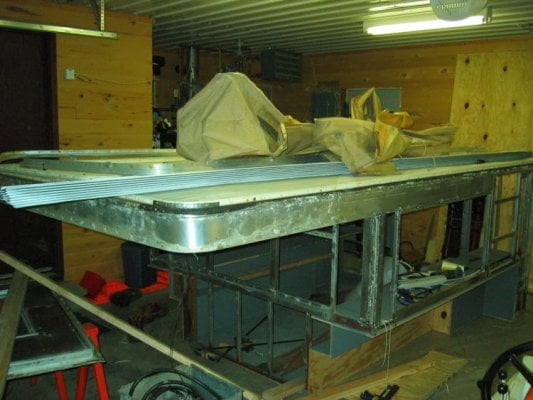
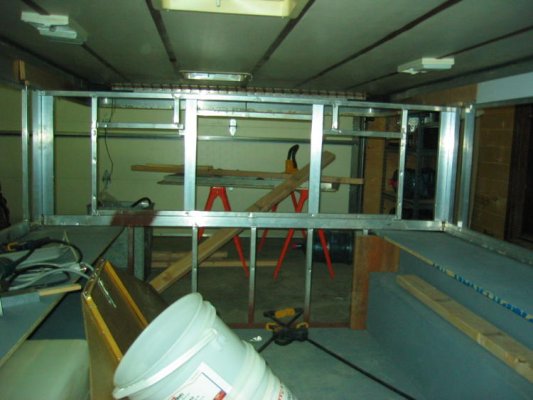
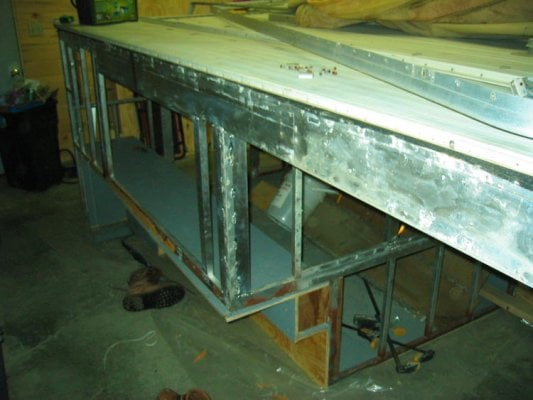
Ok guys, i just found this site lastnight and sent in for my login. I just bought a 86 keystone on a 1/2 ton ford lb. My intention is to redo/modify/update this keystone to go in my 04 3/4 ton chev crew cab pickup. The camper is going to have to be completly gutted and redone. My idea is to set it up like a grandby model (basically cut out the front to make a longer extension over the cab). I hope to make it basically flush or a little overhang on the tailgate when its down and try to get it setup like the Northstart campers where the bed cabover bed goes front to back instead of side to side. I think as i get started the parts that I am going to need forsure to update this unit are new popup fabric, windows, door, popup supports (both front and back). Does anyone have any ideas on first of all how to redo the floor to fit the newer pickups and second of all how a guy could shorten up the body and basically make a longer extension over the cab? Any ideas or pictures would be helpful.
 
Hey Winter200

Congratz' on the new purchase.

That sound like a hugh job to tackle.

I have had a few people in the past try that same concept to mold the front of the camper around an aux. fuel tank in their truck bed.

BUT, I haven't see anyone do it yet. BIG job, usually just not worth it.

There is alot more behind the scenes than meets the eye when trying to cut the front wall of the camper out and redesign it.

I'm not saying you can't do it, because I have seen our customers do some cool stuff !

But, in my opnion it would not be worth the time, energy, and $$$ to do it.

Quicker, easier, and simpler to dump the Keystone on Craigslist (sell it) and find a nice used Grandby.

I would be glad to keep my eye out for a good deal on a used camper for you and let you know what I see out there.

To make an old Keystone fit your truck you will have to remove the camper interior, remove entire camper base, resize it, reweld the front and back walls, and more ....

sorry I don't have better news for you

Maybe Ben will have some helpful tips ?

Let me know if I can help


.
 
Update:

Well the camper is completly gutted. All the interior finish is off, the heater, sink, stove, propane box, windows and all interior cabinets have all been removed. I have a majority of the siding removed along with the over cab base. I had intentions of getting the floor pack redone and the wall moved prior to now but the wife having twins kind of puts a kink in the plans. I moved the camper behind the house now and will try to make some progress on it in the months ahead. As of right now my plans include the following.

Make 20" wide beds/seats on each side by 72" long (will expand out to 30").
This will allow for the residents to seat face to face on the sides.
Stove and Propane box in the front drivers side corner.
Sink in the front passangers side corner.
Flip up shelves between the two up front to cook and clean on.

Add a fantastic fan
Add a engel fridge
Use current furnace
Add AC/DC power center
Quick connect Propane on the back of the camper
Add LP Detector
Rewire/replumb
Rigid board insulation
Milk house board for interior walls
Tyvec house wrap on walls
new siding
110/12 volt outlets down each side
Zodi Water heater
Outdoor shower


Things I need to figure out
Windows
Lift system (only have one and its rotten)
Roof AC/heat pump system
Door (needs to be fixed/replaced/rebuilt)
Material for overcab bed support
How to make the extended bed system.

Of course a lot of these items will come with time after I get the unit together but I want to have the main plan before I dig in much further. Any ideas?
 

Attachments

  • floorplan (Medium).jpg
    floorplan (Medium).jpg
    46 KB · Views: 664
Well I finally got back to work on the keystone. At this point I have a new base built for it with the first coat of primer. I have moved the front wall back so now I have a 8' base and a 4' cabover. I rewelded to fit my windows which are 48" x 22" for both sides. I have new siding on the way. Need to screw the new base to the walls, insulate, reskin the inside and install the heater etc. Its moving along well now hat i have it back inside the garage.
 
Roof liner and Fabric

Does anyone know if the popup fabric should tuck under the roof skin at the roof. I pulled the drip cap off to finish removing the fabric and to my surprise the side fabric was over the roof skin. It would seem to me to be better if it was under than over, this way water couldn't get between and down the inside of the side liner.
 
Can't help you with that. Ben or Stan should know. I'm just way impressed with anyone who would undertake a project like. Pics please :)
 
here is a start
 

Attachments

  • IMG_0124.jpg
    IMG_0124.jpg
    69.5 KB · Views: 448
  • IMG_0125.jpg
    IMG_0125.jpg
    55.4 KB · Views: 444
  • IMG_0126.jpg
    IMG_0126.jpg
    58.7 KB · Views: 443
I don't know if these pictures help at all but here are some from the factory with happy workers.
 

Attachments

  • CIMG1477.jpg
    CIMG1477.jpg
    37.2 KB · Views: 372
  • CIMG1496.jpg
    CIMG1496.jpg
    45.4 KB · Views: 370
  • CIMG1476.jpg
    CIMG1476.jpg
    60.8 KB · Views: 372
  • CIMG1480.jpg
    CIMG1480.jpg
    60.7 KB · Views: 366
Thanks, that is exactly what I was looking for. You can see on the first picture that there is extra fabric that will go over the top of the frame and back under the roof skin. This is not the case with what I have so I am going to make some changes to protect against water.

Thanks again.
 
One thing I would do while you're at this point is prewire for anything you might think you might ever do. Side lights. Fan. Solar panel. It'll never be this easy again.
 
Im kind of glad I didn't finish this camper yet. GMs offers are very good right now and my 04 is going down the road. The 08 is in the driveway which means I have to rebuild my base again. I will get photos of the progress soon.
 
Back
Top Bottom