Panther 3/4 Dinette

ScottBailey

Senior Member
Joined
Jul 22, 2008
Messages
649
Location
Mesa, AZ
While camping with my folks, my wife found herself desiring a dinette.

3055252804_735b759e97_m.jpg

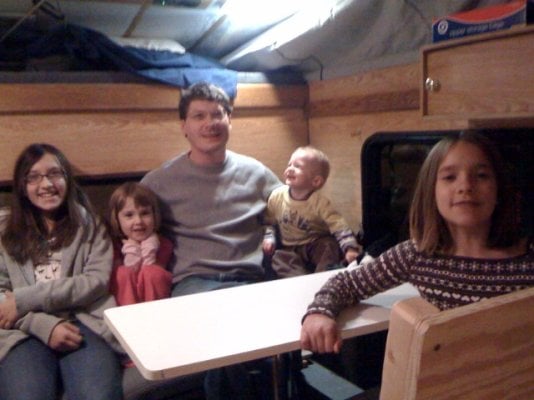
Sitting in a C class dinette. Much bigger than our 3/4 dinette.


I'd already read DLN's [thread=1302]Eagle mini dinette thread[/thread] and bobg333's [thread=1339]Grandby dinette thread[/thread]. So I started planning and...

Well, I'm done! At least, for now. I still need to upholster and build the final table, but I'm going to use it first and see what, if anything, needs to change.


On to the pics!

d_01.jpg

Notice how I've left an opening on the passenger side and how easy it is to get to the turnbuckle ports. That's the old settee cushion (well, half of it) sitting loose on top of the cab side bench. It's not wide enough, but I needed something for testing!


d_02.jpg

Here's a pic of the back of the roll-over seat. Thanks go to Mtn-High for his spare hardware. Big thanks!


d_03.jpg

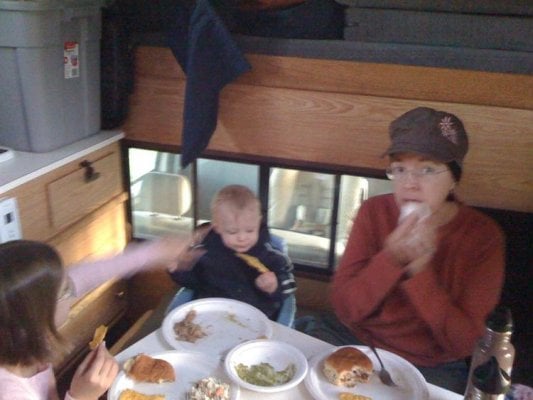
Here you can see the seat's distance from the galley cabinetry. The seat takes up an extra 2 inches of aisle, but 2 adults can sit in the camper easy while a 3rd cooks!

Note the Porta Pottie. We can use it where it is, but just barely. We'll be upgrading to a model with a larger holding tank soon.


d_04.jpg

Here is the seat back folded down. I suppose I could make an extension over the potty to have a full length bed... I'll think about it.


d_05.jpg

The seat from a different angle. Note that I've left the front open here, also. Not only does it make easier to store long items, but it gives you more foot room; less kicking each other under the table.


d_06.jpg

The seat bottom lifts up somewhat to make storage access easier. Also, getting to the turnbuckle is a snap! (As a side note, the seat bottom will flip vertical, but it's kind of a PITA: flip the back horizontal, bottom flips vertical, then back flips vertical. Will do if the stored object is unwieldy.)


d_07.jpg

Here's the cab side storage. 5 gal gray serendipitously fits in the box. Yay on that happy accident!!! (Of course, it intentionally fits between the galley and cab seating nicely. But I like it in the box better.) The rest of the space is for towels and rags. The battery moved a little to the driver side, but not much. 2 inches, maybe.


d_08.jpg

Here is the passenger side storage. That's a shovel and one of our long camp chairs. Great storage! Sure, you can't really sit at the dinette when lots of stuff is stored below, but so what? I think it'll work well enough.


d_09.jpg

Jakey sitting on the ledge!

If we put one of our folding stools in the aisle (next to the seat) and I build a table with an extension, we can seat 4 adults or 2 adults and 3 children. Not counting a single ledge sitter, that is...


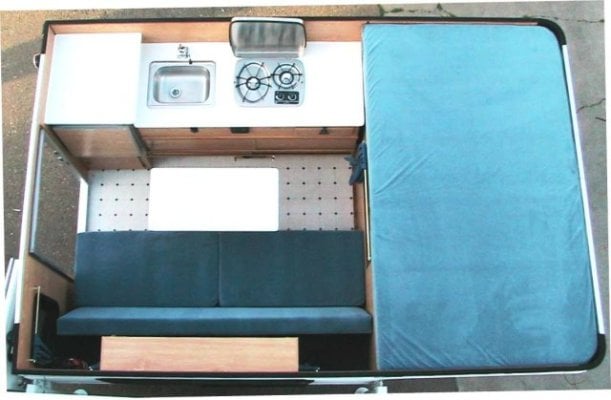
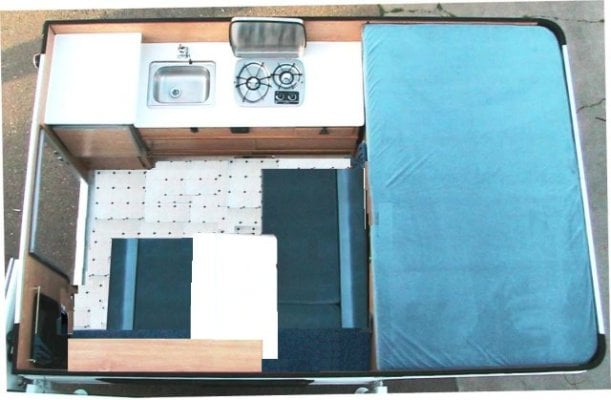
Clickable thumbnail of the original floor plan.


Anyway, I didn't reuse any of my settee. I wanted to keep it pristine in case I didn't (or don't) like the dinette.

Seats are 42" x 20", and 24" by 20". Big and comfy. I raised the height by about 3/4" from the stock settee (stock was 13"). Side's are 1/2" birch. The seat has a 3/4" 'lip' around the top (for the folding hardware to bolt to). It is further reinforced by 1/2" plywood. The cab side seating has a 3/4" lip along the cab.


The camper feels so much bigger and brighter. The difference is amazing. And it better be: I worked on the camper instead of camping! (We missed our December trip... Bummer.)
 
Another great Mod..

It looks super.. would love to see it in person...you going to make Death Valley in a couple weeks??
 
Scott,

Your Dinette came out very nice, well thought out and applied, good job. The amount of space in and around it is excellent and of course the openness in the camper really adds to the comfort level. I'll be looking forward to seeing the final product with the cushions finished.
 
Thanks!

It looks super.. would love to see it in person...you going to make Death Valley in a couple weeks??

First, we're going to miss the DV trip. To far (8+ hours?) for my little guy and I'm out of vacation time at work. Further, It'll be a lot more interesting to see when I have the little kinks worked out, the seats upholstered, and the table built.

Let me tell you: my workmanship is OK at best. You can't see it at a distance, but when you get up close it's quite a bit clearer that I'm an amateur. None the less, I'm happy with the result.

Interestingly, when I gave up on perfect and went for good enough my quality of work improved significantly and my speed drastically improved. Mood got better, too. I think a table saw and jointer would both speed me up and add a real level of quality to my work. Might as well get a planner too, right?

A couple further notes:
  • This mod has taken about 20 hours to do. Would have been way less (1/2 to 1/3) if I'd had the aforementioned tools.
  • Cost so far was about $100 to $150 for wood, screws, and cabinetry mounting hardware.
  • The fold-over hardware can be purchased for abput $150 + shipping from FWC. Mtn-High sent me his on the condition I donate some amount of my choice to an animal shelter. He even paid the shipping himself. Very selfless. (We sent $100 to goldenrescue.com.)
SB
 
Oh yeah

I wanted to publicly say thank you to Ben. He is always available by phone to answer the dumbest of questions. (I'd failed to remember which lead to the battery was negative. Calling Ben confirmed it.)

This level of after sale service is impressive.
 
Yep. Yessir.

I agree with the idea of using it awhile before buttoning up. Some people get 80% of the way and never finish, but some people are in a hurry to finish and then have regrets. It's the details that really bring joy over time. I'll try to ask how it's going from time to time.

Nice project.
 
Great job, scott.

THANKS for the donation to Golden Retriever Rescue of the Rockies. The dogs appreciate it! FYI, I often find myself on the road...heading to remote places in CO/UT/NM to transport dogs and help deliver them to Denver where they can find *forever* homes.

Now to figure out what to do with the couch back. LOL.

thanks again.

mtn
 
Couple more pics

Adding a couple more pics for your perusal.
  • A fun pic of testing. Note that we are scrunched together (for the pic) and their is another foot (or more) of space on the bench to the left. Also, the little guy is actually sitting on his plastic camper meal chair on the ledge!
  • before
  • Gimped up an after floor plan.
 

Attachments

  • tc6.jpg
    tc6.jpg
    48.6 KB · Views: 1,279
  • tc5.jpg
    tc5.jpg
    88.6 KB · Views: 1,210
  • tc4.jpg
    tc4.jpg
    49.4 KB · Views: 1,236
Good question...

How does it sleep?

I really won't know until I've made cushions. I can tell you that the "bed" length is around 51 inches. The only child who sleeps in the camper is good for at least 5 years (after which I might put the cab pass through in and he can sleep there). Furthermore, since the "bed" is 3 cushions, and the folders don't seem to lay perfectly level (mild angle, I can probably fix when with hot wire cutter) I don't expect a lot of comfort.

That said, my wife wanted the dinette so she'd have a good place to sit while reading, drawing, using a laptop or whatever. This mod is--according to her--a vast improvement.

Of course, storage got more complicated: what we once threw on the shelf, captured between wall and couch, now requires different containment. While simple solutions exist (e.g. Rubbermaid containers, netting, milk crates, duffel bags), I haven't settled on one yet.
 
Storage idea:

I have been using those mountainsmith type rectangular soft storage cubes. 4 fit in a soft tray. Turns out, each ones fits behind the stock couch very nice against the window. When I turn the couch down, these stack up in a corner, the floor, or on top of the counters nice and easy. Removable as well. In a pinch, through the slider and into the back seat of the truck.

Good luck with storage.

dave
 
I really won't know until I've made cushions. I can tell you that the "bed" length is around 51 inches. The only child who sleeps in the camper is good for at least 5 years (after which I might put the cab pass through in and he can sleep there). Furthermore, since the "bed" is 3 cushions, and the folders don't seem to lay perfectly level (mild angle, I can probably fix when with hot wire cutter) I don't expect a lot of comfort.

By 'folders' you mean... folding hardware?

That said, my wife wanted the dinette so she'd have a good place to sit while reading, drawing, using a laptop or whatever. This mod is--according to her--a vast improvement.

If doing Pareto analysis, this observation would be a clear number one in my mind.

Of course, storage got more complicated: what we once threw on the shelf, captured between wall and couch, now requires different containment. While simple solutions exist (e.g. Rubbermaid containers, netting, milk crates, duffel bags), I haven't settled on one yet.

This is why you *needed* to start with a quick prototype design and then see how to improve it-- just too complicated to wrap ones mind around (without solid modeling which is why you might want to get familiar with that Sketchup freeware). Even for those of us who are CAD proficient, nothing is as life-like as life.

Keep on.
 
Yes, yes, and yes!

By 'folders' you mean... folding hardware?

Yes.

If doing Pareto analysis, this observation would be a clear number one in my mind.

Yes.

This is why you *needed* to start with a quick prototype design and then see how to improve it-- just too complicated to wrap ones mind around (without solid modeling which is why you might want to get familiar with that Sketchup freeware). Even for those of us who are CAD proficient, nothing is as life-like as life.

Keep on.

Unfortunately Google hasn't released a native Linux SketchUp or source. So it's a non-starter for me. I tried Blender, but ultimately found that I wasn't patient enough for the huge learning curve and reverted to paper and pencil.

This dinette in fact went through multiple prototype revisions that changed size, mounting, and various other minor details. My first mock-up was scrap plywood, some cardboard, and my plastic entry ladder (to sit on). Playing around with these props in the camper was tremendously advantageous!

You know, I really like your couch and am mulling over an adaption and extension of your work into a dinette. Ultimately, I might make a small scale cardboard mock-up... But for now I think I'll camp instead of build, my current dinette is "good enough"!
 
Nice work, seat hinges?

Very nice work. I am in the process of remodeling my old Fleet with a similair dinette set up. Great to see how someone else is putting it together. Where did you get your seat hinges for dinette? I will post pictures as soon as make some progress. The more posts I see the more my dinette design evolves. Thanks
 
For now...

Very nice work. I am in the process of remodeling my old Fleet with a similair dinette set up. Great to see how someone else is putting it together. Where did you get your seat hinges for dinette? I will post pictures as soon as make some progress. The more posts I see the more my dinette design evolves. Thanks

I just used door hinges on the solo seat, and haven't finished the dual, yet. I'll probably swap to piano, but the door hinge--since it doesn't support weight--should be adequate...

The dual will probably be fully removable. Just lift up, held in place by "cleats"...
 
Roll over seat back?

I am curious as to where to get the roll over seat back hinges that allow the seat back to fold down.
 
I am curious as to where to get the roll over seat back hinges that allow the seat back to fold down.

Ah! I see! I got them "used", but you can purchase them from the FWC parts department. This will likely be the most expensive part of the mod. I'm not convinced that roll-over is the way to go. Fixed back might work just as well.
 
Dinette shakedown trip results...

Just got back from the first trip with the beta-dinette.

3283167341_f813e07bbd.jpg


WOW, I say. The utility of the space rocks. The improvement in light is fantastic, if only because you are no longer looking at cabinetry when seated.

Furthermore, there is significantly more room for a toddler to play. Some of this comes from a necessary behavioral change on our part: we could not just throw stuff loose on the shelf behind the couch. Everything went in an easily moved and stacked bin or a duffel bag.

Before I forget, here are some words from my lovely wife:
First time camping since Scott made the dinette modification. Compared to the bench seat we had previously, the dinette is SO family friendly. The set up is much roomier and the layout is far more conversational. I liked that there was room for the hubby, a tween and the toddler to sit there while I prepared a meal and served it to them at the table. When we had the bench, there wasn't a lot of room for other people to sit on it while I was cooking - knees in the way. And, of course, no table, so I was handing the food out. We always had to eat outside. While that is usually something we WANT to be doing, since we're camping, after all, it was pretty cold on this trip (got below freezing at night) so we were glad to have the dine-inside-where-it-was-warm-and-comfortable option.
Anyway, I got the cab side seat absolutely right. I now need to build the cushions and determine an anchor method, probably wooden cleats. The rear seat cushion will likely go to the halfway point on the window to allow light. No angle on it, just straight up and down. Any angle would be purchased at the expense of space somewhere else.

3282538357_2244db038c.jpg


Next, I have 1/2" plywood on the solo seat, but I'm pretty sure it's already cracked. 3/4" with a few support ribs (since the front is open) feels about right. Also, I'm going to dump the door hinges and install a piano hinge. I think I also need to move the solo an inch or so closer to the other seat so the back will span the open floor. Also, I am pleased with the FWC folders: they are both swift and solid.

For the table, I'm going to start simple and resize only. You can probably see in the pictures, it's currently just too small. As we use it I'll brainstorm a more stable anchoring.

There were 4 of us on this trip. We used a small 3 legged folding camp stool in the aisle for a 4th place at the table. Worked great. Although the little guy can just sit on the camper overhang for about 3 more years...

One of my concerns with this mod was a change in storage. Unexpectedly, it's improved. I carry a large Rubbermaid bin (48x18x??) that I previously had to lift through the door and over the top of the seat. It contains all the gear necessary for the 3 outside campers so it's kind of heavy. Now, it just slides through the door. We will travel with the solo in the down (bed) position and it easily supports the clothes duffel bags and light food containers.

Overall I'm very pleased with the outcome. This mod was well worth the effort.
 

Attachments

  • dinette_action.jpg
    dinette_action.jpg
    52.2 KB · Views: 501
New Minor Version

Time to rev the dinette's version. Let's call this version 0.2.1... What's in a version number, anyway?

Somewhere above I say I'm going to use the camper before I finalize the dinette... After using it twice and seeing pictures of FWC's [post=18000]dinette[/post], I'm ready to complete it.

In the pic you can see the tentative bench, hinge, and "mounting strip" in the background. I'm seriously considering making the strip wider and bench narrower by 4 inches. This way I only need to move one cushion to open. Wish I would have planned that up front. Oh well. I'll test it in the camper before I cut....

In the foreground you see the new solo. The gray box is standing in for the camper ledge. This seat will have a piano hinge also (running North South, above the ledge) with the seat top resting on those lips.

Workmanship is much improved here. I started by cleaning my workspace. I had 3.5 unusable benches (plans here, I recommend these) before I cleaned up. 3 of the 4 are now usable. Having a clean workspace helps!

Furthermore, I put a new blade in the circular saw. Complete deal changer, don't know why I didn't think to replace the blade sooner...
 

Attachments

  • atc_dinette_teaser.jpg
    atc_dinette_teaser.jpg
    89.4 KB · Views: 340
Progreesing slowly...

I'd rather camp than work on the camper, but at least I'm making progress. The dual dinette -- behind the little camper -- is installed as well as the solo bottom; however, the folders aren't attached nor is the solo seat back complete...
 

Attachments

  • atc_dinette_in_progree.jpg
    atc_dinette_in_progree.jpg
    83.2 KB · Views: 303
Back
Top Bottom