This is the thread to use when talking about how you take or want to take a particular type of photograph. It can range from what kind of a lens is or would be best, to camera settings, types of filters, or topics like night photography.
You are using an out of date browser. It may not display this or other websites correctly.
You should upgrade or use an alternative browser.
You should upgrade or use an alternative browser.
Photography Technique
- Thread starter Wandering Sagebrush
- Start date
Our WTW site has gotten so deep in info.It's a great platform to give and receive.
Thanks to all.
Frank
Thanks to all.
Frank
I'll get this started by saying that I shoot almost anything from landscapes, events, action, macro, portraits, street scenes, abstracts, to night skies. Most of it is outdoors without flash, tripod or filter, although I will use those tools if necessary. Most of my photography is done during walks or other activities rather than carefully setting up a shoot, although I admire photographers who can envision a scene and patiently create or wait for it.
For the most part technique is second nature although there is always something new to learn. Here is a favorite image from a snowshoe outing on Tumalo Mountain near Bend. Panasonic GH2 with Rokinon fisheye lens. Fisheye lenses have limited application but I like to carry one for when the subject seems appropriate to the distorted perspective.

One trick I learned is to use a teleconverter on a fisheye to get very close to the subject in tight situations such as this butterfly.

For the most part technique is second nature although there is always something new to learn. Here is a favorite image from a snowshoe outing on Tumalo Mountain near Bend. Panasonic GH2 with Rokinon fisheye lens. Fisheye lenses have limited application but I like to carry one for when the subject seems appropriate to the distorted perspective.
One trick I learned is to use a teleconverter on a fisheye to get very close to the subject in tight situations such as this butterfly.
craig333
Riley's Human
Anyone have tips for cave photography?
I'm no expert at caving or cave photography but I try when I have the opportunity. Caves are distinctive and there are many photographic approaches including depth, dramatic backlighting, people or water in motion, geometric shapes, etc. In general I do best with a wide-angle lens, tripod, manual settings, flexible light sources, and people in the scene for scale. The light can be from an opening, flashlights, lantern or remote speed lights. I just experiment and try different light intensities and positions until it looks right. So many possibilities.craig333 said:Anyone have tips for cave photography?
Skull Cave in Lava Beds National Monument, Olympus E-M5 with 12mm lens, f4 @ 20 sec, ISO 200

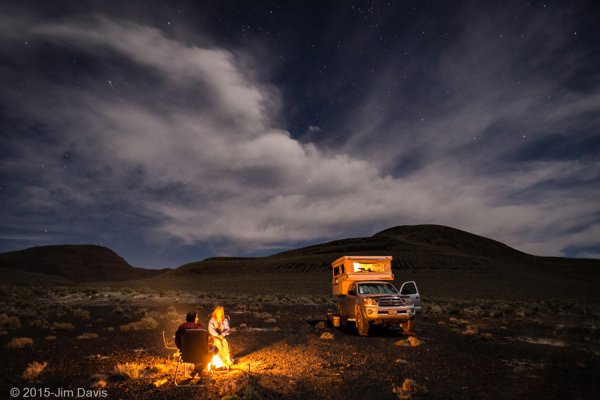
Been playing with this night photography stuff for quite a while. I'm a slow learner but I have figured out it is lots easier to work with night shot files if there is some moonlight to help balance the pic. Able to use smaller apertures for depth of field and overall sharpness, exposures not as long so better to manage movement showing up in the stars, among other things. Processing has more options as the noise issue isn't quite so noticeable.
Still learning with balancing the lighting of camper and outside activity which typically is sitting around a fire with a cold one close at hand.
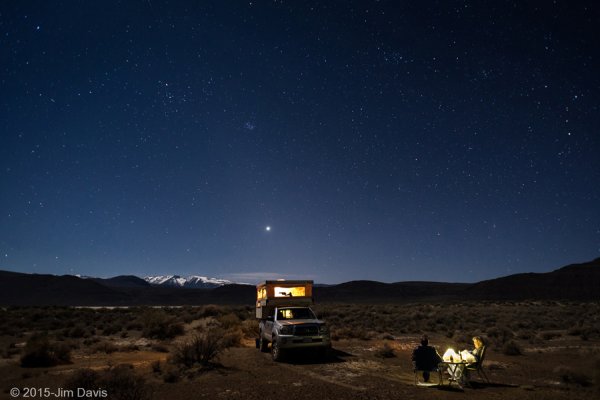
Here's a pic from first night, super warm so no fire needed and the stars were sparkling. Hard to see in this reduced size but got a sharp sun star off of Venus.
15 seconds, f/4.5, ISO 2500
Still learning with balancing the lighting of camper and outside activity which typically is sitting around a fire with a cold one close at hand.
Here's a pic from first night, super warm so no fire needed and the stars were sparkling. Hard to see in this reduced size but got a sharp sun star off of Venus.
15 seconds, f/4.5, ISO 2500
Attachments
OP
OP
Craggy, very nice! When you don't have people in the image, try two shots at night. Shooting manual (and manual focus), use the rule of 500 for sharp stars, then vary the ISO. High ISO to get the foreground, lower ISO for the stars. Load into photoshop as layers, then use a mask to get rid of each portion of the layer that is not wanted. That is, mask out the stars on the foreground shot, and the foreground on the crisp star shot. You can flatten the image if you want, or just save if you might want to adjust something later.
This image is one that uses that technique. The FG is lighted with a LED lantern covered by an amber plastic.

This image is one that uses that technique. The FG is lighted with a LED lantern covered by an amber plastic.
craig333
Riley's Human
Nice. Thanks for the tips.
Lighthawk
Weekend warrior
Nice suggestion, Steven. Using iso to vary the exposure instead of shutter duration seems like another way to obtain the two different exposures.
I have a bit of a learning disability when it comes to layers and blending.  I keep dragging my feet on this technique. I like the idea of what you have done and will have to play with this a bit, I'm sure I can figure it out eventually. Your shot is a great example.
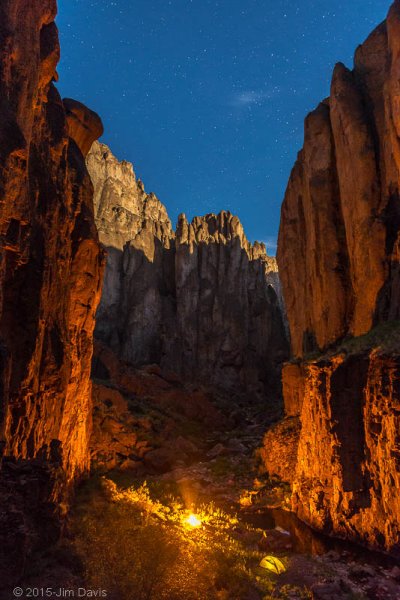
But, I actually enjoy playing with night exposures and balancing light trying to obtain a single capture that has enough information to work with in post. Probably goes back to the days of playing with these ideas with slide film. Hence my comment about working with a little moonlight to make it a bit easier on me. Here is another example, lots of moonlight and had my backpacking buddy throwing small twigs on fire to get just enough light both illuminate the canyon walls but not blow out the campfire too much. Had my extra headlamp in my bivy tent with a yellow hankerchief over to knock down and diffuse the light a bit.
I keep dragging my feet on this technique. I like the idea of what you have done and will have to play with this a bit, I'm sure I can figure it out eventually. Your shot is a great example.But, I actually enjoy playing with night exposures and balancing light trying to obtain a single capture that has enough information to work with in post. Probably goes back to the days of playing with these ideas with slide film. Hence my comment about working with a little moonlight to make it a bit easier on me. Here is another example, lots of moonlight and had my backpacking buddy throwing small twigs on fire to get just enough light both illuminate the canyon walls but not blow out the campfire too much. Had my extra headlamp in my bivy tent with a yellow hankerchief over to knock down and diffuse the light a bit.
Attachments
OP
OP
Craggy, that looks nice. If you're not trying to capture really sharp stars, etc. There's no reason that a singe exposure won't do exactly what you want. One of these days we should head over to Mitchell and shoot the Painted Hills at night.
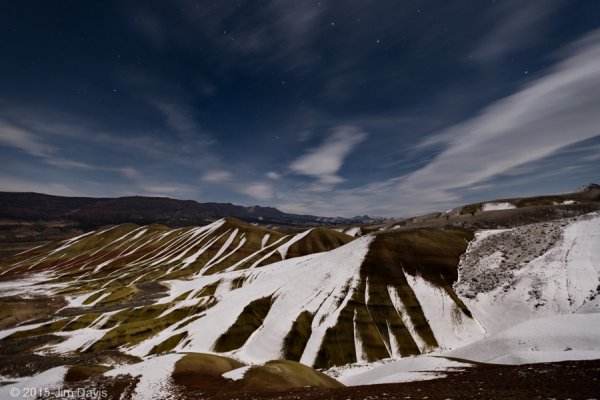
WS - The pix I have posted in this thread are all in the 20 sec or less exposure so I think by the 1/500 rule ???, that is within the range for very little apparent movement. I'm sure in a big print they would be a tad soft but for the web or even small prints they should be sharp enough. Yet another reason for shooting with a little moonlight. Would love to go over to the Painted Hills again at night. Here is a shot from a couple of winters back. I was meeting a ONDA staff person the next day to check out some WSA trails that I knew about so decided to check out the snow/star possibilities by driving over the evening before. The moon was very bright but going in and out of clouds that were just racing through the sky. This is a 30 second exposure so star movement is probably visible in this jpeg. Many possibilities out that way. Let's Go!!
Attachments
These are all really cool. I just started to get into night photography not long ago but I'm still fishing in the dark. I like how the pics end up being really sharp... Mine aren't but I've stayed away from low f-stops because i always end up messing my DOF... maybe I'm too close.
DOF is a whole 'nother' black hole of discussion. You can shoot wide open for night shots if your focus is truly set to infinity and there are no foreground subjects too close. I try and not have anything prominent that is closer than around 15'. Check a DOF chart and also find a way to set infinity accurately. Sometimes I set it in the evening if I know I am going out and then use a small piece of tape to lock it down. Infinity location marks on many lenses are not accurate. Older manual focus ones with a fixed focal length are a bit better at this. I'm far from an expert on this and would appreciate any better ideas from the more knowledgeable out there...?jlrray said:These are all really cool. I just started to get into night photography not long ago but I'm still fishing in the dark. I like how the pics end up being really sharp... Mine aren't but I've stayed away from low f-stops because i always end up messing my DOF... maybe I'm too close.
OP
OP
Craggy, I tend to stop down to f5.6 or f8 to get the lens into its sweet spot. For more light, I either extend the exposure time and/or ISO. You get good DOF, and the images are usually sharper. One trick I haven't tried is long exposure noise reduction in camera. Is anyone using LENR?
OP
OP
Following up on night photography, I was watching an online episode of Wild Photo Adventures with Doug Gardner. Here's some very good instruction on several different styles of night photography. Go to episode 9.
One more on night photography of waterfalls. Go to episode 12.
One more on night photography of waterfalls. Go to episode 12.
Similar threads
- Dipodomys
- Four Wheel Camper Discussions
- Replies: 21
- Views: 2K
- Sagefemme
- Four Wheel Camper Discussions
- Replies: 53
- Views: 2K