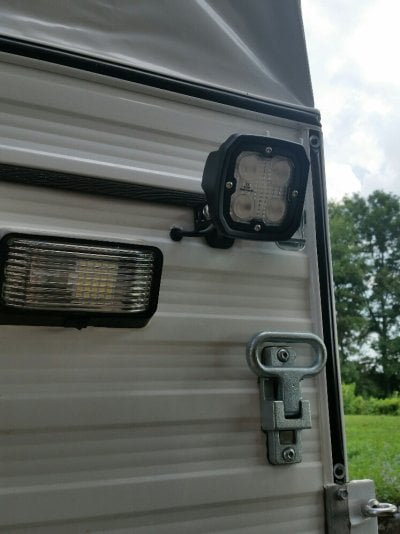
After considerable time and searching, I finally have my 2006 Grandby rear LED flood light installed. The advise in the original post and subsequent replies does not apply to my Grandby. I am sure it is easy for a shell model Eagle to pull back the panel and access the green wire from the inside, but after some effort, I pried the right side panel back a bit and did not see green wire on the right side, and on the driver side, my 3 way fridge preclude any prying out the panel at all.
I called FWC and they informed me in the 2006 Grandby, the green wire is only accessable from the outside if I drill a 1/2" hole at 7 1/4" from the side, and 5 1/4" from the top corners. Best to open the top of the camper to measure from the top edge of the trim. The green wire is crimped with a blue connector and grey duck taped at the tip. The wire is a little stiff and may be stapled to the backboard, so the 1/2" hole as necessary to fish it out, with some effort with needle nose pliers, short hooked wire for fishing wire, small flat head screw driver helped too. Best to drill 1/2" hole with step drill bit so you avoid drilling too deep and nick some other wires. I did see a purple and red wire too on the right side, and had no idea where they go. I hooked up a ring terminal for the negative side and had the wire looped back to the outside and installed on on one of the self drilling screws #10, 3/4", 1/2" will work too. I used a 2" x 3" angle iron 1/8" thickness. Doesn't look too pretty, but the $15 LEDs lights from EBAY does not allow me to mount in the verticle position. I used four self drilling hex screws pre drilled into the angle iron and the siding. Caulked the hole and it's done.
I installed a on/off switch with bezel first, $10 from Amazon after trying to use couple of other kind that does not accomodate the thickness of the panel below the fridge. There are two green wire that is hooked up to the #6 15 amp fuse, one is the lighter green, which is the positive and the darker green is the negative and these wires is for the switch. A rectangular hole needs to be cut into the panel to accomodate the bezel switch.
It took me several days of asking other posters in the thread and calling FWC several times and scratching my head trying to figure out how to do this project. It took me maybe 10 minutes to do the driver side once I figured out how to do the rigfht side. Hope this will save others from wasted time and frustration. Moral of the story is, when someone says it is easy, ask questions! They may not answer your questions as you may have asked too many. They may tell you to just start prying thing open, but...Easy for them and for their model camper, their advise does not necessarily apply to your camper and year of the model.
Wow, it is bright, glad I installed the 18 watts lights and learned a few things. $395 factory lights verse $25 total cost for my project.

