Renovating Sköldpaddan – 1977 Grandby Interior Build

JaSAn

Grumpy Old Man
Joined
Apr 18, 2014
Messages
1,140
Location
Minnesota
[SIZE=14pt]Renovating [/SIZE][SIZE=14pt]Sk[/SIZE][SIZE=14pt]öldpaddan – 1977 [/SIZE][SIZE=14pt]Grandby Interior Build[/SIZE]

After spending the last 50 years camping out of a backpack, I finally decided that I had enough of sleeping on the ground. My research last winter zeroed in on pop-up pickup campers, and especially the FWC/ATC design. I had despaired of finding any in the area and had resigned myself to buying a used stick built camper and saving my shekels for a new one.
The ad in Craigslist didn’t mention make or model, but the accompanying picture told me what it was. Called the number immediately and told the guy I would be out the next morning to pick it up (and only 15 miles from my house!).

001 look what followed me home.jpg
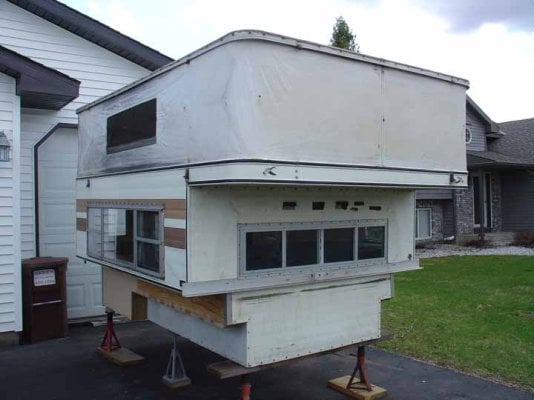
Look what followed me home!

This is what I am starting with:
1977 FWC Grandby. Initial investment $500.
Hail pocked roof, dinged up siding. Looks its age.
Soft sides in usable condition.
Roof and canvas don’t leak.
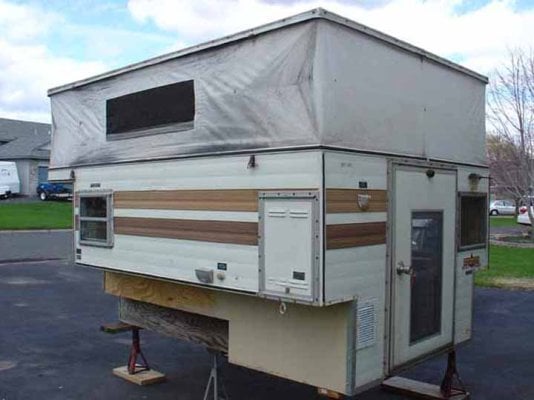
Bottom right rear doorframe leak rotted small section of floor.
Door is in poor condition, will need to be replaced or rebuilt. Usable for now.
Crank out windows work, don’t leak.

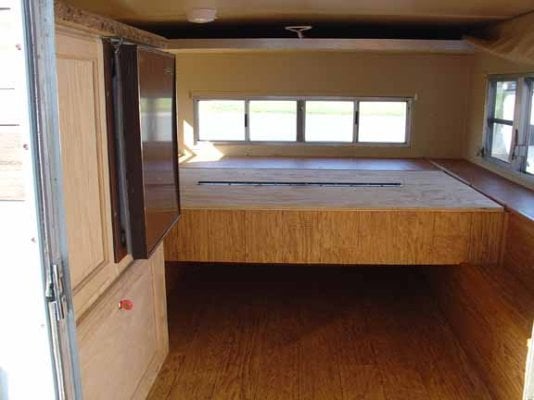
All original interior stripped to frame by previous owner because of mouse infestation in walls. Replaced with 1” Styrofoam and ¼” paneling; walls and ceiling. PO claimed frame is in good condition, no cracked or broken welds. Floor is OK, not original. Material had been added to wings to strengthen, rebuilt for 6-½ foot pickup bed. PO rebuilt front lift panels out of ¼” hardboard, OK for now, but need to support with added 35 lbs solar panels on roof. Rear lift panels are delaminating and will work for this winter. I will replace both front and back next summer. Interior was replaced with a simple build, just a refrigerator cabinet (1982 Norcold TF-65) and sleeping for 3 adults. PO used camper as added bedroom for when adult children accompanied on weekend trips.

I waited until almost done to post because I got frustrated with some builds ending in the middle; just quit posting. Downside is I got focused on the task at hand and forgot to take pictures. Oh well, it’s not like you guys need me to show you how to build, though might serve as a BAD example! I also should warn you that I come from the ‘when in doubt, build it stout’ school of engineering. I used mostly ½ inch plywood in the build.
 

Attachments

  • 01 original exterior.jpg
    01 original exterior.jpg
    57 KB · Views: 640
  • 02 original exterior.jpg
    02 original exterior.jpg
    53.5 KB · Views: 840
  • 03 original interior.jpg
    03 original interior.jpg
    42.4 KB · Views: 864
Renovating Sköldpaddan

DESIGN CRITERIA

Room for me and ‘the monkey’ (a Beagle).
Keep the weight low and well balanced.
Be able to sleep without lifting the top (for convenience, stealth, warmth, violent weather).
Ability to boondock for a week or more at a time.
Only cooking inside is to boil water, all other cooking done outside.
Lots of storage: for backpacking gear, climbing gear, hunting gear.
Don’t want to have stuff out that I have to move around just to use the camper.

THE PLAN

I went through 10 iteration of layouts (gotta love solid modeling). Everything from side dinette/bed to rear dinette/bed. Since I camp alone, wanted lots of storage, and don’t want the hassle of converting from table to bed, I ended up with a rear twin bed with lots of storage underneath.

These are models of my final design.
04 model right rear.jpg05 model left front.jpg
Seen from right rear and left front. Counter tops, cabinet doors, frig, seat, and bed hidden to show detail. Part of right wall hidden also.

06 stripped interior.JPG
Stripped interior.

REPAIRS

Spent June and July repairing the camper, learning about solar, collecting parts, stripping out and designing a new interior.

Replaced all roof screws with #10 x ½” and resealed roof.
Replaced roof vent with a MaxxFan.
Repaired holes in soft side material with ‘Gear Aid Tenacious Tape’. PO had patched holes with ductape.
Removed and patched over unused stuff in outer skin.
Stress tested the refrigerator (it’s a energy hog, but it works).
Repaired rotted floor section with ‘Minwax Wood Hardener’.
Replaced door weatherstripping.
Moved wheel well notches back to fit 8’ pickup box.
 
[SIZE=14pt]Renovating [/SIZE][SIZE=14pt]Sk[/SIZE][SIZE=14pt]öldpaddan [/SIZE]

SOLAR

First I did an energy budget to determine my needed amp-hours from batteries and solar:

[SIZE=10pt] LOADS DRAW DUTY RUN LOAD[/SIZE]
[SIZE=10pt] CYCLE TIME per DAY[/SIZE]
[SIZE=10pt] amps % hrs/day amp-hrs[/SIZE]
[SIZE=10pt] Refrigerator - TF65 -2.50 30% 24 -18.0[/SIZE]
[SIZE=10pt] Fantastic Fan on med -1.40 8 -11.2[/SIZE]
[SIZE=10pt] Laptop -2.10 2 -4.2[/SIZE]
[SIZE=10pt] Cell Phone -1.40 1 -1.4[/SIZE]
[SIZE=10pt] Small loads -1A or less -10.0[/SIZE]
[SIZE=10pt] LED lights, charge controller, BMS, refrig fans [/SIZE]

[SIZE=10pt] TOTAL USAGE PER DAY -44.8[/SIZE]

From that I ended up with this for my power sources:

SOURCE SUPPLY EFFICIENCY SUN INPUT
[SIZE=10pt] TIME per DAY[/SIZE][SIZE=10pt] [/SIZE]
[SIZE=10pt] amps % hrs/day amp-hrs[/SIZE]
[SIZE=10pt] Solar Panels [/SIZE]
[SIZE=10pt] 2 x 100W 16.67 75% 5 62.5[/SIZE]
[SIZE=10pt] Batteries [/SIZE]
[SIZE=10pt] 2 x Crown CRP290 207.0[/SIZE]

Optimally, I have about a 17 amp-hour surplus and I can run everything for two days with no input without going below 50% on the battery.

The solar setup consists of 2 x 100 watt Renogy solar panels, two 3 foot extensions (cut in half for splice in combiner box), a 90° outdoor rated plastic conduit splice connector (for combiner box on roof), a Morningstar Tristar TS-45 PWM controller, a Bogart Trimetric 2030 battery monitor & 500 ohm shunt, 2 x 60 amp ANL fuses in holders, 15 feet of AWG 4 welding wire, and two Energizer GC-2 6 volt golf cart batteries.

First, I had to cut a 1 1/8” hole in the roof for the combiner box outlet. Took me two days to work up the courage to do it. I didn’t want to tear out the ceiling inside to access the roof from underneath, so I had to cut from the top and I was afraid the aluminum skin would catch and tear with a hole saw. If I could have accessed the roof from underneath, a chassis punch would have been a no-brainer. Turns out the cut was easy. Went slow and light on the drill. Nice cut and no problems. Hole in the ceiling is ¾”.

07 hole for solar feed.jpg

I mounted the panels to the roof with 1” x 2” x 1” wide ‘L’ brackets made from ¼” aluminum angle, tilted 3° to the front for water runoff and a slight downward pressure while driving. Brackets are attached to the roof with 3M 5200 and ¼-20 machine screws through the frame to fender washers and nuts on the inside ceiling. Combiner box joins the two panels leads in parallel, with AWG 4 wire going into the camper. Combiner box is mounted to the roof with 3M 5200 adhesive/sealer and is supported laterally by the extension on the exit of the combiner box and a ¾” flanged insert coming up from the ceiling.

08 layout of solar.jpg09 closeup of combiner box.jpg10 solar on roof.jpg

Inside the camper, the solar wire comes down the right front corner, through a 60-amp fuse, into the TS-45 mounted on the right wheel well ledge. The controller feeds two GC2 batteries, connected in series. The battery pack is stored in an airtight plastic bin with a 2” vent to the outside.

11 solar inside.jpg12 battery setup.jpg

I have one 110 volt, 15 amp fused circuit going to the refrigerator with dual outlet on over kitchen counter and to a dual outlet next to the battery (for a charger) for when I have shore power.
 
just got a 79 grandby my self keep posting I am learning what I might need to do to mine from post like yours .we can use ours this spring then do some repairs.how is lifting the roof with solar panels on top?
 
Looks great JaSAn! Neat interior layout. Do you have a serial number on yours? Mine was removed some time ago and I would like to know just how old it is.

Thanks.
 
KILR0Y said:
... And I love the old PowerWagon that you have in your profile picture.
Thanks. Every once in a while I have a brain fart and think it would be neat to put a flatbed model camper on it. In my rebuild, I have become painfully aware of how much space is lost fitting inside a pick-up box and clearing the wheel wells.

superminoh said:
just got a 79 grandby my self keep posting I am learning what I might need to do to mine from post like yours .we can use ours this spring then do some repairs.how is lifting the roof with solar panels on top?
Kinda the blind leading the blind.
I use an 'On Stage' speaker lift to raise the roof. http://www.amazon.com/gp/product/B000CD3QYW/ref=oh_aui_detailpage_o05_s00?ie=UTF8&psc=1
It is a real grunt to manually lift the roof with an added 35 lbs. cantilevered off the front. The lift is one of the better additions I made to the camper. I didn't get to 65 with a good back by being stoopid. :p

Dusty Roads said:
Looks great JaSAn! Neat interior layout. Do you have a serial number on yours? Mine was removed some time ago and I would like to know just how old it is.

Thanks.
Sent Brenda at FWC my serial number and she couldn't tell me anything about the camper.
sticker.jpg
As you can see, I don't know how many numbers are hidden by the spooge, but I can see the mfg date clearly. I am just assuming by its size (96 x 80), that it is a Grandby.
jim
 
I also sent Brenda an email. I got a response but she couldn't gie me a date of manufacture. My serial number is 13962, so that should tell you the number of digits. BTW i found the S/N handwrittenn on the inside of a piece of siding, along with the word Grandby.
 
[SIZE=14pt]Renovating [/SIZE][SIZE=14pt]Sk[/SIZE][SIZE=14pt]öldpaddan[/SIZE]

RIGHT SIDE BUILD

Sorry for the delay. Doing @%$*& taxes.

Once I got the solar installed and working, I am ready to begin on the interior cabinetry. This is new territory for me. I spent my career working with metals and plastics, but have never seriously worked with wood.

14 interior.jpg

First thing I cut ventilation holes for the refrigerator. I am placing the refrigerator in the left rear of the camper where the (long gone) propane locker was located. PO had put paneling over the inside and caulked the door to it. I cut four 5-inch holes in the plywood (biggest hole saw I have) and placed an exhaust fan in the upper rear one. I found a heating return vent at Home Depot that I could cut down to make a vent in place of the propane door.

15 refrigerator vents.jpg16 old propane door.jpg17 new frig vent.jpg

Next I placed the back edge of the bed, with a cutout for the bathroom, and assembled the right side storage bins. This will be for t-shirts, socks, underwear and other daily used items (and it will be easy to reconfigure if I find a better use for the space). The space under the overhang is just high and wide enough for my water supply, sized for seven 1-gallon water jugs. The top hinges for access and will be covered with a cushion to create a bench seat.
The small right rear is a cabinet goes up to the rear window. This is kind of a junk collector, a place to put the dog stuff, and stuff to reach from outside the camper.
In the picture you can see the panel I put over the solar wiring coming down from the roof, with a cutout for the Trimetric.

20 right side bins.jpg22 right side bins with bench.jpg

In the next picture, I have the rest of the under bed structure, and the face on the right side bins and a kick panel to keep the water jugs from sliding all over.

An acquaintance suggested to use Formular® as a cutting board for 4x8 sheets of plywood - works slick. Set blade depth to just deeper than plywood thickness. The cut is supported down it whole length and the Formular is so soft it doesn’t dull the blade. I set the Formular down on the driveway, the plywood on the Formular and could kneel down on the plywood for long cuts. Also used 8’ of aluminum angle and a couple of clamps as a cutting fence to make sure my cuts were straight.

Oh-oh, building inspector – Gotta go.
23 building inspector.jpg
 
JaSAn said:
[SIZE=14pt]Renovating [/SIZE][SIZE=14pt]Sk[/SIZE][SIZE=14pt]öldpaddan[/SIZE]

RIGHT SIDE BUILD

Sorry for the delay. Doing @%$*& taxes.

Once I got the solar installed and working, I am ready to begin on the interior cabinetry. This is new territory for me. I spent my career working with metals and plastics, but have never seriously worked with wood.

attachicon.gif
14 interior.jpg

First thing I cut ventilation holes for the refrigerator. I am placing the refrigerator in the left rear of the camper where the (long gone) propane locker was located. PO had put paneling over the inside and caulked the door to it. I cut four 5-inch holes in the plywood (biggest hole saw I have) and placed an exhaust fan in the upper rear one. I found a heating return vent at Home Depot that I could cut down to make a vent in place of the propane door.

attachicon.gif
15 refrigerator vents.jpg
attachicon.gif
16 old propane door.jpg
attachicon.gif
17 new frig vent.jpg

Next I placed the back edge of the bed, with a cutout for the bathroom, and assembled the right side storage bins. This will be for t-shirts, socks, underwear and other daily used items (and it will be easy to reconfigure if I find a better use for the space). The space under the overhang is just high and wide enough for my water supply, sized for seven 1-gallon water jugs. The top hinges for access and will be covered with a cushion to create a bench seat.
The small right rear is a cabinet goes up to the rear window. This is kind of a junk collector, a place to put the dog stuff, and stuff to reach from outside the camper.
In the picture you can see the panel I put over the solar wiring coming down from the roof, with a cutout for the Trimetric.

attachicon.gif
20 right side bins.jpg
attachicon.gif
22 right side bins with bench.jpg

In the next picture, I have the rest of the under bed structure, and the face on the right side bins and a kick panel to keep the water jugs from sliding all over.

An acquaintance suggested to use Formular® as a cutting board for 4x8 sheets of plywood - works slick. Set blade depth to just deeper than plywood thickness. The cut is supported down it whole length and the Formular is so soft it doesn’t dull the blade. I set the Formular down on the driveway, the plywood on the Formular and could kneel down on the plywood for long cuts. Also used 8’ of aluminum angle and a couple of clamps as a cutting fence to make sure my cuts were straight.

Oh-oh, building inspector – Gotta go.
attachicon.gif
23 building inspector.jpg
Nice job. Keep the pictures coming.
 
Looking good, JaSAn! Keep the pix coming! I still haven't figured out what I need to do with my interior, but you are giving me ideas.
 
Maybe I missed it but did you have to narrow it the lower box to get it in your truck? I thought the older ones didn't fit?
 
Vento: I am not sure if your question was directed at me or not, but yes, you do need to narrow the floor pack about 4+ inched to get the older campers (JaSAn's is a 1977, and mine is a 1978) to fit on the newer trucks. I just built a whole new floor pack due to rot issues, and eliminated the over wheel well "step" altogether.


Hope this helps.
 
That does, thanks. Was it a pain to mate it back up to the frame and all the siding?
 
Not really a problem, just takes some time. When I bought mine, the interior was out of the camper already. I first trimmed back the aluminum framing on each side. Then I started with a sheet of 3/4" plywood for the floor, painted it on both sides, and then aligned it under the camper and started building up from there.
I had the bottom 2 pieces of siding removed to jack the camper up as someone else on here had done.
There are some really good build threads on here. Just look for rebuilding Grandby or new floor pack or similar. I spent a lot of time reviewing the (re) build threads before I bought mine. The FWC's are actually pretty simple.

Hope this helps.

Found a thread for you. Look for Sheefdog's rebuild of a 87 Fleet. It has some pretty good pictures. Sorry, I can't seem to link it for you.
 
I found an older FWC Keystone I was thinking I could hack apart to make fit. Is the siding expensive to replace from FWC?
 
I reused my old siding on the sides and bought a sheet of plain white aluminum for the back as the siding there was pretty beat up. I think the sheet cost about $40. There is a guy here selling sheet aluminum for $20 on Craigslist so you might try that too. Just an FYI, I think the Keystone is a 9' camper. The Grandby's are 8'. There are some good build threads on the Keystones.
 
Sorry I didn't get back to you sooner. I've been in a foul mood (taxes :mad: ).

Vento: I cannot answer your question as PO modified the camper to fit his truck. He had a 2000 Dodge and I have a 2012, so I knew it would fit (although I had to move the wheel well notch back because he rebuilt it for a 6.5' bed and I have an 8'). It is a tight fit, less than a 1/2 inch on each side.
left clearance.jpgright clearance.jpg

I plan on replacing the siding on mine at some point. Both aluminum and fiberglass RV siding is available online. Haven't checked on pricing and shipping or local supply yet.

jim
 
No worries,

I found a Grandby that fits in Oregon and one in SD. I am trying to go look at it (Oregon) on Sunday if I can get a response from the owner.
 
Back
Top Bottom