Repair advice?

Ted

Magellan
Site Team
Joined
Dec 27, 2006
Messages
2,781
Location
East of Sacramento
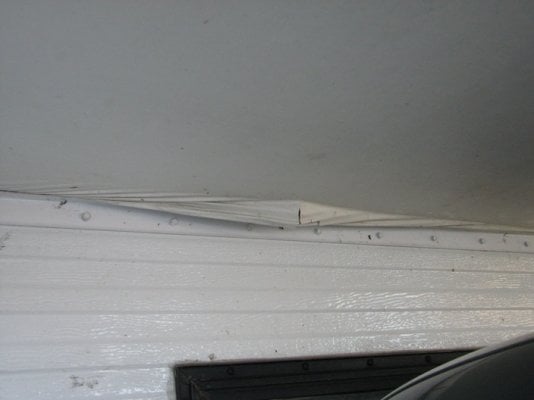
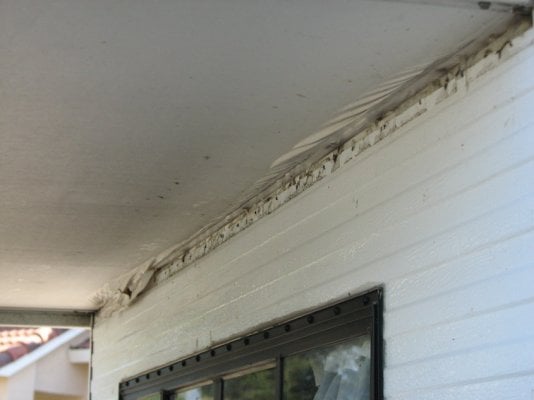
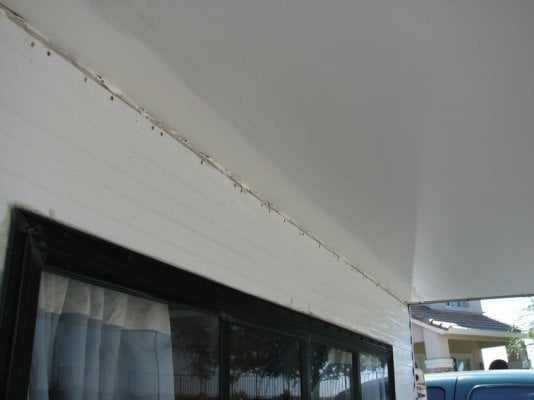
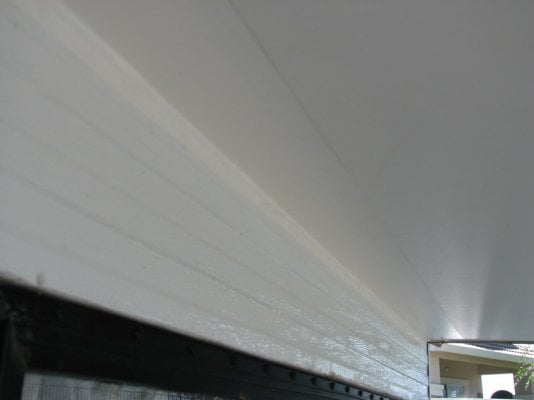
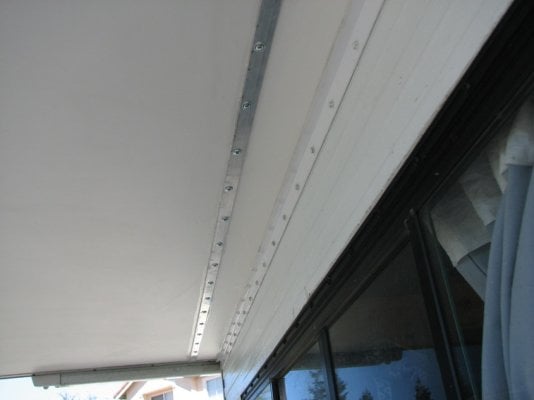
Our Hawk has always had some wrinkles in the vinyl in the cabover section. The first photo is behind the driver's side. This looks pretty much the same as when it was new. But behind the passenger's side, it seems to have worsened and now has a tear, as seen in the second photo. This is leaving the wood exposed.

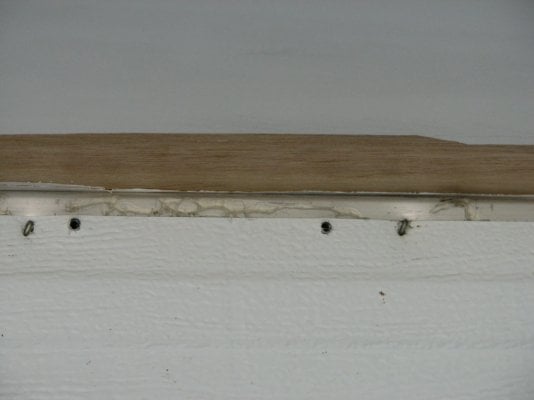
My thought is to remove the screws along that section and simply push the loose vinyl back into place. I will add some silicone to the location of the tear to seal it up.

My question for those of you that have worked on this section of the camper, and/or Ben and Stan, is if it is that simple. Others have had to remove their canvas and inside finish work to replace this board. Do I need to do that just to fix the vinyl or is the board loose enough to remove a few screws and pull the vinyl tight as planned?

Thanks in advance for any advice.

TedView attachment 1279
 

Attachments

  • camper 003.jpg
    camper 003.jpg
    67.8 KB · Views: 562
repair

I haven't seen that one before. I would go one of two ways with it. The first would be to just take off the outside trim piece that you have there, glue the vinyl back to the board if possible and reinstall the trim. The problem with this idea though is that I doubt you will be able to get all the vinyl glued back in place well enough to last over the long haul.

The second way that I would do it and I think this will work well in the long run, is to just cut the loose vinyl off the board. Once the vinyl starts to come loose like that I would expect it to continue unless you take off the loose part. I would strip off the loose vinyl and then paint the exposed area with a good exterior white paint so that it will be a close match. You can even take a sample of the vinyl to a Home Depot and have them make a quart of paint that will match for very little expense.

Now I would also expect to do this a few times over the years as more of the vinyl tends to come loose. There is no reason though, that if you keep ahead of it and use a good exterior paint that you should have any problem with the bed board or have to replace it. Moisture is the killer on these bed boards and as long as you keep it sealed with a good paint, it should hold up just as long as the floor packs of the campers do.
 
Mine has the same problem, pretty frustrating. It seems as though a better material is in order, or maybe FWC has already switched to a new design since my camper (2001)
 
new material

I don't know what FWC is using today. We have switched to a new bed board that has a hard covering now instead of the vinyl.
 
Since Stan hasn't replied yet I'll chime in. The new FWC's don't have the vinyl covering. The surface is what appears to be a high quality paint. I'm sure Stan will fill us in later.
 
Hey Ted


Let me check on it and get back with you.

I know we are using different materials now, but I want to verify what it is.

Feel free to call Chicali in our service dept. if you like.

He might be able to give you some tips & tricks to fit it.

CHICALI 800-242-1442


.
 
Has this been identified yet? I'm heading down to the factory in Eagle WI on Saturday to check out some Hawks. I'll add this to my list of things to checkout/questions to ask.
 
You won't find the factory in Eagle, but you will find a very knowledgable and helpful dealer who has been in business for years, Sean Dempsy and his wife Diana. We bought are Hawk from him last year at this time.

He is much closer to you than the factory!

Before final purchase, I suggest reading thread on option regrets.
 
option regrets

The option regrets is a good thread to start with. Everyone has a different idea though on what options work for them compared to others.

The one thing to think about is how your going to use the camper and in what conditions you will have it in. Then in turn the options that you feel would work well for you in your style of camping.

Sean is a great guy to work with and if you call Stan at the factory, he should have a wealth of information on the pro's and con's of the options from customer feedback over the years and how they have used them in the conditions that are similar to yours.
 
Ben, that's excellent advice! A person's camping style is going to strongly affect which options are going to be useful and which are going to be a waste of money, space and fuel.

The little fiberglass trailer groups are rife with folks adding bathrooms to their used rigs while other folks are taking bathrooms out because they want the space!

My latest trailer came with a converter and no battery because the original owner camped only in CGs with hookups; I've put in a battery and removed the converter because I rarely camp with hookups.

A person who camps in warm weather is going to want all the ventilation possible and a person who camps in cold weather is likely to prefer insulation to windows, etc.
 
Repair completed.

Of the suggestions I received here and elsewhere, the solution came down to removing the bad vinyl and either painting the exposed wood or covering it in contact paper. I don’t feel paint alone would be a good moisture barrier but was also concerned that new contact paper would peel away at the front seam. Decided to go with the overkill and do both plus add an additional molding strip to keep the new stuff from peeling. Sorry about having to pan back and forth, I haven't been able to get my photos to paste within the text.

First step was removing the molding. That came away easily enough. The vinyl continues along the board so there is no flashing behind this molding. There is only a bead of caulk which seems minimal to me. First photo is the area with the molding removed.

Next I cut away all of the loose vinyl and cleaned up siding and rest of the top. From there I painted the exposed wood with a good exterior paint. As some suggested, this may have been good enough. It certainly looked better already. Second and third photos are of the exposed wood, which was still in good shape, and then after painting.

After a couple of coats of paint set, I added the contact paper. It actually is more like vinyl than paper, but that is what I’ve always known it to be called. Rather than take it up to the corner, I cut it so that it would come down about ¾ “ in back, like flashing. This way, any moisture that manages to get between the vinyl and the molding can’t go into the camper at the seam. You can see this in the fourth photo.

Then I ran a bead of silicone along the lower edge of the contact paper and screwed the molding back in place. Since I was concerned about the front edge of the contact paper peeling, I bought a piece of ½” aluminum and drilled holes every 3 ½“ to match the corner piece. Before attaching it, I ran a bead of caulk the whole length. Probably should have painted it white to match but I can do that later. Here is how it looked when completed.

So it has paint on the wood and new vinyl over that. Both edges of the vinyl are sealed with silicone caulk and then have the molding pieces screwed over that. To be safe, I then caulked all of the edges of the molding just in case. This had not become a leakage problem yet and there was no damage to the bed board. With this completed, I don’t expect any problems in the future either.

Ted
 

Attachments

  • IMG_0825.jpg
    IMG_0825.jpg
    101.3 KB · Views: 301
  • IMG_0827.jpg
    IMG_0827.jpg
    87.4 KB · Views: 307
  • IMG_0830.jpg
    IMG_0830.jpg
    86.5 KB · Views: 314
  • IMG_0832.jpg
    IMG_0832.jpg
    68.6 KB · Views: 304
  • IMG_0833.jpg
    IMG_0833.jpg
    82.8 KB · Views: 311
Repair...

Nice job Ted. I think it is just right. Overkill perhaps but you will be sure that it won't become a problem again.
Brian
 
ted, very nice work...just noticed this on my camper today...i think it is from moisture geting up under the material causing the vinyl to strip away...yours looks great and way to go with the overkill, better safe than sorry. was it difficult to remove the vinyl? mind posting the brand of vinyl and paint you choose...i think this will be something i need to remedy in the near future. thanks again.
 

Attachments

  • IMGP1360.jpg
    IMGP1360.jpg
    38.5 KB · Views: 250
  • IMGP1359.jpg
    IMGP1359.jpg
    64.3 KB · Views: 237
Hi Erod

The ripples on my camper were there from new. It looked like the vinyl was pushed out of place as the board was placed into position. The wood the damaged vinyl underneath looked good as new. Hopefully this will be the same for you as opposed to being caused by water.

Anyway, it was very easy to remove the damaged vinyl. Once you remove the trim piece, simply cut a line in the vinyl slightly ahead of the damaged area with a razor knife. Go easy so as to only cut the vinyl and not the wood. Also cut a line where the board goes past the front wall into the camper. Then just peel the damaged area off.

The paint I found in my shed. Don't really remember what project it was from. It is Glidden Evermore Premium Exterior. Claims to be for all siding, brick, masonry, and stucco. Pretty thick stuff. It might be one of those paints with the plasticizer in it. The vinyl is simply contact paper from Ace Hardware. Not sure of the brand but it was about 9' x 2' (maybe 3') and only cost $5. It is the same stuff used on shelving.

The hardest part of this repair was taking the camper off the truck. It was only my second time to do that. Waiting for the paint to dry was the longest part of the job. You can easily do this in an afternoon and with minimal cost. Good luck.
 
Back
Top Bottom