Replacing board under bed in FWC Ranger 2

patrickkidd

Senior Member
Joined
Aug 30, 2018
Messages
114
Hello!

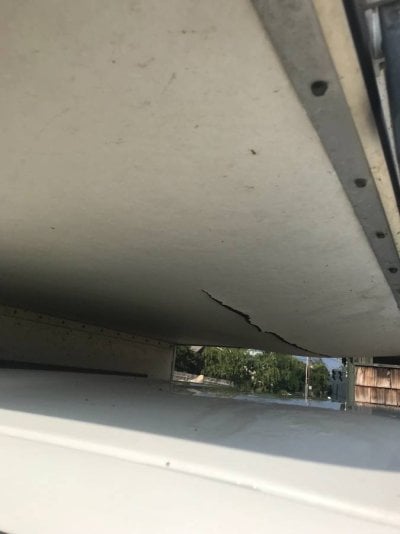
I have a 1993 FWC Ranger 2 and need to replace the board under the bed. It was water damaged (see photo).

Does anyone know what the proper material would be for this part? Or if it's better to just try to order one?

It seems like it is an especially stout particle board for the thickness, as if it was some kid of composite. Seems to me that normal particle board would have broken through with a tear that big bug I can still lay on the board (for now).

Thanks!
 

Attachments

  • 00E0E_9pCF5C7rklq_1200x900.jpg
    00E0E_9pCF5C7rklq_1200x900.jpg
    30.3 KB · Views: 153
Patrick, there are a couple of threads on this topic, including if my memory is right, one that documents replacement. Google “Wander the West: water damaged cab over” or similar to find the threads.

I’d give All Terrain Campers a call. There’s a very good chance Marty or Jeff had a hand on your camper when built, and both guys are very helpful and knowledgeable. They probably can share some tips to make it an easier job.
 
Thanks for the reply. I looked around for the other threads and got the material and am ready to trace and cut it. However, I can't figure out how to get the existing piece out!

It seems like the metal bracket that holds it up from below is fixed to the frame, but I can't tell. It also seems like you have dismantle the entire interior siding to get the two pieces of trim out from holding the piece down. See photos.

Does anyone know how to remove this piece?

Here is the inside trim piece holding it down:
IMG_0654.jpg

Location of the trim piece and showing nothing else holding the board down in the front:
IMG_0655.jpg

The back-end of the metal bracket holding it up and associated material:
IMG_0656.jpg

The front-end of the metal bracket holding it up, with trademark 4"radius curve at the front of the cabover section. This bracket doesn't seem to come out downwards so far as I can tell.
IMG_0657.jpg
 
patrickkidd said:
Thanks for the reply. I looked around for the other threads and got the material and am ready to trace and cut it. However, I can't figure out how to get the existing piece out!

It seems like the metal bracket that holds it up from below is fixed to the frame, but I can't tell. It also seems like you have dismantle the entire interior siding to get the two pieces of trim out from holding the piece down. See photos.

Does anyone know how to remove this piece?

Here is the inside trim piece holding it down:
attachicon.gif
IMG_0654.jpg

Location of the trim piece and showing nothing else holding the board down in the front:
attachicon.gif
IMG_0655.jpg

The back-end of the metal bracket holding it up and associated material:
attachicon.gif
IMG_0656.jpg

The front-end of the metal bracket holding it up, with trademark 4"radius curve at the front of the cabover section. This bracket doesn't seem to come out downwards so far as I can tell.
attachicon.gif
IMG_0657.jpg
So I gave it another go and now I’m totally stuck. The piece of trim that supports the pullout portion of the bed does not come off despite having been unscrewed. It doesn’t even budge. The one on the other side came off as expected. Consequentially, I cant remove the siding and so can’t remove the lighter piece of trim holding the bed board in place. I also can’t even remove the little brown plastic edge trim because the staple holding it in is behind the trim that holds up the pullout bed. The lighter trim itself doesn’t budge when pushed, though I don’t see any screws holding it in yet. The siding on the other side is fixed in behind the entire galley which also is in front of its respective lighter piece of trim.

This is insane!
 
Patrik, responding to your PM here to keep the discussion open for all to enjoy.

About the bed board, that is literally one of the few things I did not rebuild :) but only because the previous owner had. I did paint it to protect it. Mine looks like it is 3/4 ply. I would not go with particle board, quality ply is your friend. For some reason mine is two pieces but i would think 1 solid piece is most ideal.

My fifth post in my thread has shots of the piece in question. http://www.wanderthewest.com/forum/topic/11945-84-fleet-09-tacoma-project/

let me know if i can offer any additional info.
 
I purchased my new bedboard from ATC, Marty gave me a few pointers and cut the new bedboard using jigs and a router. He told me he cut it a bit undersize to help with the installation.

I call the trim pieces "sideboards" in my write-up, they need to be cut lengthwise to release the bedboard. I used a cordless circular saw to trim about an 1" off the bottom, then used a sharp chisel to cross-cut the board from behind the paneling that was still in place on the left side of the camper. I set the cut depth carefully to avoid cutting into the aluminum c-channel, that is a very important structural piece! I only needed to cut one side to remove the old bedboard as it was cut in half for removal, but eventually also trimmed the other sideboard for re-installation of the replacement bedboard.

P1030803r.JPGP1030805r.JPGP1030807r.JPGP1030792r.JPG

The sideboards were originally the same material as the bedboard, I replaced one side with hardwood (poplar) as I had that side completely disassembled. The other side has not been replaced but deferred for a future cabinet replacement project. Here's the old boards (left side) and new one (right side) along with the new skidguard bedboard.
P1040033r.JPGP1040035r.JPGP1030815r.JPGP1040039r.JPG

Let me know if you have any other questions!
 
wuck said:
I purchased my new bedboard from ATC, Marty gave me a few pointers and cut the new bedboard using jigs and a router. He told me he cut it a bit undersize to help with the installation.

I call the trim pieces "sideboards" in my write-up, they need to be cut lengthwise to release the bedboard. I used a cordless circular saw to trim about an 1" off the bottom, then used a sharp chisel to cross-cut the board from behind the paneling that was still in place on the left side of the camper. I set the cut depth carefully to avoid cutting into the aluminum c-channel, that is a very important structural piece! I only needed to cut one side to remove the old bedboard as it was cut in half for removal, but eventually also trimmed the other sideboard for re-installation of the replacement bedboard.

attachicon.gif
P1030803r.JPG
attachicon.gif
P1030805r.JPG
attachicon.gif
P1030807r.JPG
attachicon.gif
P1030792r.JPG

The sideboards were originally the same material as the bedboard, I replaced one side with hardwood (poplar) as I had that side completely disassembled. The other side has not been replaced but deferred for a future cabinet replacement project. Here's the old boards (left side) and new one (right side) along with the new skidguard bedboard.
attachicon.gif
P1040033r.JPG
attachicon.gif
P1040035r.JPG
attachicon.gif
P1030815r.JPG
attachicon.gif
P1040039r.JPG

Let me know if you have any other questions!
Aha! I figured as much. Now I understand what he meant when he said “cut the bed boards.” I was feeling really stuck there.

I am out of town for a few weeks but will get back on this when I return. Thank you so much for your comprehensive reply.
 
Just curious if that side board goes the whole length of the camper?

In the pictures it looked like you stopped at the cabinets cutting it out?

Did you add just a side board form the cabinets forward? does that change the rigidity of the camper?
 
knoxswift said:
Just curious if that side board goes the whole length of the camper?

In the pictures it looked like you stopped at the cabinets cutting it out?

Did you add just a side board form the cabinets forward? does that change the rigidity of the camper?
I am also curious about the necessity of these boards, and if there is a way to get them out without cutting them. For one thing I don’t have a saw or crowbar to cut them with. I also haven’t been able to remove the piece of trim that holds the pullout bed on the right side so as to remove the siding so as to remove that right side bed board. So that is another puzzle, especially if one should want to replace the siding, as I would like to do.

Another thought I had was to install the piece in two pieces and caulk the seam. Hypothetically speaking that would make it easier to install them since you could put them in one at a time, though you still might have to cut or remove one side of the bed boards. I am using 3/4” birch (though afterwards Marty told me the original piece is 5/8”) so it will be plenty stiff.
 
knoxswift said:
Just curious if that side board goes the whole length of the camper?

In the pictures it looked like you stopped at the cabinets cutting it out?

Did you add just a side board form the cabinets forward? does that change the rigidity of the camper?
The sideboard does run from the rear corner to within a few inches of the front - the radiused corner up there stops it. As I recall, mine was at least two pieces - remember it's cut from the same lumber-core ply (probably remnants) as the bedboard itself, so it probably goes to the factory in 4'x8' sheets. There is a butt joint towards the rear of the camper, I think having a continuous piece as it passes over the front wall is important. Since these run the length of the wall, there is a lot of stuff mounted to them - cabinets, exterior lights, latches etc. I used tee nuts to remount the lights and latches, and ran some dadoes along the length for a wire channel. The original wiring was tucked up between the aluminum and plywood and hardwood was a much tighter fit, I think I also had to rabbet the top side to fit it up into the channel.

P1030891r.JPGP1030885r.JPG

As I had the right (passenger) side of the camper disassembled to the frame, the entire sideboard was replaced there. I believe the replacement was in two sections, but can't recall exactly. The other side was not replaced as I wasn't too much interested in removing the kitchen cabinets and paneling to do so. Check out the photos, I cut an inch off the bottom of the left side from the front wall forward, there's still 3" of the original material in place there. I will replace the this side as part of a kitchen "remodel" sometime in the future, but for for a couple of years since completing that work I have been enjoying camping in my camper rather than working on it!

I'm not a structural engineer, but I can see how the sideboards can help increase the strength of the c-channel where it passes over the front wall. The channel itself is pretty strong, but having that wood tucked up into the wrap around section of it reinforces and prevents it from kinking there, say when you hit a large bump or dip in the road. Any kink in that piece would probably lead to eventual failure.

Newer campers are a bit taller in this area, I'm not sure if they use a taller c-channel or add (weld) another tube on top of the channel - If another tube is added it would really increase the overall strength of the cabover.
 
patrickkidd said:
I am also curious about the necessity of these boards, and if there is a way to get them out without cutting them. For one thing I don’t have a saw or crowbar to cut them with. I also haven’t been able to remove the piece of trim that holds the pullout bed on the right side so as to remove the siding so as to remove that right side bed board. So that is another puzzle, especially if one should want to replace the siding, as I would like to do.
Another thought I had was to install the piece in two pieces and caulk the seam. Hypothetically speaking that would make it easier to install them since you could put them in one at a time, though you still might have to cut or remove one side of the bed boards. I am using 3/4” birch (though afterwards Marty told me the original piece is 5/8”) so it will be plenty stiff.
My 2¢ worth on a tool. Use it one time, it’s paid for itself.
 
patrickkidd said:
I am also curious about the necessity of these boards, and if there is a way to get them out without cutting them. For one thing I don’t have a saw or crowbar to cut them with. I also haven’t been able to remove the piece of trim that holds the pullout bed on the right side so as to remove the siding so as to remove that right side bed board. So that is another puzzle, especially if one should want to replace the siding, as I would like to do.

Another thought I had was to install the piece in two pieces and caulk the seam. Hypothetically speaking that would make it easier to install them since you could put them in one at a time, though you still might have to cut or remove one side of the bed boards. I am using 3/4” birch (though afterwards Marty told me the original piece is 5/8”) so it will be plenty stiff.
The channel is plenty strong, but I believe in extreme stress situations these boards help to keep that structure from bending, in particular where the channel passes over the wall. But, hey, I'm cautious, and not a structural or mechanical engineer. On a trip to the race track playa in death valley, 20 something miles of severe washboard and generally crappy road, I stuck my arm out of the window and grabbed the cabover. I was really impressed with how much that thing was moving around!!

Your 3/4 inch birch will need to be rabbeted to fit up into the channel as you noted the original was 5/8". This will need to be done with a table saw, a jointer/planer, or a router. Have any friends with a woodworking hobby? Or, let us know your approximate location, maybe someone nearby can help.
 
wuck said:
The channel is plenty strong, but I believe in extreme stress situations these boards help to keep that structure from bending, in particular where the channel passes over the wall. But, hey, I'm cautious, and not a structural or mechanical engineer. On a trip to the race track playa in death valley, 20 something miles of severe washboard and generally crappy road, I stuck my arm out of the window and grabbed the cabover. I was really impressed with how much that thing was moving around!!

Your 3/4 inch birch will need to be rabbeted to fit up into the channel as you noted the original was 5/8". This will need to be done with a table saw, a jointer/planer, or a router. Have any friends with a woodworking hobby? Or, let us know your approximate location, maybe someone nearby can help.
Yeah shoot, I figured as much. I am in Sausalito, CA. I am living on a sailboat and don’t have storage space, otherwise I’d be accumulating all kinds of tools!
 
Thanks for the clarifications. This is some great info.
I don't have to fix anything I'm just following for the information being an engineer, and not have seen the framing I started to wonder about the boards and how they help rigidity...

Great thread!
 
After some thinking I decided to get 3/4" birch plywood (the hardest kind, usually comes sanded) and cut it to fit. The old piece was 5/8" particle board so this is certainly an upgrade. I had to cut the old piece out with a Dremel tool because I live at a marina and removing the camper from the truck bed is a pain. It was water damaged (hence the repair) so it was more of a demo-job than a removal anyway.

The key was that I made the new bed boat into two pieces so that I could taco it in under the wooden support members that sit on the sides between the aluminum framing. Turns out there is exactly 3/4" under these pieces and not 5/8" like the original board was, so this is a perfect and tight fit now. I painted the new boards top, bottom, and sides with two coats of an acrylic white roofing paint the the PO used for the roof - still had a little left over from his efforts there. That should seal it from future water damage. It looks good with texture from a roller, too. I then used silicone sealant around the edges and between the two pieces.

BOTTOM LINE:

- 3/4" birch
- White acrylic roofing paint to seal from water.
- Silicone sealant around edges and between two pieces to seal air and water.
- Didn't have to cut the support members on the left and right sides, as advised by ATC.

IMG_0667.jpg
 
Back
Top Bottom