Lighthawk
Weekend warrior
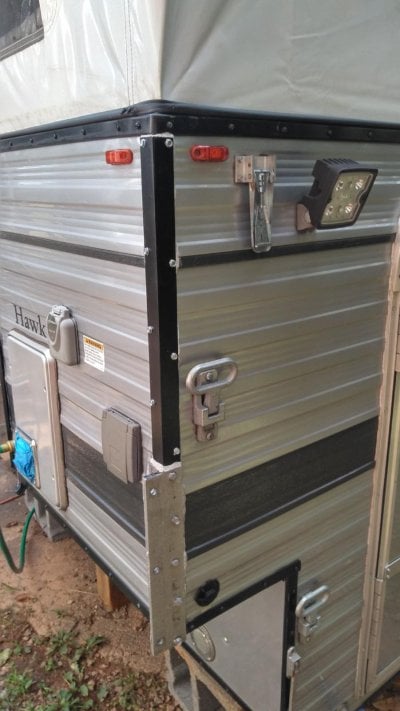
Well, it didn't take long for me to abuse my new 2008 Hawk, but that's another story.
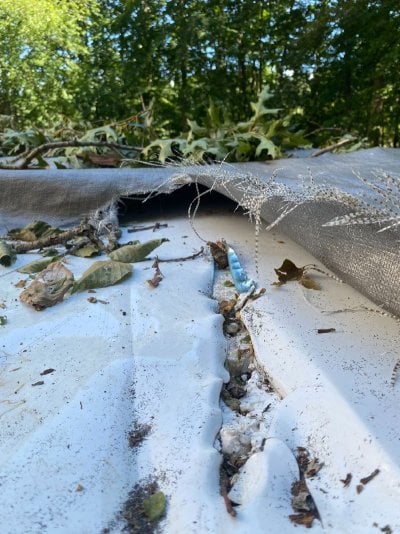
Leave it to say, I let my roof rack beat a 3" x 6" hole in my roof while driving an extremely rough road.
I'm a contractor and can just about fix anything (or think I can). So when I had to patch my roof I applied a lot of the same technology I use in my residential construction experience. I took photos of the work and thought I would share my experience with the crew that visits this site.

First step: Locate materials
Lucky for me, I live an hour away from FWC in Woodland. I visited the shop and Terry was very helpful. I was given a tour of the factory and was very impressed with their attention to detail. It's very clean and organized. I was there to buy a scrap (given free) of roof material, which is textured aluminum siding, and some sealant. They recommended a product called Silaprene (Royal Adhesive & Sealants 800-999-4583). The tube cost $9.99 BTW, a new roof skin, done by the factory was $575 I think

Second step: Define the work area
The roof damage was jagged, so I got out the snips and squared off the hole.
I took a file to remove the burrs and also sanded the area surrounding the hole to get better stick-tion (a tech term in the trades).
Note: I've masked off the perimeter of the work area. That's the Yakima roof rack next to the hole.
After thinking about it, I left the rack rail in place, but cleaned out the caulking to make a channel to tuck the new roof metal into.
Third Step: The Big Band-aid
FWC recommended riveting the roof metal over the hole, and using the Silaprene beneath and on top as a sealant. I wanted more than one level of waterproofing, so I went into my construction shed and found a roll of Fortiflash.
http://www.fortifiber.com/fortiflash.html This stuff has a peel-away paper to expose a super-sticky-bubblegum-on-a-hot-day surface with a backing membrane. It sticks to everything, including your fingers.
Originally I was going to put a big bandaid of Fortiflash over the hole, but decided to go one more level of protection. I cut strips about an inch wide and slipped them inside the hole. With some care, I stuck the flashing to the bottomof the roof metal leaving about half of the strip exposed. The thinking here is that the strip will provide another seal to the bottom of the big bandaid (5" x 7" Fortiflash) and to the bottom of the roof metal. Probably redundant, but hey, who needs a leak??


I found if I slipped the strip with the peel away paper intact, I could install the strip without sticking to everything in sight.

The styro insulation was beaten down so I had a bit of a hole. I looked around my garage and found a piece of mylar insulation from a windshield sunscreen. I cut a chunk and slipped it in there to shim up the space.
Here I am sticking the big surface mount Fortiflash to the roof with the strips in place. Notice how sticky the membrane is.

The Big Band-aid is in place! Frankly, this stuff is so bombproof, I could probably stop right there and it would not leak for ten years!
Step Four: Put a cap on it
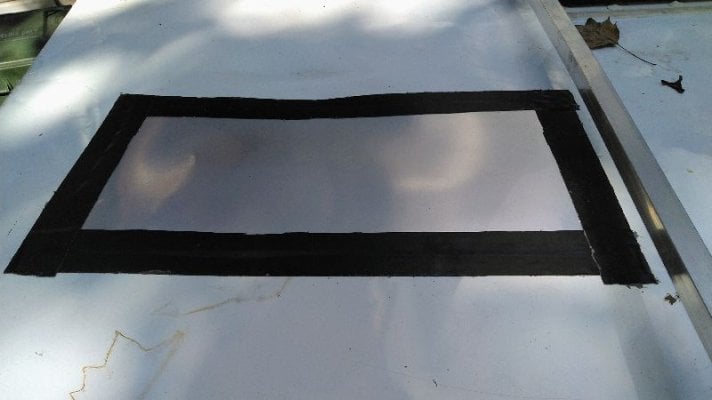
But let's make this look right. I cut a piece of textured aluminum to fit and formed it a bit with my hands so the edges were bending downward. I fit it about 1/4" under the yakima rail and drilled for 1/8" aluminum rivets (sourced at local lumberyard) about 2.5" inches on center. The rivets only hold the metal in place.
I sized the aluminum to overlap the Fortiflash by about 1/2" on three sides. My next step (no photo unfortunately) was to lay a nice double bead of Silaprene inside the footprint of the aluminum patch. I squeezed a nice 1/4" bead into the channel under the yakima rail so I could push the metal patch right into the Silaprene. It worked great.
My goal was to get a small amount of caulking to squeeze out from all the edges of the patch, but not a bunch which would be a mess. Final touches included squeezing a small amount of caulk into each rivet head.

Details, details . . .
The FWC paint is pretty weak I have to say. I had knocked off a bit while powerwashing the front edge of the camper and even masking tape pulled off some paint around the patch area. Terry at FWC recommends getting a small can of appliance paint for touch up. So that's the undone piece.
Does it work?
Ha ha. I'll let you know I let the caulking cure for two days, but am going home today to give it a good flood test. But there's the caulking and aluminum to go through, then the Fortiflash in two layers, so I don't think it could leak. Actually the weak point of the whole system is the d*#@g rivets. They go through the whole enchilada, so they couldleak, but they are easy to touch up with caulk if there was a leak.
Hope that's useful to anyone else who has dinged their rig!
Leave it to say, I let my roof rack beat a 3" x 6" hole in my roof while driving an extremely rough road.
I'm a contractor and can just about fix anything (or think I can). So when I had to patch my roof I applied a lot of the same technology I use in my residential construction experience. I took photos of the work and thought I would share my experience with the crew that visits this site.
First step: Locate materials
Lucky for me, I live an hour away from FWC in Woodland. I visited the shop and Terry was very helpful. I was given a tour of the factory and was very impressed with their attention to detail. It's very clean and organized. I was there to buy a scrap (given free) of roof material, which is textured aluminum siding, and some sealant. They recommended a product called Silaprene (Royal Adhesive & Sealants 800-999-4583). The tube cost $9.99 BTW, a new roof skin, done by the factory was $575 I think
Second step: Define the work area
The roof damage was jagged, so I got out the snips and squared off the hole.
I took a file to remove the burrs and also sanded the area surrounding the hole to get better stick-tion (a tech term in the trades).
Note: I've masked off the perimeter of the work area. That's the Yakima roof rack next to the hole.
After thinking about it, I left the rack rail in place, but cleaned out the caulking to make a channel to tuck the new roof metal into.
Third Step: The Big Band-aid
FWC recommended riveting the roof metal over the hole, and using the Silaprene beneath and on top as a sealant. I wanted more than one level of waterproofing, so I went into my construction shed and found a roll of Fortiflash.
http://www.fortifiber.com/fortiflash.html This stuff has a peel-away paper to expose a super-sticky-bubblegum-on-a-hot-day surface with a backing membrane. It sticks to everything, including your fingers.
Originally I was going to put a big bandaid of Fortiflash over the hole, but decided to go one more level of protection. I cut strips about an inch wide and slipped them inside the hole. With some care, I stuck the flashing to the bottomof the roof metal leaving about half of the strip exposed. The thinking here is that the strip will provide another seal to the bottom of the big bandaid (5" x 7" Fortiflash) and to the bottom of the roof metal. Probably redundant, but hey, who needs a leak??
I found if I slipped the strip with the peel away paper intact, I could install the strip without sticking to everything in sight.
The styro insulation was beaten down so I had a bit of a hole. I looked around my garage and found a piece of mylar insulation from a windshield sunscreen. I cut a chunk and slipped it in there to shim up the space.
Here I am sticking the big surface mount Fortiflash to the roof with the strips in place. Notice how sticky the membrane is.
The Big Band-aid is in place! Frankly, this stuff is so bombproof, I could probably stop right there and it would not leak for ten years!
Step Four: Put a cap on it
But let's make this look right. I cut a piece of textured aluminum to fit and formed it a bit with my hands so the edges were bending downward. I fit it about 1/4" under the yakima rail and drilled for 1/8" aluminum rivets (sourced at local lumberyard) about 2.5" inches on center. The rivets only hold the metal in place.
I sized the aluminum to overlap the Fortiflash by about 1/2" on three sides. My next step (no photo unfortunately) was to lay a nice double bead of Silaprene inside the footprint of the aluminum patch. I squeezed a nice 1/4" bead into the channel under the yakima rail so I could push the metal patch right into the Silaprene. It worked great.
My goal was to get a small amount of caulking to squeeze out from all the edges of the patch, but not a bunch which would be a mess. Final touches included squeezing a small amount of caulk into each rivet head.
Details, details . . .
The FWC paint is pretty weak I have to say. I had knocked off a bit while powerwashing the front edge of the camper and even masking tape pulled off some paint around the patch area. Terry at FWC recommends getting a small can of appliance paint for touch up. So that's the undone piece.
Does it work?
Ha ha. I'll let you know
I let the caulking cure for two days, but am going home today to give it a good flood test. But there's the caulking and aluminum to go through, then the Fortiflash in two layers, so I don't think it could leak. Actually the weak point of the whole system is the d*#@g rivets. They go through the whole enchilada, so they couldleak, but they are easy to touch up with caulk if there was a leak. Hope that's useful to anyone else who has dinged their rig!