Upgrade Running lights

IvanSidney

New Member
Joined
Jun 9, 2023
Messages
5
Location
Peterborough , NH
I have read a couple of post regarding upgrading to LED lights..But did not notice this issue.. After removing one light, i noticed that both wires coming out of the side of the camper were brown? , and pretty heavy duty, not sure of the gauge.. So, my assumption is to connect both brown wires with the red on the new LED and somehow ground the black from the LED to the skin? Any comments would be greatly appreciated.. One worry is that this connection will come apart in the wall, dont see any access to it ..
 
Do some testing with a meter first. Since these campers were made in multiple areas of the country there are many different styles of how people did things, not to mention someone coming in at some point and doing a repair.

I personally didn't want to use the camper skin as a ground so I ran a power (red) and ground (black) wire to each LED light. I then looped them according to some logic I had for fusing the circuits and ran them back to the Fusebox.
Of course, this was quite easy since I had removed my interior paneling and could route holes through the different 2x2 support and bracing pieces.
 
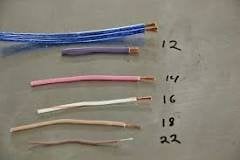
Which light did you pull first? Was it the one on the front driver's side by the DC input plug? On my '58 NCO, that front light did have two 18 gauge brown wires connected to it. One wire runs across to the front passenger light, and then a spliced run to rear passenger side light. The 2nd wire coming out from the front driver's side went directly back to the rear driver's side light. All of my other three lights only had one wire coming out for a splice. The initial ground was made to the inside of the metal DC input plug.

If this is the case for you, and the other three lights only have a single wire, go ahead and spice them together-good & tight. I used a heat gun with these self-solder butt connectors so I wouldn't have to worry about loose connections.

https://www.amazon.com/gp/product/B073RMRCC3
 

Attachments

  • Sizes_12-22WireGauge.jpg
    Sizes_12-22WireGauge.jpg
    4.4 KB · Views: 51
Thanks DaniCa,
I pulled the front side passenger light which had the 2 brown wires.. Some comments that these lights are all daisy chained together which makes sense with 2 wires. The soldered wires together , seems like the best option, as the LED wire is substantially smaller..As far as the ground wire, think i will somehow connect to aluminum skin, as i am not ready to start removing interior walls. When i removed the original fixture , The fixture just fell apart and the wires were no longer connected? So no lights .
 
IvanSidney said:
"...as i am not ready to start removing interior walls."
Trust me, unless you're ready to do an (almost) full rehab on the top half...leave them walls alone! One thing always leads to another & you'll end up like me...rebuilding the entire driver's side & bulkhead...just because I was trying to follow how far the leak had spread from the corner bulkhead. What a PITA. Let us know how the LED lights work out for you.
 
My feelings as well Newbie, I once bought a new refrigerator, the next thing i new I was rebuilding the whole kitchen. I did replace all of the lights, except for the center rear brake light, still no luck . At this point i am looking for a wiring schematic . All 8 lights except for one had 2 wires, the one was drivers rear side. Most of the old light fixtures were cracked, and connections rotted off.
 
"I once bought a new refrigerator, the next thing i new I was rebuilding the whole kitchen."

hahaha Yep! I feel you. I bet that new refrigerator was just a tad too big, huh? Anyway, what year/model do you have? As I stated, mine is a 1958 NCO. Simple wiring, but the only reason I know that is because as I was "following how far that leak" went, I ended up getting stuck-on-stupid with frustration & just kept tearing off panels. However, I WAS able to verify that the wiring diagram I found is correct. Maybe this link will help:

https://www.wanderthewest.com/forum/topic/5559-12-volt-power-connection/
 
I did this mod on my 1990 8-ft CO. There is one hot wire that feeds all the running lights, and they are all grounded to the aluminum skin. Any break in that one wire, and all the lights below it in the series will go dark. Discontinuities are usually associated with corrosion at the light-to-skin ground. I found full LED running lights in the same style as my stock lights (Bargman 34-99-002#99 Series Amber Clearance Light), as well as LED bulbs that fit in my stock light fixtures. Did the wiring with all new wires, during a rebuild of the top shell. These running lights are basically a cosmetic feature and I wouldn't recommend doing the work except as part of a larger rebuild. In my case I replaced all of the 30 yr old wiring with new material, and better connectors, and dimmable LED interior lights, and that package was worth the trouble.
 
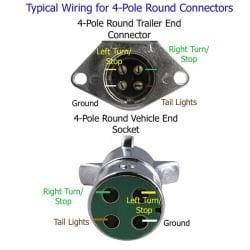
Finished replacing all Lights with LED, but still would not work. Took apart cable end ( truck to camper) and found only black and red wires connected, all other wires cut back .. Put a meter on truck connections output and turned on lights which correlated to green wire on other end of cable? not brown. Ran a hot lead to post on camper and lights turned on, so connected green cable ,plugged in and lights did NOT turn on.. At this point I am going to replace cable and fittings.. So Black is DC power , Red is brake, and green is running lights , not sure about 4th post maybe ground, but nothing is connected to it or ever was.. I looked at the drawing DaniCa sent me,,but hard to distinguish the cable connections .
 
Maybe this photo will help? Use the tail lights pin/plug
 

Attachments

  • Typical4-Pin-WireConnections.jpg
    Typical4-Pin-WireConnections.jpg
    11.7 KB · Views: 56
Sounds as though some continuity testing would sort out the wiring issue, while directly testing each light off of 12v will tell you about the lights themselves. The... there's the less than optimal ground situation.

I'm just completing a complete top rebuild and decided to string ground wires to every running light and turn signal; not relying on the mounting screws to defining ground at each light. However... sans a complete top rebuild stringing ground to all locations may not be ideal.

Best of luck!!
 

New posts - WTW

Back
Top Bottom