Wire shorts at the front lift panel

Radicalfil

Advanced Member
Joined
Feb 6, 2009
Messages
50
Location
NorCal-East Bay
2009 Hawk with all options except the 3 way fridge:
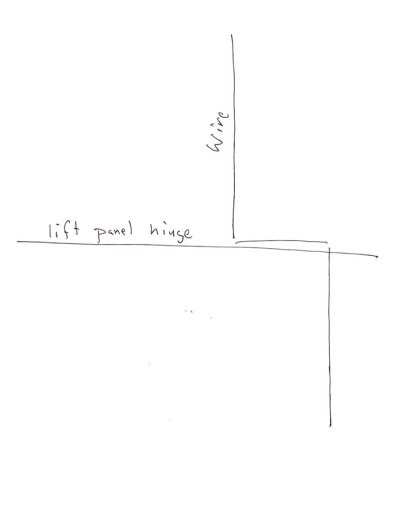
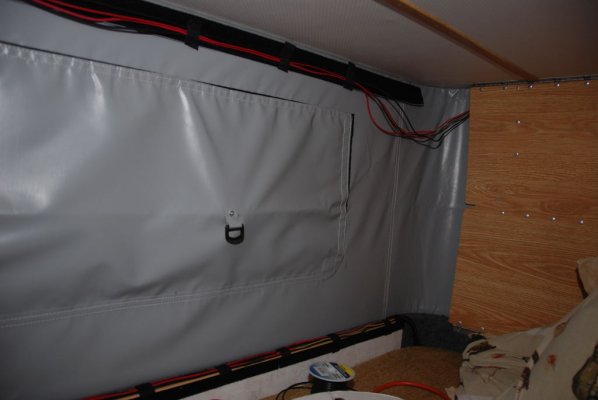
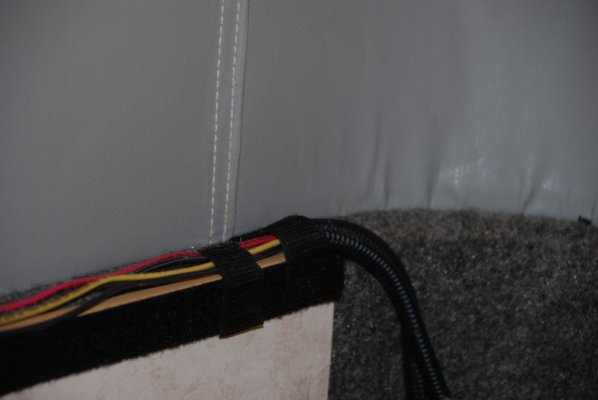
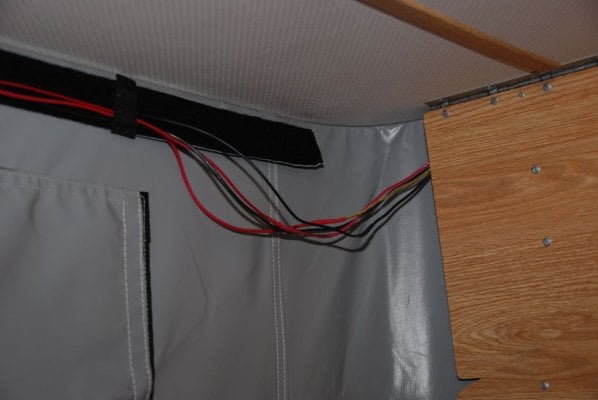
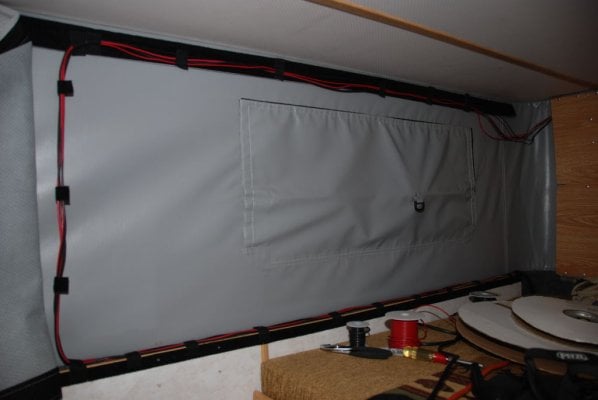
I have located wiring shorting out at the front left lifting panel. The short occurred in the wiring at the front piano hinge, as the factory wiring was duct taped to the back side of the panels. This poor design did not allow the wires to move or flex when the roof was lifted or lower and resulted in the failure of the wire and produced a short in the wiring. I stumbled on this as I blew a fused on an unrelated electric project (additional wiring loom to accommodate a ARB fridge). This also explains why my shore power plug would arc when I plugged into a 120v source. I have tried to repair these wires by splicing a 1 foot piece to allow for the extension/contraction of the roof and the wiring. I will eventually use plastic split wiring loom to protect these from contacting each other. There is not adequate room to do a real neat/good job.

There were 2 black, 1 red, 1 yellow wire at this locus. I tested the black and yellow to energize the lights and fans. Anyone know what is the other pair (red/black) are for? Does any one have a permanent fix for this situation. Anyone else have this situation and what how did you handle it?


Phil in San Leandro
 
Yes red and black are for solar.

Mine did the same thing. The overhead light and fan stopped working - wires were not working like you said. I just fixed the exposed, worn wires, and tried to give it more room and a better angle to flex when the push panel flexes. So far so good.
 
Yes red and black are for solar.

Mine did the same thing. The overhead light and fan stopped working - wires were not working like you said. I just fixed the exposed, worn wires, and tried to give it more room and a better angle to flex when the push panel flexes. So far so good.


Thanks for the responde:
I got a call into the mfg and they are suppose to get back to me. On original discussion with the tech. he said there should have been flexible type conduit and some slack in the wiring to allow for expansion and contraction. I'll wait and see what they come up with. I have a temporary fix with the cheap splice connects. I really don't want to have to continuously monkey with them.

pd
 
I'm bumping this thread, since the same problem happened to the wiring in my '08 Eagle. I first noticed the short when I blew the 10 amp fuse for the lights and fan.

Here is what the wiring looked like behind the lift panel. The 12 gauge black wire was broken in two and was pulled to the side, so isn't in the picture. (12 gauge wire is solar panel, 14 gauge is lights and fan).
IMG_0625_small.jpg


What I decided to do was add splices made of more flexible silicone insulated wire (the stuff used by RC and robotics hobbyists) held in place with Posi-lock connectors on either side of the lift panel hinge. The rationale is that the splices should last longer since the wire is flexible, but if they don't they can be easily replaced because the Posi-locks are re-useable. All you have to do is unscrew the splice ends, put in the new splice and tighten them back down.
IMG_0627_small.jpg


I then duct taped the connectors on either side of the hinge, close to the hinge so they are held in place (more or less), but will be easy to get to if the need arises.
IMG_0629_small.jpg


I may leave the splices off to the side of the panel providing they don't get caught in the lift panel hinge - haven't decided their final location yet.
 
I had the same problem. I soldered the connections and covered them with shrink tubing. Then I covered the wires (two in my case) with flexible black tubing that is cut lengthwise on one side to allow you to open it up and put it around the wires (tubing was found at radio shack). Then I taped it with electrical tape in several places to hold it on for good measure. Zip ties would have probably been better but I didn't want the possibly sharp ends of the ties around the sideliner. So far no problems, the wires are not connected to the lift panel and always seem to fold out of the way when the top comes down. Good Luck
 
I'll be taking a look at mine before I get out again. Missed this post the first time around. Thanks.
 
I missed this too the first time around. We have the '09 Hawk and at least twice it has arced and tripped the fuse when plugged into shore power. Hihgz, thanks for the bump and photos. I'll look at mine today.
 
I had the same problem. I soldered the connections and covered them with shrink tubing. Then I covered the wires (two in my case) with flexible black tubing that is cut lengthwise on one side to allow you to open it up and put it around the wires (tubing was found at radio shack). Then I taped it with electrical tape in several places to hold it on for good measure. Zip ties would have probably been better but I didn't want the possibly sharp ends of the ties around the sideliner. So far no problems, the wires are not connected to the lift panel and always seem to fold out of the way when the top comes down. Good Luck


I forgot to mention that the original wiring was covered with clear shrink tubing (you can see it in the photo if you look closely). It obviously didn't help much. The main problem lies in the repeated flexing of the wire and the resulting fatigue. That's why I went with more flexible wire and an easy-peasy-no-tools way of replacing the section that bends. I bet your solution will work, mainly because the wires aren't attached to the lift panel so don't have to flex as much.
 
Marty at ATC directed me to run wire behind the lift panel as I have crudely depicted in the drawing. Putting two bends in the wire eliminates the repeated bending in one place that leads to breaking.
 

Attachments

  • lift-panel-wire-run-web.jpg
    lift-panel-wire-run-web.jpg
    16.2 KB · Views: 359
What I decided to do was add splices made of more flexible silicone insulated wire (the stuff used by RC and robotics hobbyists) held in place with Posi-lock connectors on either side of the lift panel hinge. The rationale is that the splices should last longer since the wire is flexible, but if they don't they can be easily replaced because the Posi-locks are re-useable. All you have to do is unscrew the splice ends, put in the new splice and tighten them back down.
View attachment 15473

I haven't had the problem of this thread...but I just noticed this bit about Posi-Lock connectors.
Hmmm....I wonder how/if they compare to Powerpole connectors?
Anyone have experience with both and so have an informed opinion? Pros/cons and if each type is better for a particular application?
I'm a recent Powerpole convert but still a novice, and I know nothing about Posi-Lock.

(sorry for the semi-off-topic diversion...but I think it's related).
 
Marty at ATC directed me to run wire behind the lift panel as I have crudely depicted in the drawing. Putting two bends in the wire eliminates the repeated bending in one place that leads to breaking.


Ski, are the wires taped down or free to move? Seems like the wires would have to twist in this configuration?
 
I taped them down on the top and bottom to near the hinge. They are near the edge so I can reach in and evaluate how they're doing. I think the idea is a little twisting in the parallel section is better than repeated flexing in the same spot.
 
I haven't had the problem of this thread...but I just noticed this bit about Posi-Lock connectors.
Hmmm....I wonder how/if they compare to Powerpole connectors?
Anyone have experience with both and so have an informed opinion? Pros/cons and if each type is better for a particular application?
I'm a recent Powerpole convert but still a novice, and I know nothing about Posi-Lock.

(sorry for the semi-off-topic diversion...but I think it's related).


I'm afraid I haven't used Powerpole connectors. They look like a great connector, though. I used the Posi-locks previously to wire the light in my camper shell (pre FWC days), so that I could disconnect without a hassle to take the shell off. They worked great - held securely and made a solid connection. They are often used in automotive wiring in place of butt connectors.
 
Does any one have a permanent fix for this situation. Anyone else have this situation and what how did you handle it?


I have a 2010 Hawk and exact same thing happened to me. I no longer have any wires being pinched by the panel. I rerouted the wires.

Since I have the artic pack and leave it installed permanently....this solution was viable. The arctic pack totally hides the wires. The way it is wired now....no wires are bent in a tight pinch with the panel. This fix won't work if you don't leave the artic pack permanently installed to hide the wires.

No more pinching....no more problems.

It's been fixed for over a year now.
 

Attachments

  • DSC_07240001.JPG
    DSC_07240001.JPG
    77.6 KB · Views: 239
  • DSC_07250002.JPG
    DSC_07250002.JPG
    69.8 KB · Views: 245
  • DSC_07260003.JPG
    DSC_07260003.JPG
    90.6 KB · Views: 251
  • DSC_07270004.JPG
    DSC_07270004.JPG
    80.1 KB · Views: 250
PA030082 (360x640).jpg
I initially used those cheapo wire splicers to splice about 8 inches of wire onto each of the wires and they failed after only a few lift cycles. Then I went to West Marine and bought some good connectors. I used the "bullet" type (male/female) then wrapped the wire pairs with the split plastic wiring loom.

I found a little more room to work and gained some slack in the original wiring by collapsing the roof about half way. I had to hold it in place with a webbed strap with hooks, because I have the roof lift rams trying to keep the roof up. This gave me enough room to climb atop the cab-over and do a decent job at stripping wire and crimping connectors.

BTW, I called the Mfg and they didn't respond to my request for suggestions or help. This is clearly a lousy design issue, as many others appear to have this same "falmunction". That is disappointing!

Now if the lights or roof fans stop working, I know where to look for a quick fix.

Hope this helps others.
 
When I first got my camper I was surprised that FWC was using stiff wire meant for static household applications. For applications that are subjected to flexing and vibration you need a fine stranded wire with compliant insulation.
 
When I first got my camper I was surprised that FWC was using stiff wire meant for static household applications. For applications that are subjected to flexing and vibration you need a fine stranded wire with compliant insulation.


If I remember correctly, I used some spare stranded wire I had left over from my solar panel/refrigerator circuit install which was a marine grade. The splices are slightly larger gauge wire but the connectors I used allowed me to splice into the damaged wires and still make good connections. I don't remember exactly what size wires they were. I think in the picture you can see different color connex that depict this.
 
What type of wire is it can you see the factory marking it should be next to the 12 AWG. In the one pic the wire looks to be not automotive wiring by way it is twisted,it looks like THHN OR THWN which would not seem a good application for that spot.
 
I have to agree, not sure why household style wiring is used outside of it's likely cheaper and easier to route. It is definitely not designed for vibration or flex. If it wasn't such a huge project, I would like to rewire the whole camper with correct automotive wire. Thanks for the heads up. I'll be checking my wiring shortly... no pun intended. :)
 
Back
Top Bottom