Wood rot - Side panel removal help?

bajaphile

Senior Member
Joined
Sep 26, 2019
Messages
132
Location
NCSD CA
Hi All,
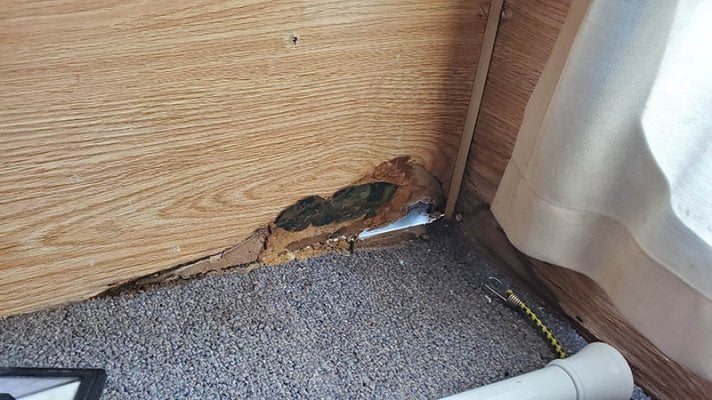
Yet another fix I am attempting this week. I've had wood rot in the back passenger side corner of the camper since I bought it. Previous owner tried to hide it with a lock box. Well, I finally dug into it today and does not look like I am able to simply patch it easily.

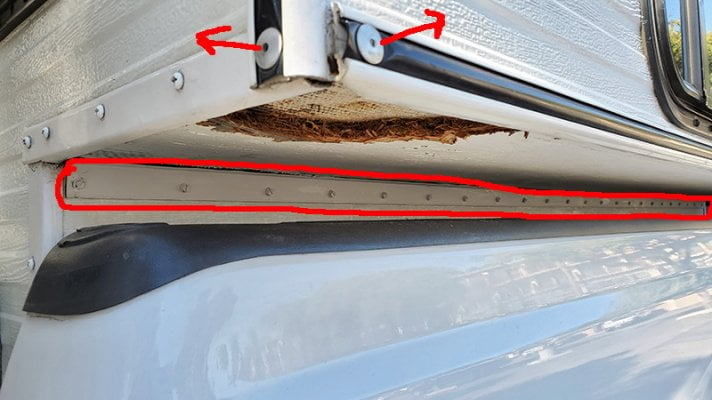
If I drill out the rivets, pull off the trim (and screws beneath trim), then take screws out from the length of the camper which hold this angle iron (circled in red), will this panel remove? Or, is it more involved? I did not try and peel back the carpet yet.

I was hoping to simply cut out a patch and glue/seal it in with another piece of wood, but I'm not sure that will be the best fix here.
 

Attachments

  • wood_rot_inside.jpg
    wood_rot_inside.jpg
    114.1 KB · Views: 280
  • wood_rot_outside.jpg
    wood_rot_outside.jpg
    157.9 KB · Views: 257
You are on the right path. I've drilled out those rivets (elsewhere on the camper) before, no issue there. They really just keep the trim from shifting. You will also need to remove the interior trim and carpet. The 3/4" plywood is stapled together.. Fearsome long staples too.

If it were me, I'd be inclined to replace the whole horizontal piece all the way to the front of the camper. Lots of work, but thorough. If you just want to patch/repair the area, that should be ok, as it isn't super structural (does help support the corner bracket though!) and so, pick a spot 1' or so past the rot and cut there and patch it up with custom sized piece.
 
Thanks for your reply again!

So it looks like replacing the entire section will be more in depth, and difficult to do while on the truck... Unfortunately I do not have corner brackets and would need to purchase (or borrow) some cable jacks.... So it looks like I'll need to do the band-aid repair instead for the time being until I get some more time!

I think I'll try cutting out a piece of treated plywood to the size of the hole. I'll fill the irregularities between the patch and camper with bondo or some epoxy wood repair stuff. Once done, sand down, possibly use a strap to secure it a little, re-paint and try to seal up the edges the best I can.

Trying to get all my tools and materials together to do this ASAP before any rains (and before our next trip in 2 weeks...). Right now, I think I just need to buy some of those rivets that hold the trim on. Anyone know the size by chance? And does it appear that the ones below would be what I'm looking for?

https://www.mcmaster.com/rivets/zinc-plated-steel-large-diameter-domed-head-blind-rivets/
 
Bajaphile,

I remembered someone else dealing with dry rot in a corner. I’ll provide the link. Unfortunately there isn’t much he wrote on technique and material, but there are several pictures. Sounds like he used fiberglass Matt and resin. perhaps this will give you another option.

Additionally, if you haven’t already, you’ll want to address leaks that may have caused the wood rot as well.

Start on page #5 and scroll down on the pictures and written info.

https://www.wanderthewest.com/forum/topic/6364-slos-1990-hawk-buildrefurb/

You could also try to remove a small section as you’ve proposed, but that might be difficult without removing from the truck bed. Anyhow good luck, hope you can find something that can work!

Poky
 
Hmm interesting, he didn't even remove the outer black molding/screw covers... I wanted to get the old screws out, then put new ones in as they'd hold my new patch in pretty well for the repair process.

Anyway, yes, looks like I'll be doing something similar. I still think an epoxy based wood repair substrate or Bondo (polyester resin with fiberglass and a thickener) will be easier to work with in this area. I won't feel too bad doing the patch I guess now as it looks pretty common.

Thank you for all your help and ideas guys, I appreciate it. I'll post up my repair in the coming days...
 
The fix was pretty easy. I just removed the trim and cut out a piece of 3/4" plywood to fit. Then filled the gaps with Bondo Wood Filler.

However, I noticed that the wood rot was worse on the inside than the outside. In fact it was wet on the top still, where I pulled the carpet back. This makes me think I have a leak somewhere, coming down the aluminum frame and collecting on that wood...I think? Are there any common places to check for this type of leak location?
 
Bajaphile,

I would look at everything from the roof down where the sideliner is connected in that corner. How does the sealant look on the top of the roof on that corner overtop of the upper trim ring? Are there any pinhole spots on the sideliner on that corner? Any pinching of the sideliner around the trim ring on the camper wall? Also could be the trim piece on the corner of the outside wall needs more butyl tape applied underneath, or sealant around the trim piece on the corner itself.

Just my thoughts. It doesn’t take much to form a puddle.
 
PokyBro said:
Bajaphile,

I would look at everything from the roof down where the sideliner is connected in that corner. How does the sealant look on the top of the roof on that corner overtop of the upper trim ring? Are there any pinhole spots on the sideliner on that corner? Any pinching of the sideliner around the trim ring on the camper wall? Also could be the trim piece on the corner of the outside wall needs more butyl tape applied underneath, or sealant around the trim piece on the corner itself.

Just my thoughts. It doesn’t take much to form a puddle.
So the leak happens when the roof is closed, I still haven't camped in the rain, so I am uncertain if it happens then too. When you say side liner, that is the soft siding of the camper, correct?

I may need to pop the top, and check the top trim ring just in case...

The black trim pieces which cover the screws... is that what you are referring to for adding some butyl tape to? The ones I pulled off to do the fix did not have any butyl tape or sealant. I added some when I put the screws back in.

pvstoy said:
Top of the window seal is leaking???
On a 2005, is it pretty easy to check this? I was thinking I'd just pull the outside screws from the window trim and check the sealant?

It appears that the previous owner had added these rear foot steps. They seemed new when I bought the camper last year. Thing is, the wood rot had already been there when I purchased it, so I don't think they were the problem. I ended up pulling the bolts and sealing the holes anyway.
 
Butyl tape is applied between the camper and the window or whatever you are attaching to the camper. It will get brittle and shrink over time. A semi-permanent fix is to run a bead of sealant around the edge of the window. I did that, then as I had to remove doors and windows for maintenance/remodel I replaced the butyl tape.

Finally the dampness will stay for a very long time even if you fix the leak. I kept my camper in a garage for about 3 months with the windows and turnbuckles open only to find my front two corners still very damp.
 
Kolockum said:
Butyl tape is applied between the camper and the window or whatever you are attaching to the camper. It will get brittle and shrink over time. A semi-permanent fix is to run a bead of sealant around the edge of the window. I did that, then as I had to remove doors and windows for maintenance/remodel I replaced the butyl tape.

Finally the dampness will stay for a very long time even if you fix the leak. I kept my camper in a garage for about 3 months with the windows and turnbuckles open only to find my front two corners still very damp.
Ensure all butyl tape butt joints are on the bottom, otherwise you can get a window leak.
 
Thanks guys. I've got a big roll of butyl tape from when I re-sealed my roof vents. I will remove the rear window and reseal ... and cross my fingers!! : )
 
Update here. I am glad those who responded mentioned the rear wall window. Once I popped it out, it was obvious that the water was coming in from the "seal" between the window and the camper. The seal used was some sort of foam tape like substrate. It was about 0.25" thick, mainly open cell foam feel. It was old, cracked, and barely sticking.

Took me about a whole 5 mins to clean it off. I ran some real butyl tape around the mounting flange, and then added some 3M 4200 in each screw hole. I also ran a bead of it between the aluminum skin and the aluminum frame as a secondary seal to the butyl tape.

I didn't find much on the forum with regards of removing the rear square window, but it was almost too easy. It was essentially the same as the roof vent. Remove exterior screws and carefully slide a putty knife inbetween the mounting flange and camper, cutting the bond from the old butyl tape (or whatever else people use). The window popped out within 5 mins of removing the screws.
 
Bajaphile,

way to go, it sounds like you found the culprit with the window seal. I’m betting you’re home free now. Good luck when you try it out with a water test!
 

New posts - WTW

Back
Top Bottom