Paul here is what I did.
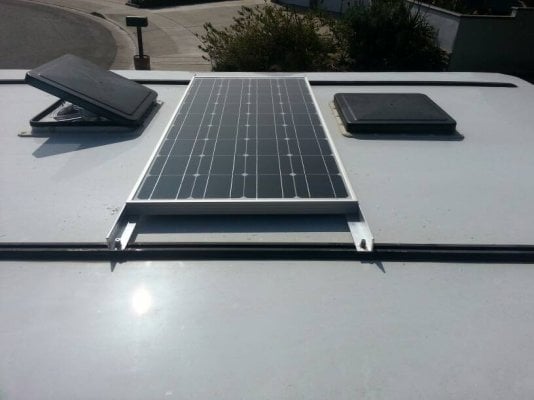
Switching out the factory solar panel for the grape solar panel was fairly straightforward of course the 160 W panel was much larger than the replaced panel. I have never installed any solar panels before so I just followed what four wheel camper did. Four wheel camper makes their own mounts for the panels. They use a U-shaped Mount that extends the length of the panel. These mounts we're screwed to the roof with three screws on each side for a total of six screws. I don't know why but these mounts are not one piece but rather 2 pieces. I just used the same mounts for the new solar panel leaving a gap in the middle for the size difference. I was able to use two of the screw holes from the original mount the other four I returned the screws to the hole and put sealant on top of them. I installed the new panel with eight screws total. It was fairly easy to find where The roof members were as I could just tap on The roof and find them. I'm sure that couldn't be done in the factory because you need a quiet place. Also you know where the members are from the previous screw holes and from the vent placement and the distance between the wood strips on the ceiling inside. Measure twice before drilling. Six new holes for me.
Between the mounts and the roof I followed what Four wheel camper did. Where the screws are I put Dicor butyl seal tape between the mount and the roof, between the screws I put a small piece of foam tape under the mount. The tape keeps the mount from rubbing on the roof and wearing a hole between the screws. I used 3M Marine adhesive sealant fast cure 4200 to seal the top of the screws.
I cut off the solar MC4 connectors and crimped on the plug that plugs into the roof Solar connector.
I do like the installation on the factory Yakima tracks. If I had those tracks I would've used those.
You can see the mounts in the lower right of the picture.
This photo shows the old screw holes and the gap between the mounts with the larger panel. Also you can (barely) see the foam where mount is keep away from the roof.
In this photo you can see my two group 30 batteries, 100 amp shunt and a new Morningstar Mppt 15 amp controller. Also you can see I left the factory Morningstar SS-6-12V SunSaver 6 Amp Charge Controller which I left hooked up and used when I had only one portable 100 watt bendable panel.
")