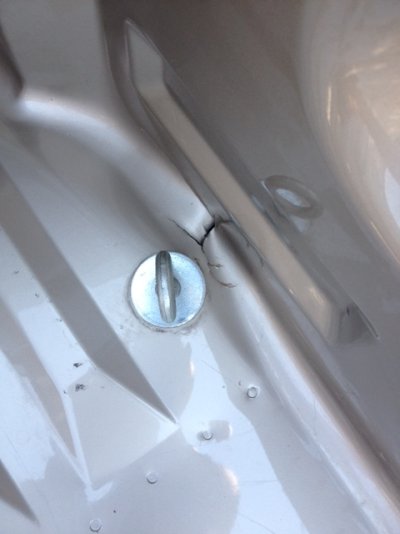
My 2008 Tundra/ Hawk combo has served me well- 165 nights camping, 35k miles and lots of rugged roads- White Rim, Magruder, Lolo motorway et al. I took the camper off yesterday- first time since it was installed in 2008- and was surprised to find cracks in the pickup bed. 1/2" to 1 1/2" cracks, all the way through the bed, outboard of all 4 eyebolts. The camper was professionally installed in my brand new truck. I am diligent about checking turnbuckles and conservative in my driving speed. Anyone else have this problem and what was your repair solution?
You are using an out of date browser. It may not display this or other websites correctly.
You should upgrade or use an alternative browser.
You should upgrade or use an alternative browser.
Cracks in Tundra bed at turnbuckle eye bolts
- Thread starter Chel
- Start date
SunMan
King Taco
My 2008 Tundra/ Hawk combo has served me well- 165 nights camping, 35k miles and lots of rugged roads- White Rim, Magruder, Lolo motorway et al. I took the camper off yesterday- first time since it was installed in 2008- and was surprised to find cracks in the pickup bed. 1/2" to 1 1/2" cracks, all the way through the bed, outboard of all 4 eyebolts. The camper was professionally installed in my brand new truck. I am diligent about checking turnbuckles and conservative in my driving speed. Anyone else have this problem and what was your repair solution?
I had a corner start to pull up in my 2006...got a $40 Mig weld job down in the barrio and I've been good ever since. Its been over 2 years now, a little weld job and you should be fine, maybe have them put a plate behind it for extra piece of mind.
I had a corner start to pull up in my 2006...got a $40 Mig weld job down in the barrio and I've been good ever since. Its been over 2 years now, a little weld job and you should be fine, maybe have them put a plate behind it for extra piece of mind.
SLO_F-250
Senior Member
Yea, Its doesn't surprise me. The thin walled metal flexing over and over again is bound to develop cracks. Like Sunman said, get it welded up and just watch it.
You could also beef it up by welding some thicker metal around the area, or get some bigger diameter washers for your bolt. That will help distribute the load. Thicker and bigger washers would be really easy.
I am going to be watching mine closely and will probably end up welding some thicker material around the bolted area.
Good luck!
ntsqd
Custom User Title
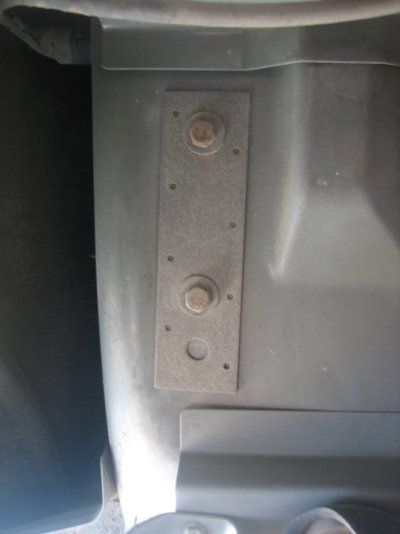
I made load spreading plates for my install. They're 3/16" thick and about 3" x 4" and have radiused corners as well as radiused edges (don't need the corners and edges acting like an old oil can opener). I did NOT weld them in place, and I would not recommend doing so. The reason is that the weld will create a large stress riser in the form of a massive change in thickness combined with a usually unfavorable change in the metal's internal structure. (Think of all welds as being "On-site Castings" when considering welding because metalurgically that is what they are.) I did carefully place the holes so that the plates overlap the flange of one of the 'hat' section under-bed structures and it looks like you may have that same opportunity judging by the line of adjacent spot welds.
I would weld the cracks in sheet-metal. Strongly suggest drilling a ~1/8" hole at the very ends of the cracks first. That will stop any inclination for the crack to continue out beyond the end of the weld.
I would weld the cracks in sheet-metal. Strongly suggest drilling a ~1/8" hole at the very ends of the cracks first. That will stop any inclination for the crack to continue out beyond the end of the weld.
5444
Senior Member
- Joined
- Apr 24, 2012
- Messages
- 124
My 2008 Tundra/ Hawk combo has served me well- 165 nights camping, 35k miles and lots of rugged roads- White Rim, Magruder, Lolo motorway et al. I took the camper off yesterday- first time since it was installed in 2008- and was surprised to find cracks in the pickup bed. 1/2" to 1 1/2" cracks, all the way through the bed, outboard of all 4 eyebolts. The camper was professionally installed in my brand new truck. I am diligent about checking turnbuckles and conservative in my driving speed. Anyone else have this problem and what was your repair solution?
I was concerned when I saw this so I called FWC. I believe the owner answered the phone because I recognized his voice from all of the videos. I asked about reinforcing plates. He stated they supply a 1/8" thick and about 2"x 4" piece of aluminum for underneath the bed for reinforcement. They also use 2" washer for the top of the inside bed. I was concerned that the different type of metals would react to each other over time. He stated it isn't a concern because of the small contact area. I also asked about putting a plate inside the bed and he stated it wasn't necessary because all of the force would be coming from the bottom. He also mentioned that the turn buckles must be kept tight. If they are allowed to loosen this could still be a problem.
What is everyone's thoughts on the new method for reinforcing the bed. Is this sufficient, or should overkill be observed and use a plate on top also?
Darryla
Senior Member
I noticed some lifting in my bed so I put 1/4 steel plates on the underside. I have not seen any problems since.
Darryl
Darryl
ntsqd
Custom User Title
The load is tensile, a plate on the top won't do much of anything. You have bigger problems if the turn-buckles are trying to push the eye-bolts down from the top.
Thanks everyone for your input.
My Hawk was installed with fender washers above and below the bed. Probably enough for most but I guess I pegged the fun meter more than average. A couple years ago on the White Rim I straightened a turnbuckle hook...hard to believe but when I checked the TB's at our Potato Butte (aka tater butt) camp the second night one turnbuckle was hanging loose, the truck bed end hook straight as an arrow.....
The local Toyota dealer said that it would be about $500 to weld the cracks and another $500 to do a bondo and paint job to return my Tundra to showroom condition. (Except for all the Idaho, Nevada and Arizona pinstripes, Hah!)They won't touch a backing plate fabrication order. I am currently shopping some weld and fabrication shops. Looks like I can get the job done for a couple hundred. Drill holes at ends of cracks, weld cracks, fabricate 1/4" steel backing plates with radiused edges. I will post pix when done.
Phird05
Senior Member
When I was researching the purchase of a camper some seven years ago, I saw that FWC did the truck bed mounts and had a concern about drilling through the bed, as I saw a few posts describing the bolts pulling through. It was not a factor in my decision when I purchased my camper, but I have never been one for drilling into any part my trucks or cars over the years. Since I travel some fairly rough roads getting to my destinations, I decided to use the Torklift frame mount tie downs, front and rear. They installed the bumper buttons for the rear tie downs before I realized there were rear frame mounts available that mount to frame at the tow hitch system. I abandoned the bumper button tie downs and immediately purchased the rear tie downs as well and was totally satisfied. No part of the tie down mounting system touches the vehicle body/bed/bumper anywhere. Installing the frame mounts was simple as well. I believe I saw a post a number of years ago where FWC did do external tie downs in addition to the bolts through truck bed. Maybe you have a choice when ordering. IMHO, it just seems more stable and eliminates the possibility of damage to the truck to go directly to the frame.
Good Camping,
Paul
Good Camping,
Paul
Paul- FWC says that the Torxlift frame mount tie down system works if you use the bottom hole on the jack brackets as the top attachment point. Is that how your rig is set up? If your attachment system is different would you please post a picture?
I am reluctant to go to external tie downs; I'd rather keep them inside the bed and out of the way of brush, etc due to the narrow forest roads I often travel.
Thanks, Chel
I am reluctant to go to external tie downs; I'd rather keep them inside the bed and out of the way of brush, etc due to the narrow forest roads I often travel.
Thanks, Chel
When I was researching the purchase of a camper some seven years ago, I saw that FWC did the truck bed mounts and had a concern about drilling through the bed, as I saw a few posts describing the bolts pulling through. It was not a factor in my decision when I purchased my camper, but I have never been one for drilling into any part my trucks or cars over the years. Since I travel some fairly rough roads getting to my destinations, I decided to use the Torklift frame mount tie downs, front and rear. They installed the bumper buttons for the rear tie downs before I realized there were rear frame mounts available that mount to frame at the tow hitch system. I abandoned the bumper button tie downs and immediately purchased the rear tie downs as well and was totally satisfied. No part of the tie down mounting system touches the vehicle body/bed/bumper anywhere. Installing the frame mounts was simple as well. I believe I saw a post a number of years ago where FWC did do external tie downs in addition to the bolts through truck bed. Maybe you have a choice when ordering. IMHO, it just seems more stable and eliminates the possibility of damage to the truck to go directly to the frame.
Good Camping,
Paul
Good Camping,
Paul
Phird05
Senior Member
Paul- FWC says that the Torxlift frame mount tie down system works if you use the bottom hole on the jack brackets as the top attachment point. Is that how your rig is set up? If your attachment system is different would you please post a picture?
I am reluctant to go to external tie downs; I'd rather keep them inside the bed and out of the way of brush, etc due to the narrow forest roads I often travel.
Thanks, Chel
Hey Chel,
Yes, mine tie down to the bottom portion of the jack bracket. As far as them being in the way, I have no problems with that as they are so close to being even with the width of the tires I don't worry too much about it. I do however keep a close eye out when maneuvering in tight back country areas mainly because I leave the jacks on when I travel and I am more worried about those.
I hope this helps.
Good camping!
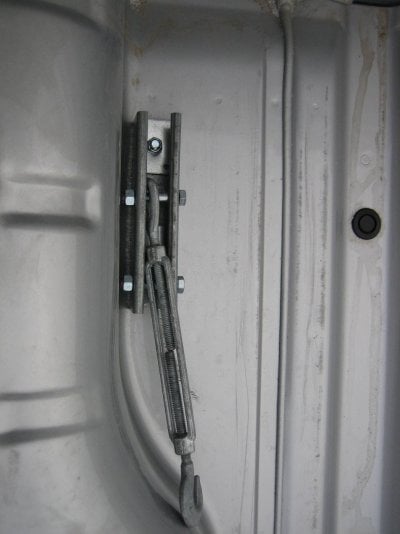
I never liked the factory eyebolt install. On my Nissan I used a plate underneath the bed and a U-channel on top. I also upgraded to forged turnbuckles and grade 8 bolts at the camper. Have had no problem after several years and thousands of miles of rough roads. However you repair the bed I would reinforce it or you'll just have the problem again.
-BillM
-BillM
Attachments
Hello BillM and all, my friend has purchased a used Bobcat camper. She has not installed it yet. We are deciding on a fastening system now, and like what you (BillM) write on this subject. Could you help us with some questions?
- Can you indicate where the front and driver's side of the vehicle is in your photos? We are not sure of how the superstrut is oriented. Our best guess is you have shown the rear driver's side superstrut assembly, oriented parallel to the length of the truck and perpendicular to the (soon-to-be removed) tailgate.
- What is the cross-bolt diameter and length? Where did you buy the cross-bolts? (I am experienced with Grade 5 vs. Grade 8 from automotive suspension work and usually go to True Value's bins of bolts for purchase of these.)
- What are the dimensions on the superstrut? Where did you buy the superstrut?
- Did you drill holes in the superstrut to install the cross-bolts? Or did the superstrut come with pre-drilled holes in the sides?
- What are the dimensions of the reinforcing plates on the bottom of the truck?
- What are the dimensions of the turnbuckle?
- How are the Grade 8 bolts doing today? The superstruts?
Elle,
Thanks for asking the questions, I haven't really looked close at my camper attachment recently except to check turnbuckle tightness. I just crawled under the truck and poked into the turnbuckle camper access doors and am happy to say that everything is still straight, tight and good to go. We now have 40,000 miles on the truck with the camper and since I replaced the bolts at the camper with grade 8's we've had no camper attachment issues. We don't use our truck as a daily driver so most of the miles are on trips which consist of highway miles driven to our destination and then dirt and 4wd roads. At this point we have thousands of dirt miles on the camper. So to your questions:
1. I just checked and the picture is of the front passenger side and yes the Superstrut (SS) is oriented parallel to the long side of the bed.
2. Cross bolts are 5/16 x 2" long. Probably got the bolts at Home Depot. I went with grade 5's for the crossbolts because the shear strength should be sufficient to hold the load. Grade 8's could not hurt though, virtually anything is better than an eyebolt. I used nylock nuts or red locktite on every nut.
3. The SS is 1&5/8 x 1&5/8 x 6". I got mine from a now gone metal supply shop in Reno, however, I just saw it at Home Depot in the fastener aisle with the other steel stock.
4. I drilled the side holes in the SS which comes solid on the sides. FYI, the reason I used 2 crossbolts was to ensure that the turnbuckles would fit, I didn't have my camper when I mounted the SS and wanted to be sure I had some flexibility in mounting points.
5. 2x8" in the front and 2x6" in the rear. I wanted to spread the load out more in the front because the camper loads the front attachment points more. I used some simpson tie straps that I already had, they are about 3/32" thick.
6. As installed and tightened the forged turnbuckles are 12" long, they could be adjusted down to about 10" and up to at least 15". I got them from Fastenal which is also a great source of bolts and nuts. I tighten them by hand wearing a glove and don't use a tool. They should be snug with no movement but don't overtighten or you could damage the camper. I don't know how ATC sets up the attachment at the camper, make sure that there is a metal reinforcement plate in the camper, FWC didn't have this for many years and the attachment bolts were pulling out of the campers.
7. Everything is looking great.
I've got to say that I think the factory setup with eyebolts is a really crappy design. I'm sure it works for many folks who bought the camper for its light weight and low drag but who don't venture far off the pavement. If you go offroad and boondock like we do it is a recipe for failure. Our preferred camping is many miles off the pavement and nobody within miles of us. We sometimes go a week or more w/o seeing another soul. Have fun with that camper!
Hi BillM, what a great elaboration. Much obliged.
A few more questions:
8.
What is the diameter and length of the two holddown bolts (meaning the ones that attach the superstrut to the truck bed)? I hope you do not have to crawl under the truck again; apologies if so. I keep in mind that my friend and I may need a different length of bolt for her truck bed.
9.
Were all the bolts you used coarse thread?
Understood about drilling multiple holes for the cross-bolt. My friend is in a similar situation. She has to travel 500 miles to pick up the camper. As much as possible, her truck needs to be ready for attachment. It's a 1999 Toyota Tacoma, with the smallest cab made.
For others: I see the Simpson tie straps at Home Depot.
My early calculations using proof loads and yield strengths for Grade 5 (failure of holddown bolts) and Grade 8 (holddown bolts do not fail) and estimating the bolt diameter indicate a dynamic load in excess of 15,000 pounds at each corner of the bed/camper. I have not done dynamic load calculations in some time and am not sure if this is reasonable or not. All I know is the Bobcat camper weights about 600 pounds and will be held in place by the four turnbuckles etc.
Thanks so much BillM.
8. I think I used 5/16 for everything, if you think that's too weak go 3/8, the SS hold down bolts go only through the SS, bed and bottom plate so are about 1" long.
9. All bolts are coarse thread.
I'm an engineer but not mechanical (chemical), I went with my gut and experience. I built a pop up camper in the late 90's and lived in it for a year with my wife and 90lb black lab. Went to AK, the East coast, baja and all over the west. We then used the camper for another 10 years for vacation and weekend trips. Finally had to replace the truck and decided that 4WC was the best choice since I couldn't build another one myself, I consider ATC and 4WC to be pretty much the same.
Squatch
Senior Member
One thing to think about when using backing plates. Don't make the plates the same size for top and bottom then sandwich the bed metal. This is basically making a big cookie cutter that will fatigue and cut the bed metal at the edges. Make the top and bottom plates a somewhat different size and shape. This does a better job of distributing the stress.
Similar threads - WTW
- CanadaGeese2017
- Four Wheel Camper Discussions
- Replies: 7
- Views: 1K
- Jack
- Four Wheel Camper Discussions
- Replies: 20
- Views: 2K
- puddlian
- Gear Exchange
- Replies: 4
- Views: 677
- odannyboy
- Four Wheel Camper Discussions
- Replies: 14
- Views: 3K