Free for a reason- Hawk restoration/renovation

FreeHawk

Advanced Member
Joined
Jul 9, 2023
Messages
30
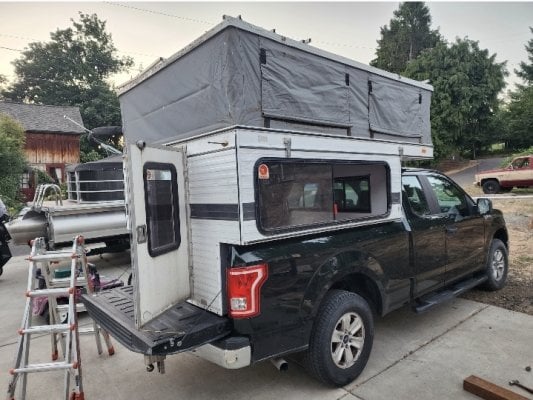
I've got the dispersed camping bug... my buddies have "outdoorvan" money, I'm on a significantly tighter budget!

This Hawk came to me at the right tine and at the right price Free! Super stoked.

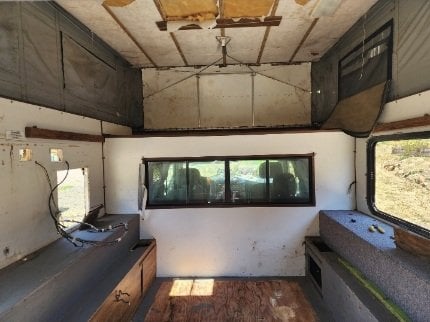
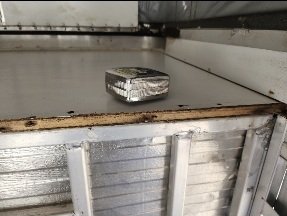
Down side is the mice that lived under the mattress on the top buck and the 143,930 dead ants.

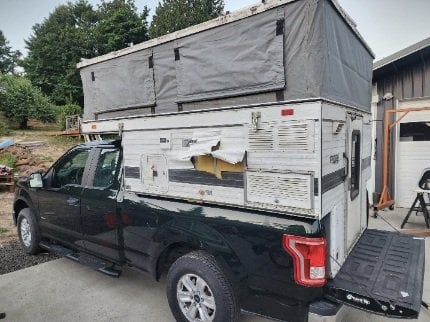
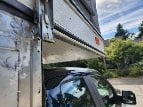
And the mild exterior damage... my plan is to delete the propane, this will eliminate most of the holes on the outside. I figure everything can be run off a couple lifepo4 batteries, solar and a dc/dc converter for those dark winter days.

I'd prefer to do all the work myself, but if there's a shop near Portland that knows how to replace the canvas and side push boards, I'm all ears, that's something tricky enough from what I've heard it might be worth farming it out.

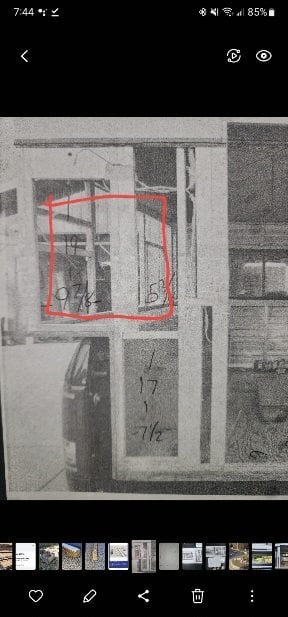
I also need a replacement window for the passenger side, it was broken and the aluminum frame is damaged to the point I'd just rather replace it.

This is probably out there, but what is the best stuff to scrub the canvas with to remove mold/mildew,

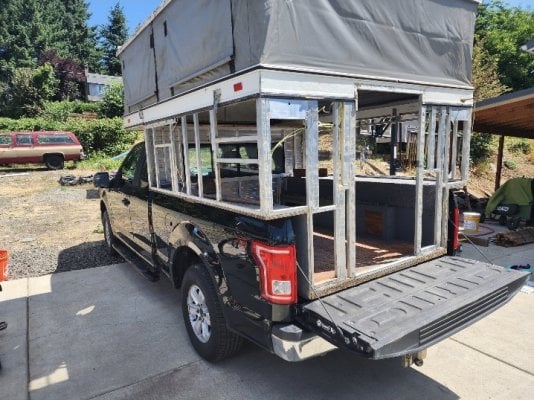
Are there some build threads here regarding shell models? That's where I'm going bCk to as enough of the systems and cabinetry were damaged/aged to the point where they just need replacing.

Bonus question... can anyone identify year based on serial number?
 

Attachments

  • Screenshot_20230709_144809_Gallery.jpg
    Screenshot_20230709_144809_Gallery.jpg
    331.3 KB · Views: 254
  • Screenshot_20230709_144917_Gallery.jpg
    Screenshot_20230709_144917_Gallery.jpg
    71.5 KB · Views: 303
  • Screenshot_20230709_144944_Gallery.jpg
    Screenshot_20230709_144944_Gallery.jpg
    56.8 KB · Views: 281
  • Screenshot_20230709_144959_Gallery.jpg
    Screenshot_20230709_144959_Gallery.jpg
    7.4 KB · Views: 238
Welcome to the cult.
Great find not in that bad of shape.Looks definitely fixable.
There are a lot of members with a lot of knowledge just ask questions.
Good luck in your rebuild.
You might touch bases with Marty at All Terrine Campers ,and Stan at
Four Wheel Campers for some info also.
Frank
 
If you want to get rid of all the smells, remove anything that looks like it got wet at some point. The ceiling looks nasty!

Don’t dismiss propane. I have an induction cooktop, with 200Ah of lithium. I can use that for 4-6 pots of boiling water a day, that’s it. Never mind replacing the furnace… propane stores a LOT of AH equivalent.

Check out my build thread and power thread (in my sig block)…
 
To replace siding, do you drill rivit then remove rubber strip to gain access to the corner trim?

Is it just a remove and replace trim with same trim and screws? Or does the rubber piece deteriorate and need to be replaced?

I took a break for today but suspicious that I might need to replace some interior panels. The insulation looks good on the ceiling, but the thin white cloth has totally failed in places. The side walls have velcro along the too, as if there is an insulated ceiling panel that can be added.
 
The black plastic strip is slid into the channel of the trim piece. It just covers the screws that hold the aluminum trim on. The black plastic is held in place with a rivet on each end. The black trim comes in a roll. If the aluminum trim is good - should be - reuse. You can easily paint it to look better.
 
The Velcro along the top of the sideliner is for - if you want - adhering the thermal/arctic pac, an additional layer on the inside of the sideliner.
 
Once you’re done stripping it out, I’d take it to ATC (Marty) in Sacramento for the major stuff like the headliner or roof and vinyl, plus they have access to components that might be hard to find. There’s a chance Marty and Jeff, his retired partner, built that camper. ATC does quality affordable work, and they stand behind it.

My 2¢… keep the propane. Maybe build a corner cabinet with the furnace and stove.

BTW, welcome to Wander the West!
 
ski3pin said:
The black plastic strip is slid into the channel of the trim piece. It just covers the screws that hold the aluminum trim on. The black plastic is held in place with a rivet on each end. The black trim comes in a roll. If the aluminum trim is good - should be - reuse. You can easily paint it to look better.
Is there any channel that os better than what they used 20+ years ago?

I'm considering a fiberglass skin, don't know ownif that makes a difference on type of channel.

Any brands or places besides Amazon to shop that is reasonably priced?
 
FreeHawk said:
Is there any channel that os better than what they used 20+ years ago?

I'm considering a fiberglass skin, don't know ownif that makes a difference on type of channel.
Aluminum is much easier to repair, and I’m gunna bet it’s less expensive to both purchase and repair.
Any brands or places besides Amazon to shop that is reasonably priced?
For items like the rubber trim and other small items, Amazon may be your best bet.
What kind of shape is the plywood floor pack it? I’d check it for rot, plus and stress or tearing around the elevator bolts where the turnbuckles connect.
 
FreeHawk said:
Is there any channel that os better than what they used 20+ years ago?

I'm considering a fiberglass skin, don't know ownif that makes a difference on type of channel.

Any brands or places besides Amazon to shop that is reasonably priced?
No.
 
Wandering Sagebrush said:
What kind of shape is the plywood floor pack it? I’d check it for rot, plus and stress or tearing around the elevator bolts where the turnbuckles connect.
The floor is very nice from the top... I should have looked closer as I was loading it at the bottom!
The pieces of plywood the elevator eye bolts are rough, at least the front two need to be replaced.

I think you're right on the aluminum siding... if I replace one side, I'll have to do all the sides. As it is, I just need to do one side. I'm thinking it is going to be easier to put the whole pieces in then trim whatever openings I need with a rotozip, like I'd sheath a house?
 
I just replaced all the siding on my 2000 Eagle. Used smooth, white aluminum, .024" thick, and accent straps of black, diamond plated al. It was very easy. The company that made the original FWC siding is in my town (The Metal Company) and they explained in detail what was required and how to specify the individual straps. Whole thing cost around 500 and took a week to make. It took a short day to put it on. 18 ga narrow crown stapler is your friend here.
They did suggest using full straps and cutting out the windows.
 
goinoregon said:
it appears that there are no jack brackets. how did you install the camper?
Guy I got it from had a pair of camper jacks, the style with angle where you balance the trailer.
 
I've made a little progress, well, I stripped the rest of the trailer at least...

Lots of thoughts here, I may have a touch, (or a bucket) of ADD, so I'll try to keep it in check.

I found a great metal siding company here in Portland called Interstate Metals, but they turned me onto a shop a few miles away that sells discount items they buy from Keystone and Forest River, doors, windows, solar stuff, trim... everything need.

AFFORDABLE RVing in Milwaukie, OR is awesome...

They get what they get, so I need to make due with what size windows and baggage doors they have. One thing I've noticed is there is no storage accessed from the outside unless you count things like shovels bolted to the outside. Since I'm going with a chest freezer, I have the space where the fridge was that seems like it would be nice for a outdoor storage space in that corner. I'd like a 16x16 baggage door on the back, but not sure about shopping out the 1x2 tube.

Since the large window is broken, I might split the opening and put one, smaller window, and one baggage door. I'm leaning towards more storage from the outside vs cabinetry on the inside.

Things I think are important for me, which I'm sure is different for everyone.

10-20 gallon fresh water tank
47L chest fridge
400 watts solar
Victron charge controller
2 100ah lifepo4 batteries (maybe 400, if I go electric heater)
Maybe diesel heater? I like dry heat vs propane moisture producing heater.
Led lights inside
Led lights outside
Coin flooring

I don't think I need much more. I need water, but just a tank, I have a little battery powered pump and a 1 gallon jug I refill.

The rv store has 8x8 sheets of fiberglass siding for $200, I think that would be pretty easy to deal with and look great when it's done.

I'm still thinking about camper jacks too, at $1,250 it seems a little steep. I've got a gantry crane, so a couple eye bolts might be better way to lift it. How are the jack plates connected to tbe frame, are they just self tappers, or are they bolted through the aluminum with steel backing plates to give a firm connection? I'm thinking about putting jack plates on, just in case, then make some hooks instead of jacks.. orayne I find a set of second hand jacks down the road.

Last question for tonight. Is the piece of wood over the overhang just one piece? Measuring, it looks like the overhang is supported by the aluminum channel that wraps around the front? So there is no insulation under the overhang?
 

Attachments

  • Screenshot_20230715_194341_Gallery.jpg
    Screenshot_20230715_194341_Gallery.jpg
    364.6 KB · Views: 87
  • Screenshot_20230715_194457_Gallery.jpg
    Screenshot_20230715_194457_Gallery.jpg
    65.8 KB · Views: 88
  • Screenshot_20230715_194514_Gallery.jpg
    Screenshot_20230715_194514_Gallery.jpg
    15.9 KB · Views: 82
  • Screenshot_20230715_194603_Gallery.jpg
    Screenshot_20230715_194603_Gallery.jpg
    26.9 KB · Views: 72
  • Screenshot_20230715_194618_Gallery.jpg
    Screenshot_20230715_194618_Gallery.jpg
    12.2 KB · Views: 68
There is no insulation under the cab over, which is one piece,but you could add it (and Drytek) on the inside. Just don’t run yourself out of mattress space.

A forced air propane furnace will not add moisture to the inside of the camper, if it does… have a very good CO monitor.

The idea about outside access to storage is kinda neat. I like it. Maybe have access from inside, too.

The jack mounts are secured by self tapping screws into the frame. Butyl tape is used to seal them. If you’re thinking of cable jacks, there’s a set here in Baker City, that are outside at a second hand place. I could check the price if you’re interested.

Keep up the good work!
 
Wandering Sagebrush said:
There is no insulation under the cab over, which is one piece,but you could add it (and Drytek) on the inside. Just don’t run yourself out of mattress space.

A forced air propane furnace will not add moisture to the inside of the camper, if it does… have a very good CO monitor.

The idea about outside access to storage is kinda neat. I like it. Maybe have access from inside, too.

The jack mounts are secured by self tapping screws into the frame. Butyl tape is used to seal them. If you’re thinking of cable jacks, there’s a set here in Baker City, that are outside at a second hand place. I could check the price if you’re interested.

Keep up the good work!
I might be perpetuating a the myth of propane causing higher moisture...

Good to knownon the overhang, that's the only thing I haven't taken apart besides the push boards and top, it looks to be sealed well from all sides with just a hint of moisture on the drivers rear edge. I can seal that up easily. So, the moisture funk is 95% in the failing push boards or lift panel, whatever you call it.

I'm surprised it is just self tappers into the aluminum. I can think of a few ways I can make stronger mounts.

One thought I had was putting my refrigerator on a slide, that way I didn't need to climb in the camper to fetch a refreshment at camp, but it might be too high.
 
I have a 2008 hawk and after a few issues with the mounting of the jack brackets and the self tapping screws tearing out (`15 years later), I ended up using riv nuts for some. Not sure if it technically makes a stronger connection or not.
 

Latest posts

Back
Top Bottom