You are using an out of date browser. It may not display this or other websites correctly.
You should upgrade or use an alternative browser.
You should upgrade or use an alternative browser.
From an Icebox to an Isotherm Cruise 85 Refrig
- Thread starter Bwht4x4
- Start date
Kodachrome
Senior Member
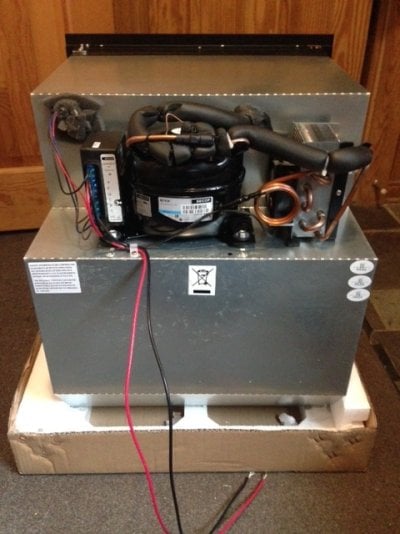
Hi,photohc said:Hello all, just wanted to share what I did to my Waeco 80L. I contacted Bill Harr regarding his 2nd fan install and received very helpful information on his installation. I then embarked on my small modification of installing the fan. As I already had a vent in place that was created by FWC, all I had to do was to connect the 2nd fan up and secure it. I couldn't access the fan wiring from the vent opening on the outside, so I had to remove the Waeco. I turns out that It was pretty simple, just removed the screws on the facia and the Waeco could slide out after I disconnected the electrical. I pulled the Waeco out and transferred it to a couple of plastic storage bins. Here is a photo of the Waeco removed. I also took the opportunity of wrap the Waeco with Reflectex.
DSCF2666.jpg
The fan install when well and now I have the heat venting outside whenever the Waeco is running. The 2nd fan is wired to run the sametime the Waeco fan is running. Works great. Thanks Bill!
What fan are you running, specifically what current draw?
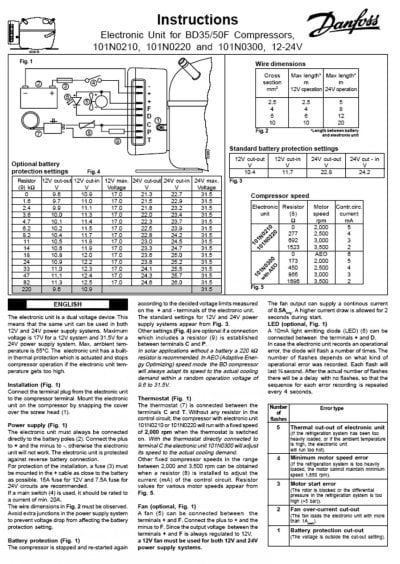
The reason I ask is that the fan output on the Danfoss BD35F compressor assembly will handle up to .5A continuous, up to 1A for the first two seconds upon startup and then will cut the compressor off as a fault above 1A, red led will show in the Dometic units by the thermostat knob. If we figure the stock fan is a 90mm type that is pulling perhaps .15A to .25A depending on RPM, then that does not leave a lot of room for a larger spare fan.
So the person who originally started this thread is running a 140mm fan, those tend to run above .3A if above 1,000 RPM. Then there is the guy who put two 120mm fans that pull .3A combined with RPMS of 1,200 each.
I suppose wiring it separate from the fridge solves that issue but it is obviously a lot better if all fans run in concert with the compressor cycling on and off.
Right now I am looking at a 140mm fan that pulls 74CFM @900 rpm and draws .2A, should be safe on the compressor's fan output.
Attachments
photohc
Senior Member
Orion. The 2nd fan added was just connected in parallel to the existing fan. I spliced into the positive and negative connection of the existing fan from the back of the Waeco.
Kodachrome, the fan I added has a draw of 0.14 A. I could not read the speed or CFM. It is a Cooler Master from Amazon. I found this newer model that has similar specs to yours but much lower draw: 140mm, 60.9 CFM, 0.08A, 1000 rpm.
http://www.amazon.com/Cooler-Master-Bearing-Computer-Radiators/dp/B00314J422?ie=UTF8&psc=1&redirect=true&ref_=oh_aui_detailpage_o00_s00
Kodachrome
Senior Member
I'll be curious to see how the fan helps when I get it in. When I installed my Dometic 65L in June of 2011 I pretty much stuffed every area of the space it sits in with reflectix and then sealed off the back with the same, leaving the coil / compressor area exposed for cooling.
I turned on the fridge a couple days ago loaded it up 30% with cold drinks and filled the freezer full of Talenti ice cream. It is set at #5 out of 7 and is holding steady at 37 degrees in the fridge and -7 in the freezer. Battery gets down to 75% overnight ( 12.45V ) and is at 14.4V by 10 AM. I have not driven the truck in that period so this system is relying on the 200W roof panels and 100AH "Night" battery to run the loads and charge the battery. Daytime high temp is 80F.
The reason I am running this test is that I think I had an issue with the door seal leaking so I pulled it off and put foam behind it to bolster it tighter. In addition to that I put electric tape on the fridge side of the contact area to make it more tacky in terms of a seal. I think this has helped a good bit.
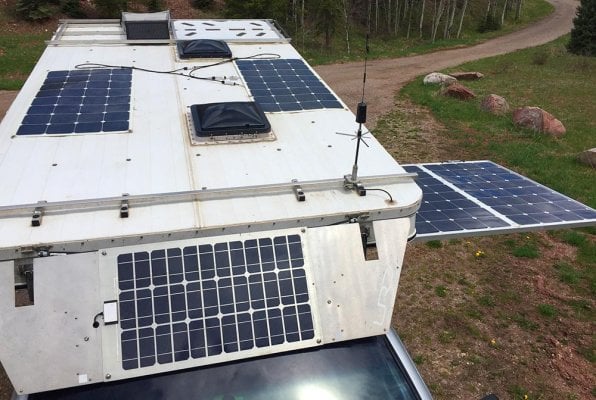
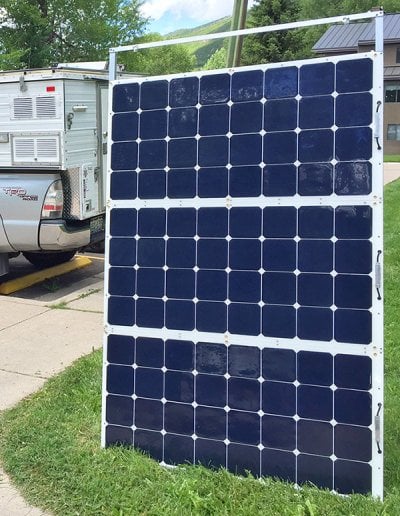
I went ahead and pulled the trigger on another 100W HQST flex panel to max my system out at 550W. I use the rig all year round and need to be able to count on max solar harvest even on flat light Winter days and that ought to do it.
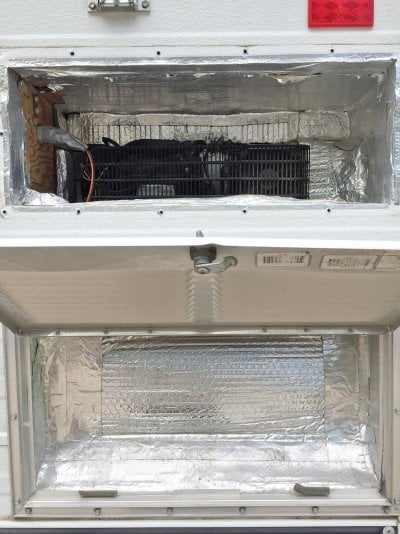
Here is a photo of the fridge compartment, I had a piece of insulation blocking the 12V plug area on the left but realized it was also blocking the cooling of the compressor so I will just put aluminum tape on it after I get the new fan in.
I turned on the fridge a couple days ago loaded it up 30% with cold drinks and filled the freezer full of Talenti ice cream. It is set at #5 out of 7 and is holding steady at 37 degrees in the fridge and -7 in the freezer. Battery gets down to 75% overnight ( 12.45V ) and is at 14.4V by 10 AM. I have not driven the truck in that period so this system is relying on the 200W roof panels and 100AH "Night" battery to run the loads and charge the battery. Daytime high temp is 80F.
The reason I am running this test is that I think I had an issue with the door seal leaking so I pulled it off and put foam behind it to bolster it tighter. In addition to that I put electric tape on the fridge side of the contact area to make it more tacky in terms of a seal. I think this has helped a good bit.
I went ahead and pulled the trigger on another 100W HQST flex panel to max my system out at 550W. I use the rig all year round and need to be able to count on max solar harvest even on flat light Winter days and that ought to do it.
Here is a photo of the fridge compartment, I had a piece of insulation blocking the 12V plug area on the left but realized it was also blocking the cooling of the compressor so I will just put aluminum tape on it after I get the new fan in.
Attachments
DrJ
Senior Member
Kodachrome,
I think you win the prize for the most solar.
550 watts definitely has me beat!
I max out at 250 watts rigid fixed and 135 watts portable, so 385 total.
Where do you put all of those panels? Are some portable?
I think you win the prize for the most solar.
550 watts definitely has me beat!
I max out at 250 watts rigid fixed and 135 watts portable, so 385 total.
Where do you put all of those panels? Are some portable?
Kodachrome
Senior Member
Oh, they are everywhere, lol!DrJ said:Where do you put all of those panels? Are some portable?
But really there are two 100W panels in series on the roof that feed the 100AH battery via a Sunsaver MMPT 15L ( night ), a 50W on the air dam that keeps the 55AH ( day ) battery topped and then the slide out / removable aluminum rack that holds three 100W panels in parallel that also feed the 55AH battery all via a Sunsaver 20L 12V PWM. For most people, the fridge is the biggest draw and when my wife and I are not working out of the camper, that is true of my setup as well.
But when we are on the road and she is connected to her VPN on a conference call in some remote location, fans going, cell booster on...the juice gets flowing and the load builds up.
So 550W is a safe bet for all kinds of conditions, sun angles, cloud cover, etc. The entire 300W array on the rack only weighs 25 pounds, wired in parallel it suffers no parasitic loss due to other panels shading. Part of the reason for maxing out the larger portion of the solar output on a now seemingly small 55AH AGM ( 28 net @ 50% ) is that I just ordered an Electrodacus SBMS60 Lith-Phosphate charge controller and a 28 pound LiFePO4 100AH battery that will not only take full advantage of that much AH output but now have a very usable net 90AH of battery to work with.
Attachments
Oh I may be out of my depth but sometimes my dad used to say one has to test the depths of water with two feet!
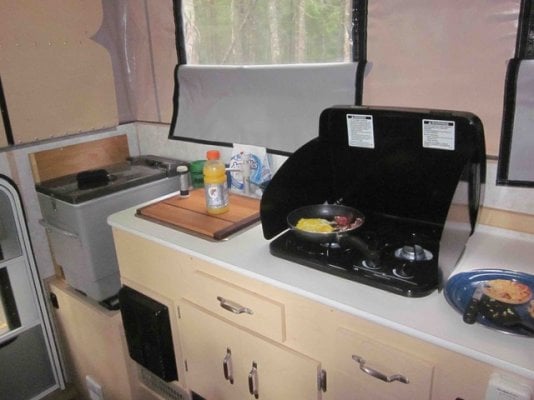
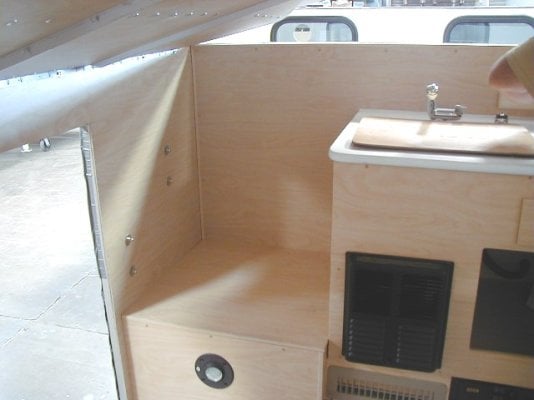
Okay... I just received my new Isotherm 65 Cruise. At least I have time... the camper is in the garage for the winter. The two photos below show my current set up with the Engel fridge. The second shot is what the space looked like (from FWC). My goal is to follow in the footsteps above and do my own install. The thread has been very informative for me and a bit daunting. My current electrical set up in the space where the Engel is, has 2 panels/sockets: a 110 plug, and two 12 V cigarette lighter style with rocker on/off switches, into which I plug the Engel.
I am assuming I will simply remove these and seal the opening. I do not need the 110 V sockets so will remove and cap. (there is another at the water/Battery light panel). I would like to splice into the 12V wires for the fridge and move the 2 12V sockets to the front somewhere to use for charging devices.
So, as you can see I have a spaced ...a cube... of 22.5" in all three directions. The fridge is 18" W x 22" H x 21" D (including door handle) (18.5" to flange).
Always looking for cubby space ... I was thinking of using 1" insulation on the sides and making a 4" cubby on one side. Filling the back with foam insulation won't be hard.... but...
Cutting the hole sounds like a nasty job.... in that I do not know what is in there nor what I would screw in to make a frame for the vent.
If there is an 2011 Eagle owner reading this with a fridge vent please let me know some placement measurements. I am also including a photo of the back of the fridge.... it seems that there is far less cooling coils. I have also tried to go to the link for the second fan but it is no longer live. Also where does one buy an appropriate vent?
Any and all advice humbly appreciated.... I am an electrical novice ( I did install my solar and 2 batteries with help from WTW folks' guidance)
Attachments
Thanks... I am sure I will be in touch just before I start cutting!... I contacted Terry at FWC and he is trying to find the build diagram of my model year to see where the aluminum frame is and wiring.
He said he suggested using 2 vents with the 2 way fridge .... did you put one...two?
Rain water penetration at the vent a problem?
Thanks and I hope you have enjoyed your fridge.
He said he suggested using 2 vents with the 2 way fridge .... did you put one...two?
Rain water penetration at the vent a problem?
Thanks and I hope you have enjoyed your fridge.
This is timely for me too. I am about to cut a hole for the fridge vent and also wonder about water penetration.buckland said:Thanks... I am sure I will be in touch just before I start cutting!... I contacted Terry at FWC and he is trying to find the build diagram of my model year to see where the aluminum frame is and wiring.
He said he suggested using 2 vents with the 2 way fridge .... did you put one...two?
Rain water penetration at the vent a problem?
Thanks and I hope you have enjoyed your fridge.
Looks to me like that fridge is vented to the rear of the camper when installed? So two vents could work, in a push/pull config, each with a small fan?
I looked online for RV vent covers, and they are all huge and or expensive for what you get. I just stopped at HomeDepot on the way home and picked up a dryer vent and a couple of cold air return vent covers to see how they would fit. The water infiltration question came up when I look at the louvers in these vents and imagine a rain storm and driving 60 mph. The water WILL get in, I'm sure.
Buckland and Vic,
I was super scared to try and cut the hole in my camper for a couple of reasons. First off I have the fiberglass siding and, two, I wasn't exactly sure where the framed opening for the vent was behind the siding. I'm about 4 hours from FWC and on a trip to the area I scheduled a visit to have them cut the vent opening and install the switch for the vent fan so it'd match the other gang of switches.
I'm glad I had FWC do the work because there ended up being a horizontal piece of tube aluminum across the vent opening.

I also had them install their vent because it was different from the vent I had bought. When I got home and before I started to install the refrig and fan I took some really thick HVAC tape I had and covered the edge of the opening and down the siding a bit to ensure water couldn't get behind the siding.

The refrig comes with a fan and as long as you have the single vent you'd be fine. I also don't think you'd need the additional fan, but if you like to camp in 100+ degree heat then it may be a good idea to have it. IMO two vents is not needed at all and is only creating another spot for water to enter. You can see the refig's fan and the additional fan I installed.One is pushing and the other is pulling.

I also added a ton of insulation to the back of the refrig (3-4 inches) and the sides of the refrig opening. The main purpose wasn't for insulation, but mainly to keep it from shifting left/right and front/back and to reduce the stress on the four wood screws that hold it in place. When I pushed it into the opening it was a nice tight push to get it back, but not too hard. It's never moved and it does an incredible job with keeping food cold. On my last hunting trip I brough ice cream cookies and made ice for my Lagavulin!


I was super scared to try and cut the hole in my camper for a couple of reasons. First off I have the fiberglass siding and, two, I wasn't exactly sure where the framed opening for the vent was behind the siding. I'm about 4 hours from FWC and on a trip to the area I scheduled a visit to have them cut the vent opening and install the switch for the vent fan so it'd match the other gang of switches.
I'm glad I had FWC do the work because there ended up being a horizontal piece of tube aluminum across the vent opening.
I also had them install their vent because it was different from the vent I had bought. When I got home and before I started to install the refrig and fan I took some really thick HVAC tape I had and covered the edge of the opening and down the siding a bit to ensure water couldn't get behind the siding.
The refrig comes with a fan and as long as you have the single vent you'd be fine. I also don't think you'd need the additional fan, but if you like to camp in 100+ degree heat then it may be a good idea to have it. IMO two vents is not needed at all and is only creating another spot for water to enter. You can see the refig's fan and the additional fan I installed.One is pushing and the other is pulling.
I also added a ton of insulation to the back of the refrig (3-4 inches) and the sides of the refrig opening. The main purpose wasn't for insulation, but mainly to keep it from shifting left/right and front/back and to reduce the stress on the four wood screws that hold it in place. When I pushed it into the opening it was a nice tight push to get it back, but not too hard. It's never moved and it does an incredible job with keeping food cold. On my last hunting trip I brough ice cream cookies and made ice for my Lagavulin!
craig333
Riley's Human
While I'm sure its possible, I've been in some pretty serious storms and not had an issue with water intrusion through the vents. Neither this  nor any of the stock FWC vents.
 nor any of the stock FWC vents.
Thanks guys... I love info! especially from those that have 'been there'. I have faith that if the area is as well sealed with the tape as
bwht4x4 and the vent is a FWC one I should just fine. Terry was saying he recommends 2 vents but I tend to lean towards just one with maybe an added vent fan. ( I am not in the desert much). I also just assumed that the vent would be in the side (my Eagle has the fridge in the back corner driver's side above the propane tanks) though I am fine with a back vent...I will wait on Terry's email that says where best to cut. This forum is a godsend ... I mean we would be winging it solo... I'd do it but sure is nice not to make that BIG mistake getting the lowdown from someone who has already figured it out. AND.... being an Irishman who was married on the Isle of Skye...at Dunvegan castle... who, mind you... was standing.... at the Talisger's sample shots within 30 minutes of saying "I do" .... a man that says "On my last hunting trip I brough ice cream cookies and made ice for my Lagavulin!" is alright with me.... I tho prefer Irish single malt.... Red Breast.... as we say in Irish "God's breath"
bwht4x4 and the vent is a FWC one I should just fine. Terry was saying he recommends 2 vents but I tend to lean towards just one with maybe an added vent fan. ( I am not in the desert much). I also just assumed that the vent would be in the side (my Eagle has the fridge in the back corner driver's side above the propane tanks) though I am fine with a back vent...I will wait on Terry's email that says where best to cut. This forum is a godsend ... I mean we would be winging it solo... I'd do it but sure is nice not to make that BIG mistake getting the lowdown from someone who has already figured it out. AND.... being an Irishman who was married on the Isle of Skye...at Dunvegan castle... who, mind you... was standing.... at the Talisger's sample shots within 30 minutes of saying "I do" .... a man that says "On my last hunting trip I brough ice cream cookies and made ice for my Lagavulin!" is alright with me.... I tho prefer Irish single malt.... Red Breast.... as we say in Irish "God's breath"
That tape is a great idea. I was wondering about how to seal the various layers together. I am going to vent mine on the outside and also on the inside, to maximize air flow over the coils.Bwht4x4 said:Buckland and Vic,
I also had them install their vent because it was different from the vent I had bought. When I got home and before I started to install the refrig and fan I took some really thick HVAC tape I had and covered the edge of the opening and down the siding a bit to ensure water couldn't get behind the siding.
The refrig comes with a fan and as long as you have the single vent you'd be fine. I also don't think you'd need the additional fan, but if you like to camp in 100+ degree heat then it may be a good idea to have it. IMO two vents is not needed at all and is only creating another spot for water to enter. You can see the refig's fan and the additional fan I installed.One is pushing and the other is pulling.
I also added a ton of insulation to the back of the refrig (3-4 inches) and the sides of the refrig opening. The main purpose wasn't for insulation, but mainly to keep it from shifting left/right and front/back and to reduce the stress on the four wood screws that hold it in place. When I pushed it into the opening it was a nice tight push to get it back, but not too hard. It's never moved and it does an incredible job with keeping food cold. On my last hunting trip I brough ice cream cookies and made ice for my Lagavulin!
I love Lagavulin too, but prefer my scotch whisky neat!
I installed my dometic 65l with out cutting any holes in the outside of my grandby. It has venting along the bottom and I installed a vent fan right above the rear and standard home Hvac. It provides 48 inch square inches well above the 36 inch required. I live in Las Vegas and it's kept up with no issues once I got it vented and added a van. You can see more details in my signature. Good luck and you won't regret going to the 2 way and solar. I love the set up and how it works.
1990 Ford F-250
1997 fwc grandby
1990 Ford F-250
1997 fwc grandby
Similar threads - WTW
- Sagefemme
- Four Wheel Camper Discussions
- Replies: 29
- Views: 1K
- Black914
- Four Wheel Camper Discussions
- Replies: 2
- Views: 195
- Black914
- Four Wheel Camper Discussions
- Replies: 1
- Views: 217
- superduty
- Four Wheel Camper Discussions
- Replies: 8
- Views: 920