Furnace won't light

I believe so. The fridge was maintaining, but I never checked the stove, so I can't say whether it had the same problem. What you described though, with the furnace running for a few seconds and then shutting down sounded exactly like my problem. I don't even think about it anymore, as I just loosen the fitting, reattach it and leave for my trip. Once I do that it is never a problem on the road.

I hope this helps.


Which fitting are you loosenig? Are you talking about the main connection to the propane tank?
 
Which fitting are you loosenig? Are you talking about the main connection to the propane tank?


Yes, the main fitting at the propane tank. I leave the tank valve on when doing this to have a little bit of pressure at the fitting, but there is a check valve in the tank so you won't have any gas leak out of the tank when you loosen the main fitting. You will hear a slight hiss for a split second when you loosen it. I then simply attach the fitting and that has solved the problem. Again, I have only had this problem 2-3 times in the last year, so it is a very hit or miss problem, usually after I have not used the furnace for an extended period of time.

I hope this helps.

Paul
 
1) As I posted a couple weeks ago, I've had the igniter-clicks-but-furnace-won't-light problem, usually when the battery is low -- but recently sometimes when the battery is mostly full.

2) And also repeating a previous post, I have started having a wimpy-flame problem, usually when the propane tank is getting low -- but not always. So, about #2 first, I went ahead and took out the burner to see if it looked clogged. I said I'd post pictures of this step, but it was so easy/obvious (with my Suburban DD17DSI, anyway) that I didn't bother: Remove 2 screws to remove the grill. The rectangle that has the furnace sight glass is attached to the end of the burner -- remove the 6 screws around the rectangle's perimeter and (after disconnecting the wire to the igniter) pull that rectangle with attached burner out the front...that's all.
So, looking at the burner I see the same kind of corrosion that I saw on the refrigerator burner...but the holes still look plenty big, so I don't think the problem is there. But I'll give the holes a little wire-brush-scrubbing anyway. And/or maybe I just need to try Phird05's suggestion (above) next time I get wimpy-flame.

Back to #1: From the symptoms, I wonder if the problem is a balky sail switch, as somebody has suggested. That would fit the original symptom (seen when the camper was new) that when the battery is low the furnace won't light: The low power doesn't drive the fan fast enough to activate the sail switch. And now -- with the new symptom that it sometimes won't light even with a mostly-full battery -- it could still be the sail switch, but now the sail switch is just sticky or "corroded" or something like that, so even adequate fan-blowing won't make it sail at times.

My question: Can someone tell me where I'd find the sail switch on the Suburban furnace? I just bet I'll find it a little stiff and some cleaning and/or a little Tri-Flo will fix it. Thanks.
smile.gif
 
The sail switch will be just forward of the fan in any heater. That switch is really the weak link in the whole safety system in these heaters. They generally fail internally due to the fact that they swing back and forth as you drive and simply wear out so adding lube to it won't solve the problem.
 
The sail switch will be just forward of the fan in any heater. That switch is really the weak link in the whole safety system in these heaters. They generally fail internally due to the fact that they swing back and forth as you drive and simply wear out so adding lube to it won't solve the problem.


Thanks. So now I just need to find the fan...guess I need to remove the whole furnace, as I expected/feared.
rolleyes.gif

The sail switch in my furnace hasn't actually failed (assuming that's the problem) -- the furnace still lights most of the time. And when it doesn't light the symptoms fit with a sail switch that's not "sailing" far enough to activate the switch.

I didn't go anywhere for T-Day (no camping), after all. My next major outing will be between Xmas and New Years. I plan to head for central and eastern NV -- maybe even far-western UT -- so I gotta be ready for cold. That's my driver for making sure my furnace is working properly (even though I have a Wave 6, too).
But it's snowing here in Bend, so I don't think I wanna work outside right now.
biggrin.gif
 
To follow-up with the original post in this thread, I got my furnace working today. Muchos gracias to Rob in MT for his earlier post in this thread to check polarity. That was the culprit.

I had already given that a cursory check since the black wire was on the positive battery post and white to negative, but who knew that the cable coming off my battery, going to the fuse block was reverse-colored? All the other electrical systems were working fine (not that there's too many of them), the fan was spinning, lights and vent-fan worked, but when I reversed the wires, the furnace click-whooshed first try. Now I just need to properly swap the wires so the colors make sense.
 
I have a similar story, I went out camping this last weekend and I kept getting the "ignition lockout fault" (three blinks of the LED). fan spins, burner ignites for maybe 2-3 seconds then stops, three times then locks out. well after trying that maybe a dozen times and reseting with the reset switch it would fire and run fine through the night. next morning, same thing, kept giving me the lock out code. so I got home and pull the burner apart to check for build up, it was really clean and nothing obvious was observed. so I tried again and I got it going after abotu three resets. Any thoughts? I turned the pressure up slightly in the regulator (3/4 of a turn) after reading something somewhere else, did not seem to make a difference. battery is fully charged, fan is running, sail switch hits, burner ignites for 3 seconds then off. only thing left I can think of is the board is bad and somehow not "proofing" there is flame some of the time.
 
Thanks to everyone who posted on this problem. I just learned that my furnace won't light problem was low battery. Had enough juice to run fan, but not ignite. Soon as I charged the battery, problem solved. I have an '82 Grandby but don't know what kind of furnace was installed back then.
 
Sounds like we have two separate furnace issues on this thread. Mine has the, it fires runs for a few seconds then shuts off problem. I have suspected it to be a regulator, OPD valve issue. I have not tried Phird05's suggestion of loosening the LP line at the tank to bleed it, but I'm pretty sure it will work like he says. Question is, what does this mean? If bleeding the line works then what is the root problem?
 
Curious, how do you check polarity at the heater? My battery seems to be hooked up correctly and is reading 12.9V. I guess I could check polarity at the fuse panel?

My heater fan runs and blows air out of the bottom register. I'm guessing this is correct since the sail switch seems to engage and the gas valve clicks, i hear the ignitor sparking but it doesn't light and then the valve clicks off. Polarity seems like the easiest thing to check but i need to know where to check it i guess.
 
My 10 year old Atwood 8012-II furnace suffered the issue of fan running and not lighting last road trip. Rather than replacing parts such as the sail switch or overheat limit switch which appears to be the most common solution taken, I studied the ckt diagram. Essentially the “logic” or “brain” of these furnaces is the sail switch, limit switch and ckt board. The logic is “Yes” = 12V +. No = less than 10V.
So rather than replace parts and hope I found the problem I measured voltages.
To assess the limit switch and sail switch I measured the voltage at the ckt board for the two blue wires. Turned out to be 6V vice the required 12V. The ckt diagram shows the source voltage comes from the thermostat which is provided 12V separately from the furnace. You can also use the same method to determine if the gas valve or fan are defective by measuring the voltage for the gas valve which is the red wire and fan motor which is rouge.
Turned out the thermostat was defective and cutting the voltage in half and therefore the ckt board would not continue the sequence of opening the gas valve and initiate the ignition. Note the power for the limit switch, sail switch and IC board appeared to be still provided via the thermostat (still has error lights) when I had the main switch to off.
The sequence of the Atwood heater logic is
Not Too Hot? = limit switch
Air flow? = sail switch
Propane
Ignition

Lastly it isn’t clear in the manual that the Reset and off switch should always be in the reset position. It is a switch,not really a reset.
Hope this helps someone. Appears most of the Atwood’s use the same ckt board and logic. This issue made me crazy for a couple of hours and I had to walk away before I solved it. Glad I didn’t spend $ on parts that didn’t need to be replaced!

Measure voltages and look at the ckt diagram before buying parts!
 

Attachments

  • Furnace.jpg
    Furnace.jpg
    74.2 KB · Views: 51
  • Ckt board.jpg
    Ckt board.jpg
    17.5 KB · Views: 41
Sledawg said:
My 10 year old Atwood 8012-II furnace suffered the issue of fan running and not lighting last road trip. Rather than replacing parts such as the sail switch or overheat limit switch which appears to be the most common solution taken, I studied the ckt diagram. Essentially the “logic” or “brain” of these furnaces is the sail switch, limit switch and ckt board. The logic is “Yes” = 12V +. No = less than 10V.
So rather than replace parts and hope I found the problem I measured voltages.
To assess the limit switch and sail switch I measured the voltage at the ckt board for the two blue wires. Turned out to be 6V vice the required 12V. The ckt diagram shows the source voltage comes from the thermostat which is provided 12V separately from the furnace. You can also use the same method to determine if the gas valve or fan are defective by measuring the voltage for the gas valve which is the red wire and fan motor which is rouge.
Turned out the thermostat was defective and cutting the voltage in half and therefore the ckt board would not continue the sequence of opening the gas valve and initiate the ignition. Note the power for the limit switch, sail switch and IC board appeared to be still provided via the thermostat (still has error lights) when I had the main switch to off.
The sequence of the Atwood heater logic is
Not Too Hot? = limit switch
Air flow? = sail switch
Propane
Ignition

Lastly it isn’t clear in the manual that the Reset and off switch should always be in the reset position. It is a switch,not really a reset.
Hope this helps someone. Appears most of the Atwood’s use the same ckt board and logic. This issue made me crazy for a couple of hours and I had to walk away before I solved it. Glad I didn’t spend $ on parts that didn’t need to be replaced!

Measure voltages and look at the ckt diagram before buying parts!
I think this is worthy of a "sticky" and would love to have a detailed troubleshooting guide for our furnaces! Can you make this even clearer?
 
Vic Harder said:
I think this is worthy of a "sticky" and would love to have a detailed troubleshooting guide for our furnaces! Can you make this even clearer?
I’ll take some time and work on a trouble shooting guide.
 
ATWOOD HYDROFLAME 700-II & 8012-II ELECTRICAL DIAGNOSIS

This is a follow - up on my original post regarding diagnosing an ATWOOD heater before replacing parts. This is my assessment and based on the installation/operation manual and troubleshooting my own furnace. Note, there are warnings in the manuals not to do your own troubleshooting and repairs. You could damage your furnace by conducting your own repairs. (I sound like a lawyer!) I am not an expert on ATWOOD furnaces other than I have electrical engineer degree, was in the Navy for 25 years and I'm an opinionated old man!

It appears that newer versions of the ATWOOD heater use the same logic and electric system....however I cannot confirm. I'm happy to get feedback or be told I'm incorrect with anything in this and follow-on posts

So let's get started.

I will divide this into three posts:
> ATWOOD FURNANCE and POWER
> Safety CKT (Limit Switch and Sail Switch)
> Propane and ignition

The sequence of the ATWOOD furnace to provide heat is:
- Power - (11-13.5 volts)
- Not too hot? = limit switch
- Air Flow ok? = sail switch
- Turn on propane
- Start igniter

I'll discuss power diagnosis and requirements first.


ATWOOD FURANCE and POWER:

To troubleshoot the furnace you will need three items. Multi-meter that can read direct 12Volts and continuity (Is the ckt on or off?), the tech manual (specifically the Wiring and Ladder diagram) and a 1/4 socket wrench. I suggest turning off 12Volts to the furnace via the main CKT breaker for the camper or pulling the blade fuse associated with the furnace.


full

full


full


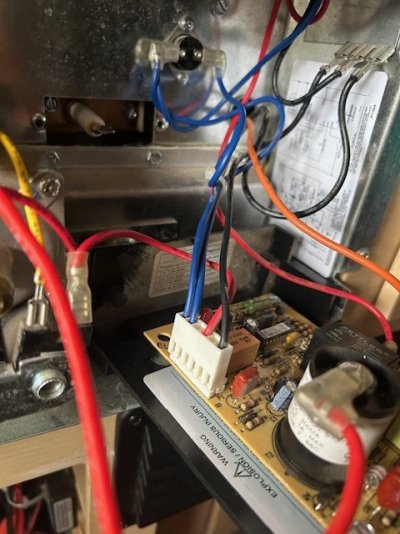
Safety - 12Volts won't shock you....however the ignition to the electrode that creates a spark likely will. Don't touch the round black device on the ckt board with a red wire on top that connects to the electrode!

To open the furnace you can turn the grommet on the bottom of the furnace face 1/4 either way and pull out from the bottom.

full


Once open, the circuit board for the furnace is on the bottom right and has the sticker "ATWOOD MOBILE PRODUCTs". To access the board remove the 1/4 inch screw on the top and tilt the board outwards.
full


full


The manual states that the ATWOOD heater will operate with a voltage between 11V to 13.5V. To assess your current voltage available either measure the battery voltage using the multi-meter or via the display panel for your FWC.

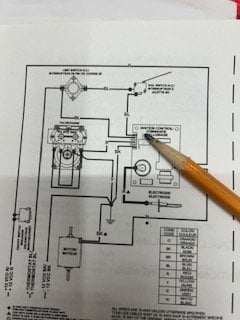
Next step is to take a look at the wiring diagram to determine if your furnace is "seeing" the voltage provided by your camper.

full

I have highlighted the two sources of 12V for the furnace on the wiring diagram. One is to the ckt board and the other is via the thermostat.
- Note, the requirement of the thermostat is 1AMP. If you have installed a new thermostat and that is not capable of 1AMP that could be an issue. (You can just connect the two wires on the back of the thermostat if you think that is a problem and see if the furnace works).

"On/Off Switch breaker" - You'll see on the wiring diagram on the left side the On/Off Switch breaker.
full

If is marked with"off" and "reset". The operating position is "reset." This switch/breaker "trips" if there is a short and to reset it you can cycle it to "off" and back to "reset." Note, your furnace may appear to operate with this switch is in the "off" position since there is another source of 12V being provided via the thermostat. In my opinion, the manual doesn’t explain that this switch should be normally set to “reset.” This could be a source of some folks issue that assume otherwise.

Trouble shooting power:
- Turn the main ckt breaker for the FWC back on or replace the blade.
- Cycle the furnace switch to "off" then back to "reset"
- Turn the thermostat on (switch to heat, auto and set temp above ambient)
- Measure voltage at two locations (red wire on the ckt board and both sides of the limit switch). Place the red multimeter wire on the location and black on metal frame of the furnace. The voltage should be the same as your battery or close.

full


Note: Test both sides of the limit switch. If one side has no volts then the limit switch may be faulty. (I'll go into detail on the next post). For the red wire, you may have to slip to multimeter probe into the plastic.

- Limit SWITCH voltage: If the voltage is zero or significantly less than your battery voltage then you may have a thermostat problem. Once again, you can remove your thermostat and connect the two wires to test.

- Power to the CKT Board (red wire): Should read same as battery voltage. If not, then On/Off breaker may not be in the correct position or the camper blade breaker has tripped.

I have read some of you have experienced the the furnace going through a normal sequence and then turning and then have the flame immediately go out. Based on the wiring diagram this could be caused by the switch/reset breaker being in the off and the power being provided by the thermostat 12V. This is only a guess since I don't have details on how the ckt board is wired. Make sure your switch is in the "reset" position.

Next post to follow will go into detail on diagnosing electrical safety features of the sail switch, limit switch and diagnostic led indications.
 
LIMIT SWITCH - SAIL SWITCH - FAULT LIGHTS - FAN POWER

The next step in electrical diagnosis are the fan, limit and sail switch. 12V+ = Happy. 11V or less = Unhappy

FAN: The fan should start as soon as the thermostat is turned on and set.

If the fan is not working measure the voltage on the right side of the board for the "RED-ROUGE - the one that looks ORANGE" wire.
full

It should read the same or near to the camper battery voltage. If is 12V+ then the fan is bad or wiring to the fan is disconnected. If it is zero then the ckt board is faulty and there should be a fault light. Discussed later.

LIMIT SWITCH: The purpose of the limit switch is to measure if the furnace is too hot. If it is cool enough to start then the limit switch is closed. To determine if the limit switch is good, you can conduct a continuity check using the multi-meter. The setting is the one where if you put the two probes together the meter beeps and reads "1". This means it is a closed circuit. If the check reads zero or no "beep" the limit switch is bad. Another method is to measure the voltage on each side on the limit switch once the thermostat is on and it should read the same....12V+ or the same or near your camper battery. The limit switch is located at the top arrow on the picture below.

full


SAIL SWITCH: The purpose of the sail switch is all about "flow". Air flow to be exact. For you old men it is all about cash flow and another flow....but I digress.
Once the fan starts, the safety logic is "cool enuf = limit switch plus is there air flow? SAIL SWITCH. If there is sufficient air flow the sail switch closes the 12V ckt. To test you can measure the voltage at on the CKT board where the two blue wires attach. Measure the voltage at the first one, You can place the multimeter probe at the bottom the white connection below the wire.
12V = limit switch is doing its job providing the fan is on. Less than 10V = the limit switch is not measuring the air flow correctly or it is broken. Access to the sail switch requires removal of the entire furnace…not something I want to do.

full


FAULT LIGHTS: The CKT board has an LED that indicates faults. Similar to an "idiot light" on a car in my youth, it tells you something is wrong but not what it is.
The details of the fault light can be found on the bottom of page 6 of the manual.
Summary:
1 Flash - FLOW problems. Either limit switch or sail switch. Note, if the on/reset switch is in the wrong position you will see one flash.
2 Flashes - Flame sense fault
3 Flashes - Ignition fault
The manual doesn't explain what the flame sense or ignition faults mean or the resolution. My assumption is flame sense is it didn't light (no voltage to the propane valve) and ignition via the electrode failed (the round black item on the board didn't provide sufficient voltage or failed). Note on the CKT diagram there is no sensor or feedback associated with determining if there is a flame....that I can figure out.

My browsing of the internet indicated the most common failures for this furnace are the limit and sail switch. Hope this helps.

Next post - propane valve and ignition voltage....
 
PROPANE AND IGNITION

The last step for the furnace to light off is the opening of the propane valve and providing a voltage to the electrode which creates a spark. It appears that this occurs simultaneously. The challenge is to figure out if the actual propane valve or electrode are not working if the electrical diagnosis is ok.

Propane Valve: To determine if the valve is getting at 12V signal measure the red wire connected to the propane valve. Either red wire connection can be measured on the valve. 12V indicates is the correct voltage and remains on until the temperature is reached. No or less than 10V indicates the CKT board may be bad. You can feel the valve open and if the furnace doesn't light, smell the propane at the exterior exhaust port. In that case the problem may be the electrode.
full


Electrode: The red wire on top of the round black object is the source of the spark for the electrode which creates the spark. You can measure the voltage provided to the electrode by setting the multi-meter to 200V. The voltage is not steady and will jump, You can usually hear the spark provided by the electrode. Note, to test the ignition you have to have the thermostat off and then on to commence the ignition sequence. I read on line some have removed the electrode and commenced the ignition sequence to see if there is a spark. That could risk having the propane light off in your face....not recommended.

full


So, if I have a problem again with my furnace, I'll start with the voltage checks for the limit switch and sail switch which are the most common issues. I can usually hear if the propane valve and electrode are working. Voltage checks are a good idea. Don't forget to ensure the reset switch is set to "reset." After that I would give the entire furnace a low pressure air cleaning.


I have gotten good "gouge" from the WTW website since I purchased my FWC in 2013 and I hope this helps someone in return. Do some diagnostics before just replacing parts. Good luck and I hope to see you on the backroads!
full
 
Back
Top Bottom