Gap betwen truck side and camper overhang?

Land-roamer

Advanced Member
Joined
Sep 23, 2010
Messages
85
Location
Ottawa, Ontario, Canada
Another question re: my 10ft NCO installation on my pickup.

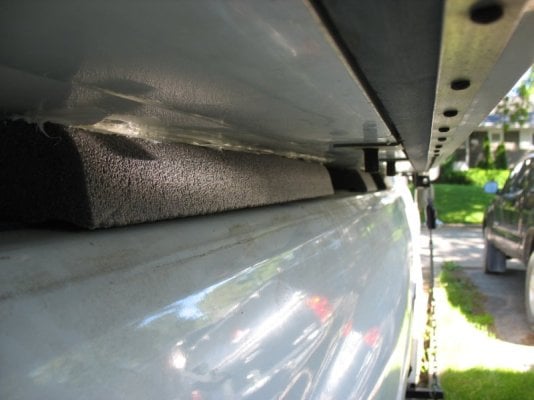
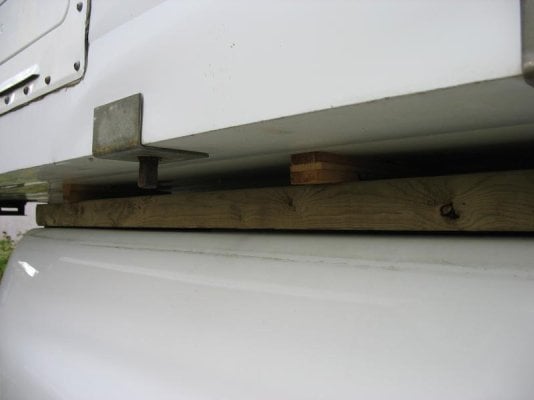
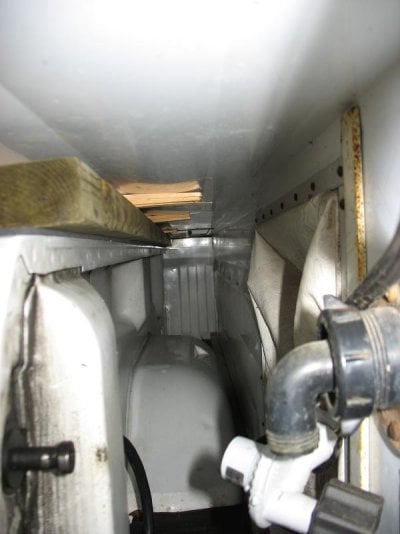
I built a wood and insulation platform in the bed of the truck prior to installation, which has raised the camper. So there is a gap between the top of the truck bed sides and the bottom of the side overhangs of the camper. I thought it might be useful to provide some support for the side overhangs, so installed a length of 2x4 on the truck bed sides and used wood shims to fill in the gap and provide support.

Unfortunately, while driving on bumpy roads, the flexing of the bed and the camper means that the shims come loose and fall off, and the 2x4 threatens to fall off (since it's not secured).

1. do I NEED to provide support to the side overhangs of the camper in the manner described?

2. if yes, how would you suggest I get something appropriate to fill the gap and provide the support in a way that won't come apart on the road?

Here are a couple of pics of my installation:
 

Attachments

  • sideshims.jpg
    sideshims.jpg
    30.1 KB · Views: 270
  • sideshims2.jpg
    sideshims2.jpg
    51.1 KB · Views: 313
  • reartiedown.jpg
    reartiedown.jpg
    62.6 KB · Views: 396
No, you do not need to support the overhang. The camper itself supports this. I would also think the threat of damage to the camper would happen if you chocked something between the bed rail and the camper, as there is always going to be some movement there, as minimal as it may be. Hope this helps.

Good Camping!

Paul
 
Thanks Paul! Glad to know I don't need to support the overhangs, or fill that gap with anything. One less thing to worry about. I may try to put something there to prevent some water from getting into the truck bed.
Best regards,
--Robert
 
Robert.....

On most modern campers there is little need for those shims...but with older alaskans the framework is simple plywood joints, nailed and without backing or corner blocking in many cases. The flexing, on older Alaskans...will in fact weaken the seating joints..especially at the front edge.

I milled and installed pieces of white cedar...attached to the camper with polyurethane adhesive, about 15 years ago. It keeps the jack brackets from digging into the bed walls and provides support for the seats.

On many of the older Alaskans the rear door had a piece of angle iron which was cut out for the door bottom.....if you inspect yours you may find the edges of the door cut in the iron have cracked. The iron was placed there to strengthen the door opening and minimize the very type of flexing your preventing by installing those shims.

They will stabilize the camper and minimize major joint repairs later.

Thanks Rusty. Any chance you may be able to upload a couple of pictures of those pieces of white cedar so I can see what they look like and where you installed them? (picture is worth a thousand words, as they say...)
I'll check the door bottom as you suggest.
Thanks.
 
Robert,

Those cracks will show themselves as hairlines from the corners of the cutout for the door. They're common and nothing to worry about...part of owning an older Alaskan. It was their way of making an attempt to minimize the flexing of the unit with the door removing so much of the structure at the rear....I'll shoot some photos of the particular locations...but they will be specific to your truck and how you have it mounted....I have two pieces, one fore and one aft...placed carefully to miss the tiedowns I have mounted in the stake holes for my truck. They bear on the top of the bed edge between the stake holes.
shims003.jpg


shims004.jpg


shims005.jpg
 
Robert,

Those cracks will show themselves as hairlines from the corners of the cutout for the door. They're common and nothing to worry about...part of owning an older Alaskan. It was their way of making an attempt to minimize the flexing of the unit with the door removing so much of the structure at the rear....I'll shoot some photos of the particular locations...but they will be specific to your truck and how you have it mounted....I have two pieces, one fore and one aft...placed carefully to miss the tiedowns I have mounted in the stake holes for my truck. They bear on the top of the bed edge between the stake holes.

Thanks Rusty! I'll try to come up with something similar for supporting the seat bases on the bed walls. Not sure I can get something in there with the camper on, but I suppose if I have to jack it up a bit it's not too bad. I see you put a strip of foam on the bottom which is a good idea. I assume that with your cedar strips resting on the bed walls, there is no gap left, so the camper is supported at the same time on the floor and on the bed walls. Plus having chosen cedar means that wood won't rot under there. Good solution, I'll inspire myself and try to come up with something half decent before I put too many miles on the camper. Cheers.
 
Robert,

best to be done with the camper off...but can be done with the polyurethane adhesive by jacking it up just far enough to slip the pieces in there...then lower the camper and allow 24 hours to cure...very tough stuff...and it allows for some lateral movement.
 
What do you think of THIS solution?
I had in my garage a couple of lengths of docking foam (to attach to sides of docks to prevent damaging boats). Nice sturdy foam which compresses a bit under load, but re-establishes its shape.
It fits quite snugly between the camper overhang bottom and top of truck bed sides. I could glue the top part of the foam to the camper overhang. I could get lengths to completely seal the sides of the truck bed, thereby not only providing support to the camper overhangs, but also block out dust and water from entering the truck box.
Will this provide sufficient support for the camper overhangs?
Pictures attached.
sidefoam1.JPG
sidefoam2.JPG
sidefoam3.JPG
 
That looks good. I used the black foam pipe insulation on mine.

You may find that over time it may squeeze or work its way out due to the slight movement of the camper and bed.
I ran a bead of RTV along the bottom side of the camper and it has held the foam in place.

~DR
 
That looks good. I used the black foam pipe insulation on mine.

You may find that over time it may squeeze or work its way out due to the slight movement of the camper and bed.
I ran a bead of RTV along the bottom side of the camper and it has held the foam in place.

~DR

Thanks DR. Indeed, I'll put a bead of polyurethane sealant-adhesive on top of the foam piece. Glad I stumbled upon this in my garage, seems the cat's meow for this issue.
 
THAT....is a sweet solution...what a find ;)

nice one Robert.....

Thanks Rusty.
The home renovation store where I bought this some years ago no longer sell it, so I used whatever I had (about 5 feet on each side - 2 longer sections at the front and rear, and a shorter one in the middle). Should do the trick! Now onto the next thing (deep cycle battery and 12v supply to camper)...
 

Attachments

  • foamside1.jpeg
    foamside1.jpeg
    72.3 KB · Views: 180
Back
Top Bottom