Grandby eyebolt repair

flattire

New Member
Joined
Feb 4, 2013
Messages
9
I am in the process of replacing/repairing the eyebolts in my 2006 Grandby. The drivers side is already done. Aluminum plates, new hardware. Same with truck bed. This had been factory installed with elevator bolts/2" fender washers at all locations. Not sure how to access the top of the eyebolts on passenger (couch) side. Anybody got some directions/photos?

E-mailed FWC almost 2 weeks ago....nothing.
Called last week...nothing.
Called again today....nothing.

Watch out for the MOJAVE ROAD. Started in Laughlin , got 50 miles, heard new noises. Ripped one mount out with another on the way.
 
Pull up the carpet,the bolt heads should be there, at least that is how my ATC is done.
Dsrtrat


I am in the process of replacing/repairing the eyebolts in my 2006 Grandby. The drivers side is already done. Aluminum plates, new hardware. Same with truck bed. This had been factory installed with elevator bolts/2" fender washers at all locations. Not sure how to access the top of the eyebolts on passenger (couch) side. Anybody got some directions/photos?

E-mailed FWC almost 2 weeks ago....nothing.
Called last week...nothing.
Called again today....nothing.

Watch out for the MOJAVE ROAD. Started in Laughlin , got 50 miles, heard new noises. Ripped one mount out with another on the way.
 
Grrrrr.

Not sure why you did not get a call back?

: (

Phones have been ringing off the hook, short staffed because of the show season(on the road), just hired a new person to help Terry in service, but no excuses. Someone should have called you.

I can help in the AM of you wanna call or email and ask for me - Stan.

Stan@fourwh.com

1-800-242-1442.

I will try and round up some pictures for you.

: )

Thanks
 
flattire,

Take a look at my build thread. http://www.wanderthewest.com/forum/index.php?/topic/6364/page__view__findpost__p__70985

Lots of picts of the gutted camper and how I reinforced my eye bolts. As dsrtrat said, it is under the carpet.

Give stan a call as well. He'll take care of you.
Cheers
 
Hey Flattire


Did the eye bolts on the passenger side snap off, or rip all the way out of the wood ?


If they ripped out all the way, you can probably (maybe?) replace them without taking too many pieces of the couch apart.

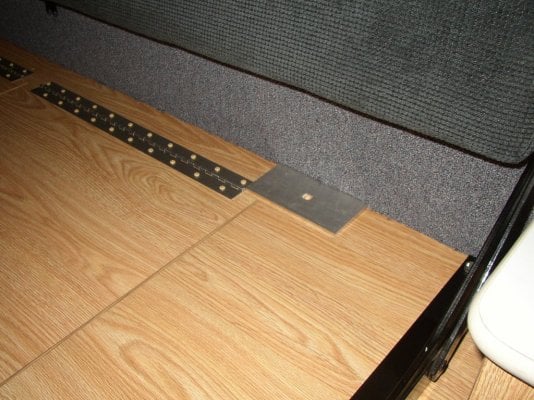
If they ripped all the way out, you could drill up (from outside) and then drop a new bolt down from the top with a reinforcement plate on the top and bottom.

This is a good thread to check out on what that looks like ...

http://www.wanderthewest.com/forum/index.php?/topic/4725/page__st__20__p__52091&#entry52091


If they just snapped off and you want to pop the old bolts up & they out to be able to install new ones, it will take you a few extra minutes.

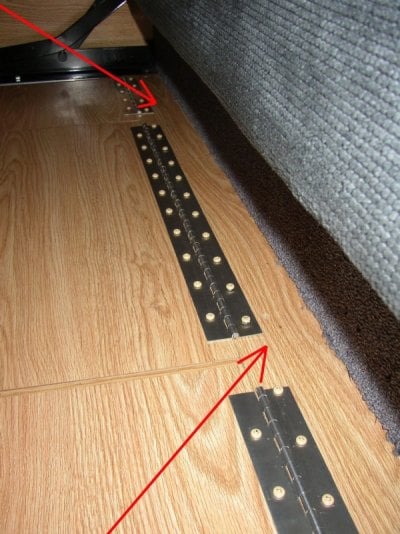
Here are some pictures that should help (see attached photos).

The eye bolts on the passenger side for your camper should be hidden under a small, long strip of wood on the backside of the couch lids.

To get to these bolts to replace them, you will need to un-bolt a few of the bolts that hold the black steel roll over couch brackets in there.

Then, on that small stip of wood there are a few screws that hold it down on to the camper base that is painted grey.

I don't think you will have to remove all of the small screws that hold the seat tops to the long strip of wood (the stainless steel hinges you see in the pics). Those can probably stay on.

Once the black steel roll over brackets are out and the long wood strip is unscrewed, you should be able to gently slide that piece, along with the hinded seat covers, back a few inches to get to the bolts.

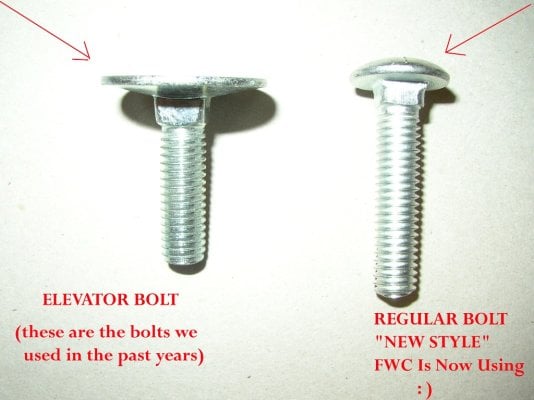
I would use a reinforcement plate on the top for sure, and on the bottom if you want, but for sure I would upgrade the bolts to a grade 8 bolt (instead of the elevator bolt).

Just let me know if you have any other questions.

Thanks

:)

Stan


.
 

Attachments

  • Removing Eye Bolts 1.jpg
    Removing Eye Bolts 1.jpg
    185.4 KB · Views: 172
  • Removing Eye Bolts 2.jpg
    Removing Eye Bolts 2.jpg
    103.9 KB · Views: 176
  • Eye bolt and elevator bolt.jpg
    Eye bolt and elevator bolt.jpg
    185.5 KB · Views: 253
Thanks for the fast replies.

I have been using 1/4" aluminum plate for the repairs.Will I need to modify the wood trim strip to get it to lay flat over top of the aluninum?
 
If you don't mind the reinforcements on top of the wood, you could put the reinforcement plates on top of the wood ?

It will stick up a little, but I don't think you will notice it when sitting on the couch.

This might be easier than trying to modify that long wood strip.

Just make sure to buff the aluminum reinforcement plate edges so there are no sharp corners.

This will help to better protect cushion covers over the years.

It would look something like this ...


_____________________________________________________________________________


Thanks for the fast replies.

I have been using 1/4" aluminum plate for the repairs.

Will I need to modify the wood trim strip to get it to lay flat over top of the aluninum?


.
 

Attachments

  • P1010091.JPG
    P1010091.JPG
    205.5 KB · Views: 156
That looks good to me! I think I am ready to give it a try this weekend. Will post the results when done.

Some background on what happened.

I pulled the rear drivers side eyebolt out of the plywood.
My repair was 1/4" alum. , 12"x4" long on top and bottom and some construction adhesive to help hold the wood together. 3/8 Grade 8 bolt, new 3/8 eyelet, 2" fender washers.

Front drivers eyebolt held but was bent. 4"x6" 1/4" alum. plate on top and bottom. Same hardware as above.
With some trim removal access was easy.
 
Yeah, the link Stan posted was my rig that I fixed from pulling the original bolts through. I am VERY happy to say, the fix I did (1/4" aluminum plate, adhesive, washers and grade 8 bolts) has held up great. We have done hundreds of miles of washboard trails and so fairly good rock crawling. I have managed to toss everything around in the back (including a wash cloth I had in the sink) and the tie down points have given me zero problems since.

Good luck on your project, it will make one less thing to worry about.
 
I had done a lot of searching from this site before starting repairs so I knew what to do. I coppied your repair (even got the same adhesive). My damage was the same. Nobody had showed the passenger side (couch). Got stumped as there was no access . My poor brain was thinking "Where the heck is the top of the bolt?"

Funny you mentioned tossing everything around in the camper. When I stopped to check what was going on in back everything was piled up on the floor. Drawers, under sink things, pots, pans ,food, forks, toothbrush ect. NO liquids ! I got lucky.
 
Finished!

To access elevator bolts on passenger side.....
Remove large seating cushion.
Remove 4 bolts holding down couch backrest.
Remove 3 small screws. See photo above.
The entire panel will now lift up/pull out. Mine was a tight fit and needed some help from a screwdriver to pry out. You just need to pull this out enough to get access to bolts to remove them. Remove bolts.

My repair was to use more alum plate. See above photo. With bolts removed I now reinstalled the panel (with 3 flip up lids). I used 2"x10" over battery and 4"x9" in the rear. Drilled up through panel from the outside using existing holes. These plates sit on top of the hinged panel and will be covered with the cushion.

I did this all myself. Would have been much easier with 2 people.

If you have any bent/broken eyebolt issues I would plan on doing them ALL. I found other bent elevator bolts, wood starting to pull apart, coupling link was bent, turnbuckles bent.

My camper has about 7 years of use. Not hard but not easy either. Baja has also taken its toll. (Not going there anymore...seems too dangerous).

Good camping.
 
Back
Top Bottom