Grandby Rebuild

jsonptrs

Member
Joined
Sep 17, 2008
Messages
12
Location
Reno, NV
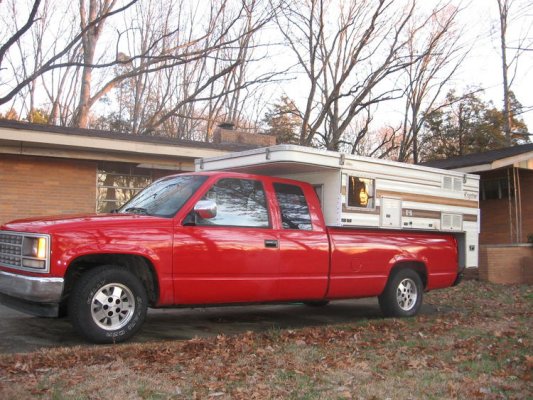
Hello WTW forum. I posted once before looking for some advice on broken welds and I thought I'd update you with my progress. I'll start from the beginning. I was looking at a couple used Grandby's on Craigslist and my travels brought me close to this one, which I bought for $1500. It came with a 3-way Dometic fridge, sink, stove, and furnace -- all working when I got it.

Camper 002.jpg
Just picked it up

I didn't really look it over with a fine toothed comb -- I was running late and overall it looked okay, so I threw it on the truck and headed out. When I got it home I found dry rot where the fridge sits and broken welds, plus the previous owner had tried cutting the rear corner by the furnace -- I don't really know why. That prompted some repairs. I partially rebuilt the floor pack and Chicali made me a deal I couldn't refuse on the welding.

Camper 011.jpg
Broken weld

Camper 013.jpg
"Modified" rear corner -- prompted partial floor pack replacement

The project snowballed and the camper was stripped to the frame -- my wife wasn't happy. I also replaced the bed shelf, but Seven did such a good job on the description I don't think I need to go into any more detail.

Camper 018.jpg
Got this far, decided to go for it

Camper 020.jpg
Truck has a gooseneck hitch that sits proud of the bed. Cut a hole for it and laid another sheet of 5/8 on the floor (.578 to be exact - darn metric milled lumber...).

I've reached the max on pics, check the next post...
 
Grandby Rebuild - Part 2

So after a couple days the floor pack is repaired and I drove to Woodland for the welding work, plus I picked up a few items I needed for the restoration -- gray liner to patch my tan canvas and the black edge tape.

Camper 021.jpg
Partial floor pack replacement, edges primed

Camper 026.jpg
Floor pack primed

In addition to priming the floor pack I treated any suspect areas of the existing plywood with an anti-fungal/rot killer and penetrating epoxy sealer. I used polyurethane glue, 1 1/2" staples for quick assembly and screws to suck everything tight. I also screwed the floor pack to the frame with lath screws rather than the #8 sheet metal screws I pulled out -- seemed like they just buried in the wood and didn't really suck the floor pack tight to the frame. The wider head of the lath screw did the trick in my opinion.

I decided to go with the rigid foam insulation for the camper. I put up two new side panels inside tonight and will fit the rest tomorrow, then finish them in place.

Camper 027.jpg
Rigid foam insulation, repaired front wall, and overlayed floor

I don't want to be too hasty in buttoning this up, but I have a trip planned for the end of October. I only have the porch light off the back and am thinking about adding more, I just can't decide if I really need them. What do you think? Thanks for your advice.
 
Great job so far, for the price you payed and your good work you'll end up with a great camper. As to the lights, you might as well put them in while you have the opportunity, just add separate switching and you'll have the option of using whatever combination you want. Keep us posted.
 
Nice work on the remodel,keep the picures coming.
What kind of jacks do you have for the camper?
 
Nice work and great pics. Add the wiring now for everything you might ever put in, Lights, fan, solar etc. Its not much work now even if you never wind using it. If you install that stuff you'll be very happy you put the wiring in now.
 
The big push -- going for cabinets tomorrow!

Greetings again. I'll post more pics tomorrow, but all the panels are cut and openings trimmed. I decided to pull them out for the finishing -- just easier overall. I used a water based exterior grade polyurethane from Varathane. The water based stuff is quick drying and obviously doesn't smell like the oil. The negative is that it doesn't get that nice, smooth finish unless you spray it -- at least I've never had any luck keeping all the bubbles out using any brush/roller method. I used a foam roller and applied 3 coats with a sanding between the second and third coat. Still ended up with some little bumps, but as my old boss and co-worker used to say, "we're not building pianos here." I also decided to pull wires for two more porch lights on the passenger side. That's where the awning is and where we'll be hanging out the most, so I ordered three switched porch lights, put them all on a master circuit with a switch to energize them all from inside the camper, then each one can be turned on or off independently at the fixture. The camper already has a fan and if I go solar I'll wire the drop outside like I saw on another post. I am definitely looking forward to being done with the project and taking her out for a test drive.

As for jacks, I didn't have any and frankly was shocked at how much they cost. This is my first camper and had no idea a set of corner jacks was $550 or better. I borrowed a set of cable jacks to get the camper on and off during the rebuild and by coincidence found a set of four Rieco hydraulic corner jacks for $100 bucks that I picked up on my way back from Woodland for the welding repairs. They work great, I just need to fabricate some brackets. I have some 3/16 flat stock that should work fine, but any tips on the brackets would be helpful. Thanks for checking in on the progress -- It's fun to have people fired up for the project!
 
Great work so far. I realy dont have anything to add but I will be watching this thread.
 
Looks a lot like the project that has homesteaded in my garage:D

Corner jacks, I would use @ 1.5" wide and go around both sides for all corners. I would also weld a piece on the bottom so the only support isnt in the bolts/screws. Since I was working on mine and had the interior all tore apart I decided to bolt my brackets on with bolts instead of screws. I used some heavier aluminum on the interior sides to help protect the light frame of the camper from pull through.

What are you planning on using for the interior skin? I decided to use a product i found at home depot.

Like this http://www.waterproofpanels.com/index.htm

It has an R-value to it, easy to clean, waterproof and fairly light. I put in on the ceiling of mine so far and am planning on using it on the walls also.
 
No cabinets, but other stuff...

I looked around and saw I had lots of little things to do before I tackled the cabinetry. There was an awning to rehang, a couple of electrical items, aluminum corner trim to put back, and general clean up to do -- the project definitely took over and the single car garage suffered greatly! As for the aluminum trim the 1/16" thick stuff on our campers is very hard to find. I ended up recycling some and using 1"x1"x1/8" on the edges below the door and base of the cab front. Additionally, I ordered some dock bumpers to duplicate what I saw at the FWC factory -- the two pads on the front of the camper to keep it from smashing into the front of the truck bed. I'll post pics of that when I put them on. In the meantime, here is what the interior looks like now.

Camper 029.jpg
Towards Cab

Camper 030.jpg
Rear door -- note the overwhelmed garage in the background... I'm so dedicated to this project I haven't even taken the time to pull the 220 I need for my new cabinet saw!

Camper 031.jpg
Camper 032.jpg
Sides

Winter200, I saw your post a little late to put my brackets on with bolts instead of lags as I haven't fabricated them yet... I also made my panels already but that stuff you linked too looks really cool and low maintenance! To be honest I was balking at spending a lot of $$ on the project and the panels you see are actually the back side of 3/16 luan plywood I purchased for $9 bucks a sheet and finished with satin water based Varathane polyurethane, exterior grade. It looked enough like birch and was quite a bit less money, something I'm striving for. Total cost of the interior re-skin -- $44 dollars, time not included of course. The skins are attached with #8 flathead sheetmetal screws that were predrilled and countersunk. One personal rant, I have developed a SERIOUS dislike of the staples used during assembly. I completely understand why they are used: speed and efficiency, cost, decent holding power but frankly for a rebuild they suck. I've got a couple hours at least in pulling staples, trying to pry them out with a tiny bladed screwdriver and bullnose pliers. The only good thing I can think of is that I'm done, unless I re-skin the exterior some day....

I've got to go to work for a few days so nothing will happen until next week. Until then, Adios!
 
impressive work...its been fun following this build...i am sure your attention to detail now will pay off down the road. thanks for posting!
 
First trip in the "new" camper....

Well, I'm back. My wife and I went on our first trip with the camper last weekend to Santa Cruz and points north and I was really hustling to get things done, or at least done enough to get on the road so I couldn't post my progress along the way. Here is the camper at Butano State Park.

October 08 024.jpg

We camped there and surfed Waddell Creek and various spots around Santa Cruz. Every day we would break camp and search for surf then return at night, staying either at Butano or Big Basin. The camper made it really convenient -- we could set up in 20 minutes or less, put dinner on the stove, have a beer and relax. I learned how fast running the 'fridge on 12v would sap the batteries -- about 6 hours on 12v sucked my starting batteries down to the point where I needed a jump. We got in late and I forgot to switch to propane. Thankfully the camp host also had a diesel truck as two sets of cables were necessary, one to each battery. Live and learn I guess. I want to equip the camper with it's own batteries and a solar panel to keep them charged. I'll do that down the road.

Here are some interior shots. It is mostly finished, but I still have a bit of work to do.

October 08 074.jpg
October 08 075.jpg
October 08 076.jpg
October 08 077.jpg

We had really nice weather in Santa Cruz so the furnace wasn't needed. I used it today when I took the camper and the dogs fishing on the Little Truckee and it worked great. The stove boiled water fast and it was nice to do the "clean" cooking indoors -- anything that splatters I still do outdoors. We could make coffee inside and stay a bit warmer until the brew kicked in. I switched a couple of the gas lines out to stainless steel flex instead of the bent copper. A couple aggressive bends in the original gas lines were pretty narrow at best, almost kinked. My "Fantastic Fan" worked in Reno but was dead by the time we got to the coast. It has juice, just doesn't want to go. No leaks with the water tank, but the water did end up having a rather "plasticy" taste even after a couple cycles of bleach and vinegar. I do wish I had re-installed the electric water pump as pumping the faucet by hand got old fast. Basically I've decided to use the tank water for doing dishes and stuff and cook or drink out of jugs if the taste doesn't improve.

In the interest of time I decided to put things back basically as before -- if it isn't broken, don't fix it kind of logic. I built the cabinets out of a hardwood veneered "12mm" plywood and I still need to apply the finish. I'm going to make the opening to get under the sink bigger than original -- make it easier getting things in and out. I extended the box making up the passenger wall bench seat to fit a couple long items we have. I also eliminated the little closet it had opting for coat hooks and simple plastic crates in it's place. Otherwise it is the same.

I either have a roof leak in the drivers front corner of the cabover or rain water is getting driven in when I drive. I've got it drying now and will try to find out where it is coming from later. Tips and tricks would be helpful. It is also clear that I need to replace the front lift mechanism -- has anyone thought to use aluminum for the parts rather than 1/8" or 3/16" paneling? Not sure about cost, but even if it was three or four times the materials cost it would probably be worth it to not have the rivets pull through.

I still need to mount my hydraulic jacks, but that can wait a bit as well. I opted to bolt the camper to the bed and I have it secured with 3/8" bolts backed with some 3/16 plate steel. The camper never moved even when driving on some pretty rough dirt roads around Reno/Truckee. I figure I'll finish the cabinets and stuff then tackle the front lift mechanism. Again, if you have any advice on the leaks let me know. Until next time....
 
I"m sure you could use aluminum but they seem to last really well if treated with some tlc. Contact the fantastic fan people. They seem to have excellent customer service from all reports. Might check with with a place like camping world and see what they have for the water tank, that can't be all that uncommon.

Sounds like its really coming along well.
 
The truth?

The old Granby is about a foot shorter than the original Keystone but they are otherwise quite similar. Those old campers were the pinnacle of their type, 8 foot bed, extended cab truck, short overhang, two couches, and made in Colorado by the original genius.

I wish someone who knows would tell the real story about why Four Wheel Camper moved from Colorado to California. What happened? The truth?
 

Attachments

  • IMG_1497.jpg
    IMG_1497.jpg
    109.6 KB · Views: 470

New posts - WTW

Back
Top Bottom