Gutted Fleet - Rebuilding

scheefdog

Advanced Member
Joined
Feb 4, 2011
Messages
50
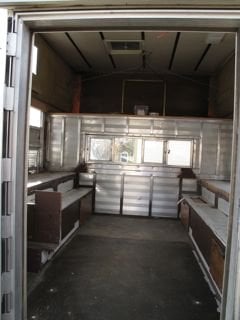
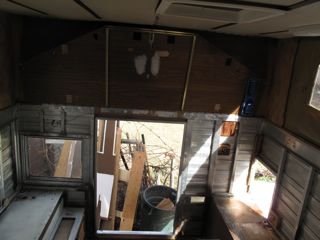
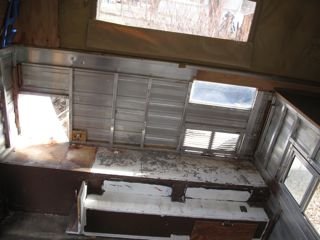
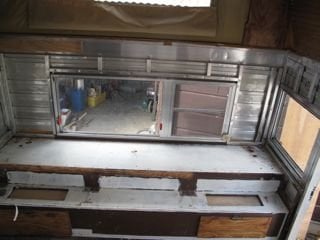
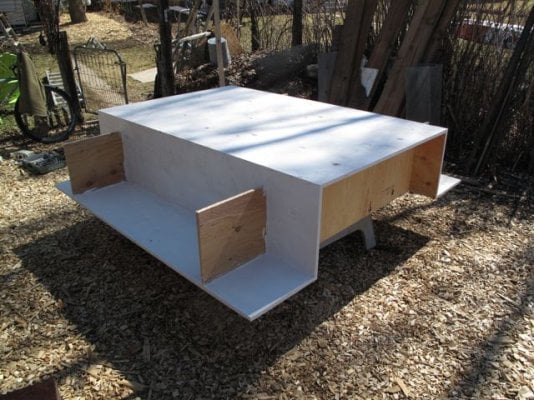
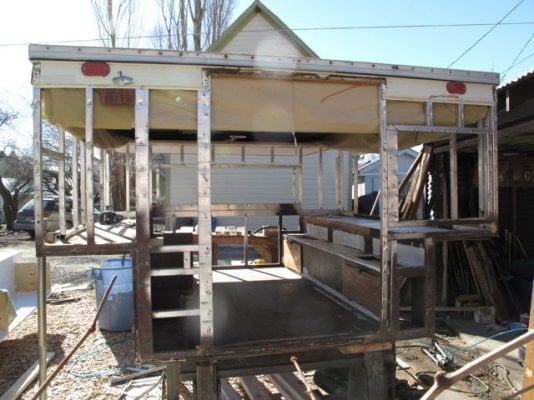
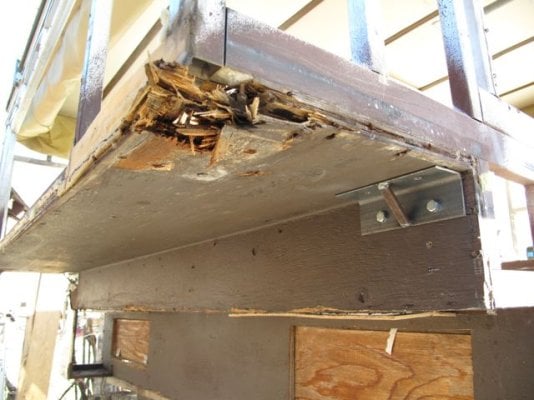
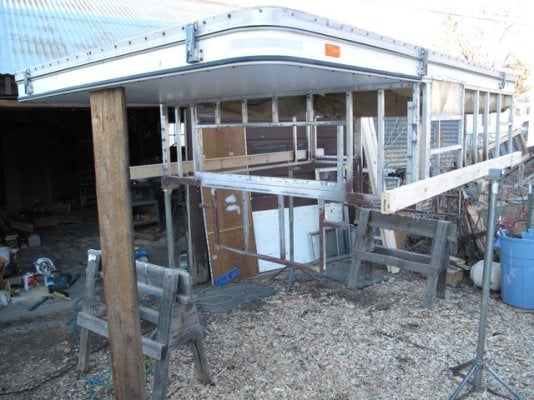
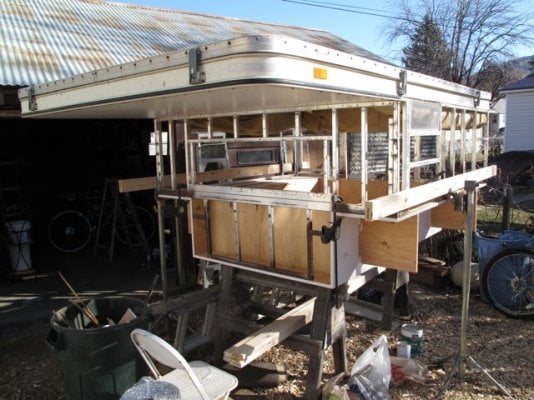
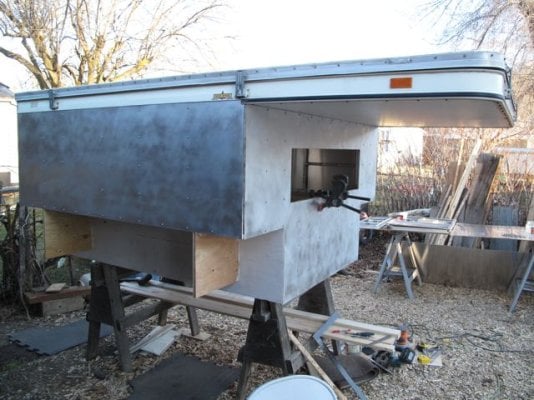
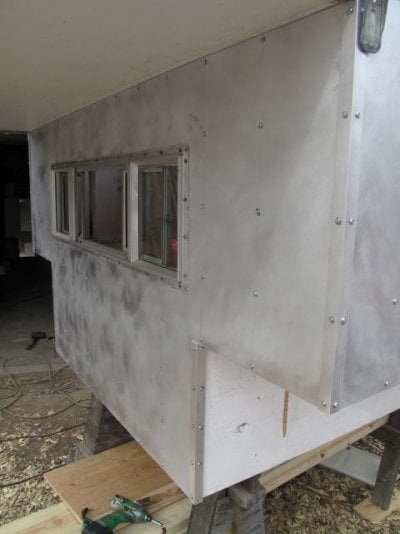
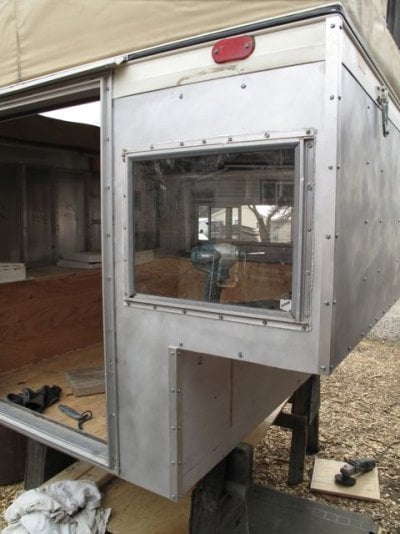
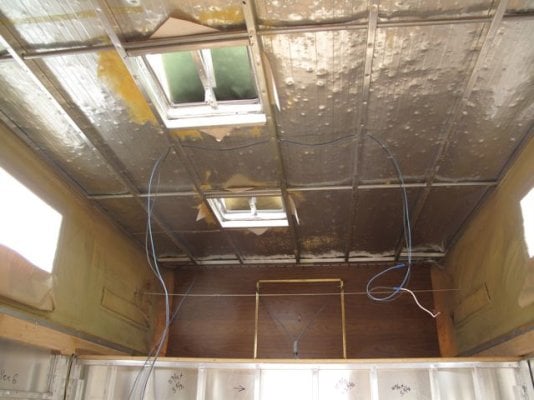
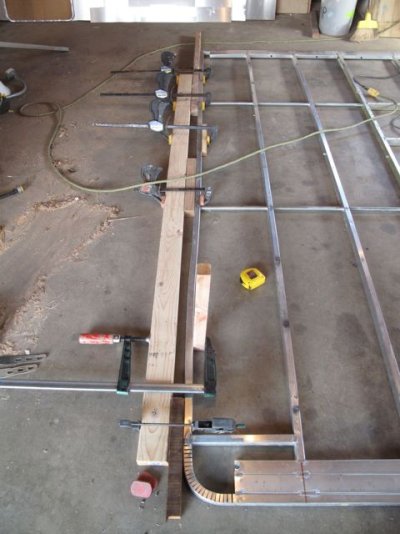
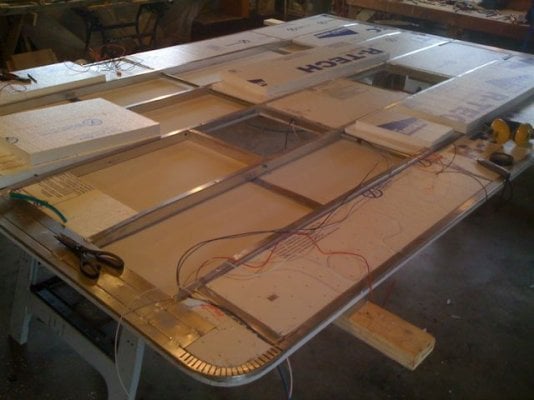
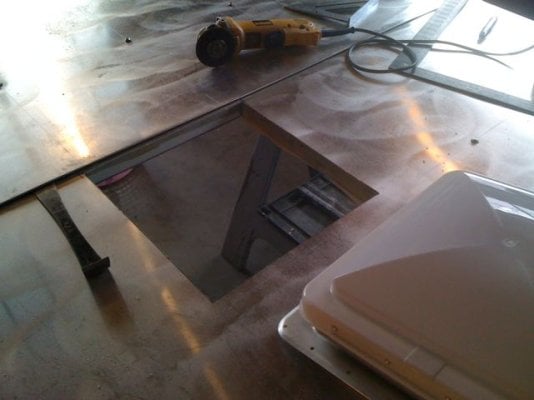
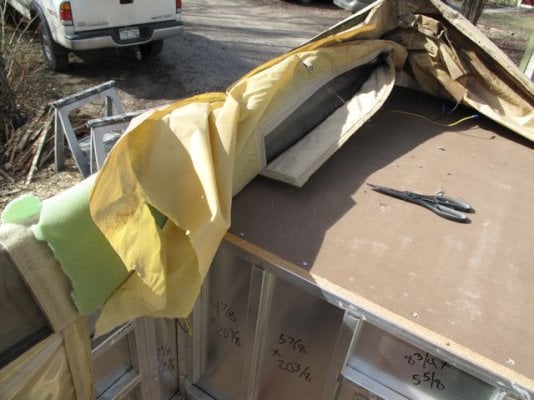
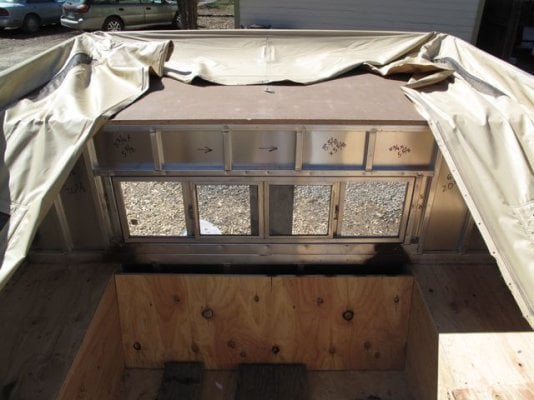
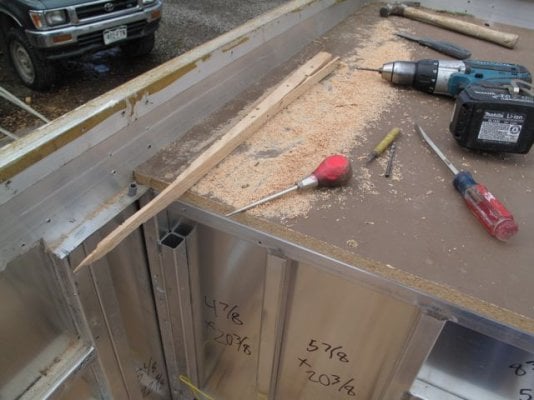
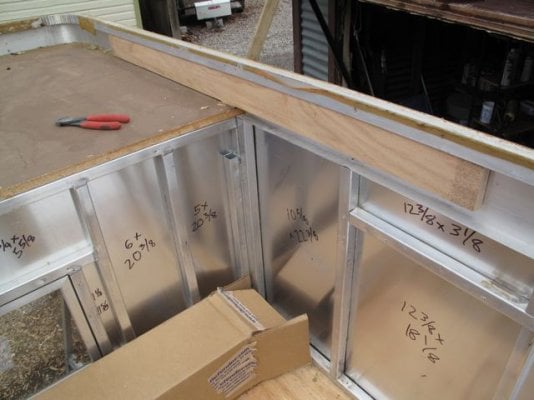
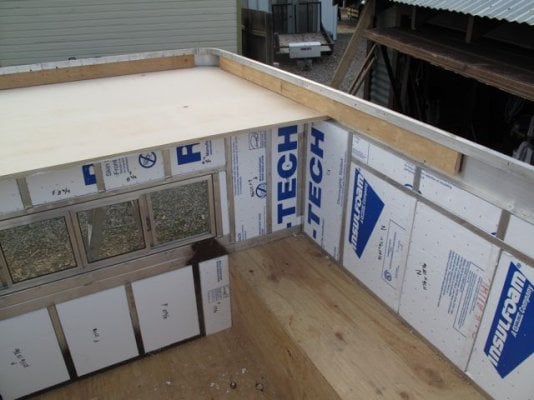
I recently became an owner of an 87 Fleet for my Tundra and decided to jump right in to some modifications...and ended up gutting the inside. There is a before picture below. Stripping all the old particle board and plywood out was very satisfying and revealing the frame and problem areas is worth it in my mind. I think I'm going to go as far as replacing the floor pack because now seems like the time. Plus, I can add a little more storage and make it custom for my Tundra. The plywood is is decent shape, but the drivers side of the floor pack is a little worked from some previous owners modifications that sacrificed the frame structure. The bottom cord of the aluminum frame was cut for the propane box and a battery? hatch leaving the 3/4 plywood doing most of the support work on that side of the camper when on the jack. See the picture below.

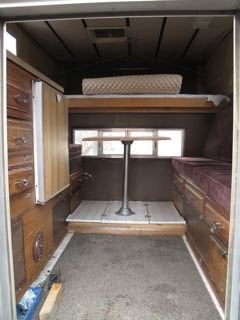
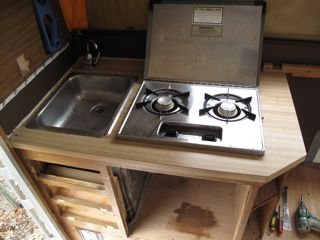
I'm working on modeling up the camper and interior on the computer to figure out exactly what I want. I'm going to do a dinette in the front of the camper. There are some pictures on the forum I found posted by Stan of an Eagle with a green interior that I really like the design of. I am going to reuse the stove and ice-box. What are peoples thoughts on the original Atwood furnaces? I'm not sure if mine works and like the idea of a simple Wave 3 heater. I don't really care about running heat while sleeping, but it would be nice in the evenings and in the morning.

I'm clueless when it comes to wiring the camper. I don't have the money to do anything fancy right now but would like to wire for the future. I would like to have a plug on the outside of the camper for an extension cord. Solar sounds appealing. What type of panels/converters etc. are needed? Can someone point me in the right direction for some "basic camper wiring"?

I have been searching and finding all sorts of good info on the forum. I'm open to all advice as this is my first camper.
 

Attachments

  • IMG_1874.jpg
    IMG_1874.jpg
    18.3 KB · Views: 2,258
  • IMG_1879.jpg
    IMG_1879.jpg
    18 KB · Views: 1,774
  • IMG_1882.jpg
    IMG_1882.jpg
    19 KB · Views: 1,622
  • IMG_1885.jpg
    IMG_1885.jpg
    19.2 KB · Views: 1,567
  • IMG_1860.jpg
    IMG_1860.jpg
    19.3 KB · Views: 1,558
  • IMG_1861.jpg
    IMG_1861.jpg
    19.6 KB · Views: 1,310
Looking good! My '7X Grandby is looking very much like that, except my lift panels are rotting away and I've stripped the roof liner out to the Al frame just like your walls. It's so simple and elegant when you get right down to the core of it.

I should start one of these threads.

BTW, I decided to pull the furnace and go w/ a Wave 3. Seems better in most ways: quieter, uses no battery and smaller/lighter. It does have the disadvantages of needing to manually vent it and not having a temp. control. This was one of the easier decisions, though.
 
I wanted to update as I have done a lot of work on the camper the past few days. I want to get it done so I can take it out to the desert in a couple of weeks.

I decided to strip off the siding and replace the floor pack. I wanted to replace the floor pack because it had a few extra hatches and holes in it. I also wanted to simplify the design by getting rid of the extra step and customizing the width of the floor to match my Tundra. I used sheets of 3/4" CDX and made the width 4' to fit between the wheel wells in my truck. I attached 2x4s to the aluminum frame and used my jacks to support the camper while I removed the old floor and installed the new. I didn't think there was any rot in the old floor pack and was surprised when I started pulling it off and found it pretty wet and rotting in all four corners. This made me really glad I was taking the extra step to replace it. I had to cut a little bit of the old frame where it stepped to fit my new floor pack but well worth it as I will have more storage in the camper.

I searched all over for different options for siding and in ended up choosing to buy 18 gauge aluminum sheets from a local source. I thought about smooth fiberglass which would have cost a little more but I couldn't find a source within a few hour drive and shipping was really expensive. I'm happy with my choice as it was cheaper and I think it will be really durable and add some lateral strength to the camper. It is raw aluminum and I'm putting a brushed finish on it to dull the shine. I installed the first piece this evening and will put the rest on tomorrow.

The walls and roof are going to get rigid foam insulation. I will run all my wiring for lights at the same time. I'm thinking of ordering some of these LED dome lights and maybe a strip for above the kitchen. Anyone have these?
http://www.superbrightleds.com/cgi-bin/store/index.cgi?action=DispPage&Page2Disp=%2Ffit.htm

I'm still deciding what to use for the new wall panels, white walls instead of wood is appealing to me. Some sort of plastic or composite would be better than thin plywood I think. Any suggestions?
 

Attachments

  • IMG_1902.jpg
    IMG_1902.jpg
    83.6 KB · Views: 1,231
  • IMG_1905.jpg
    IMG_1905.jpg
    69.9 KB · Views: 1,580
  • IMG_1908.jpg
    IMG_1908.jpg
    57.6 KB · Views: 1,556
  • IMG_1917.jpg
    IMG_1917.jpg
    76.6 KB · Views: 1,620
  • IMG_1922.jpg
    IMG_1922.jpg
    76.1 KB · Views: 1,891
  • IMG_1924.jpg
    IMG_1924.jpg
    58.7 KB · Views: 1,748
More progress...Siding

Finished up the installing the new siding. I let the siding hang 1/8" proud of the floor pack on the bottom to allow for the water to drip off. I think this will work better in the long run then running a bottom trim piece and then have to caulk it. I used aluminum 1x1 angle for the corner trim pieces to match the sheets. The siding is stout and stiffened up the camper a lot. It also reflects a lot of heat and should be nice against the desert sun.

I reinstalled the windows and door after a good cleaning. I decided to just reuse the original windows as they are in good shape. I did take the trim off the door and found some rotten wood along the bottoms and sides. I did a quick fix on the door for now as I will probably take the time to totally rebuild it later. I didn't reinstall the large window on the side of the camper. I didn't particularly like how big the window was with the couch on that side, seemed kind of useless. I might decide I want it later, but I'm going to see if I like without first.

On to the roof.
 

Attachments

  • IMG_1930.jpg
    IMG_1930.jpg
    70.1 KB · Views: 971
  • IMG_1934.jpg
    IMG_1934.jpg
    38.4 KB · Views: 1,074
  • IMG_1935.jpg
    IMG_1935.jpg
    49.4 KB · Views: 1,090
  • IMG_1936.jpg
    IMG_1936.jpg
    63.9 KB · Views: 1,521
  • IMG_1937.jpg
    IMG_1937.jpg
    55.4 KB · Views: 1,038
The roof....

I cut out the headliner and removed all of the old fiberglass insulation in the roof. This gave me a better look at the condition of the aluminum roof. I was hoping I might be able to stuff rigid insulation to help straighten the sag but that seemed like a band aid solution. After 25 years and at least one large hailstorm I decided it needed replacing as well.

I pulled the outer trim ring off and detached the popup canvas to get the roof free. I moved it onto the garage floor so it could lay flat to work on it. I had to cut off the huge globs of silicon applied by a previous owner to get to the screws. Adding more and more silicon isn't the solution, my roof had at least a couple full tubes and it was still leaking. I pulled the roof off in one piece and gave it to the neighbor who might use it on his chicken coop(vents and all)! Now that is recycling.

Taking the roof down to the frame also gave me a chance to straighten one side that was a little bent. I was able to clamp a straight 2x4 onto the side of the frame and over correct the bend to get it straight again(or close enough). I bought some .040" aluminum sheet for the new roofing(twice as thick as the original). I am going to have to do it in two pieces like the original but I'm hoping to not use screws to attach it.

I ordered some new headliner material that I think is very similar to the original(perforated vinyl).
http://www.defender.com/product.jsp?path=-1|5948|296197|309382&id=23866

I also ordered the gas struts and brackets to do the lift assist for my roof. Actually my hope is to maybe eliminate the lift panels...

That is all for now, I'm looking forward to finish the exterior of the camper so I can work on the interior.
 

Attachments

  • IMG_1938.jpg
    IMG_1938.jpg
    54.5 KB · Views: 996
  • IMG_1943.jpg
    IMG_1943.jpg
    50.4 KB · Views: 1,150
  • IMG_1946.jpg
    IMG_1946.jpg
    53.3 KB · Views: 1,171
  • IMG_1949.jpg
    IMG_1949.jpg
    53.7 KB · Views: 1,361
I also ordered the gas struts and brackets to do the lift assist for my roof. Actually my hope is to maybe eliminate the lift panels...

That is all for now, I'm looking forward to finish the exterior of the camper so I can work on the interior.


Great job!! Be interesting to see if you can eliminate the lift panels.
 
Ambitious! My rebuild is standing still next to this! I'm excited to see where the roof repair goes. Mine looks less beat up but is probably pretty much the same. I'm hoping to repair it, though.
 
scheefdog
how are you attaching the skins to the framing? looked like rivets? Are you applying any sealer between the aluminun frame and the skins? Keep up the good work ,and reports as you go, I have thoughts of doing similar reskin to my keystone camper one of these days,to give it a more modern look.
 
In regard to alternative interior paneling, I suggest you take a look at FRP (fiberglass reinforced paneling). It takes a lot of abuse and is easy to clean. Marlite is one name brand.
 
I have been meaning to update for a month...so here it goes.

Ben-I have been attaching the panels using small sheetmetal screws that are pretty low profile.

New Roof-
With the frame all cleaned up and straightened I decided to install the headliner first. This would allow me to wrap it up around the roof edge and then run tape all the way around to secure it. The new material I got from defender looks identical to the stuff I pulled off so I was happy with the purchase. I cleaned the roof frame really well and smoothed all the screw holes before installing the headliner. Then used 3m spray adhesive to bond the liner to the frame. I did the headliner in two pieces just like the original with the seam down the middle. I ran tape around the edge of the frame to really hold the headliner in place while installing the insulation and roofing. I used 1" wide strips of aluminum(cutoffs from the roofing metal) secured with screws as battens over the framing in place of the old foam/fake wood composite trim that was stapled.

Once the headliner was in place I flipped the roof over and insulated the roof using rigid insulation. I ran wiring for the fans and lights at the same time. I had to drill holes for wiring to run through the frame in a few places and used an old air compressor hose scrap cut into short pieces as sleeves to protect the wire from the sharp metal. I also created brackets out of aluminum scrap for the dome light fixtures to mount to. I’m planing on 4 lights, 2 at each end of the bed for reading, 1 over the kitchen, and 1 over the couch.

For the new roofing I bought two 4x10 sheets of .040" aluminum. I had a local sheet metal shop cut and bend the sheets to my specs, the new metal is way more stout. Yes, it does weight twice as much, but it is only the difference of 20 lbs. I had the metal shop bend a flat seam for the center of the roof which overlaps 3/4" to prevent any water working its way through.

I did the same brushed finish on the roofing metal as the siding using an orbital sander and scotchbrite pad. Originally I was going to use 3M VCB tape to fasten the roof to the frame(like they do on the new campers). However, I abandoned that idea once I did a test fit of the metal on the roof. The frame needed a little persuasion to match the new roofing metal(square and straight). I had to fasten one side first so I could work the frame as I went. I fastened the new roof using rubber washers on the screws(just like a metal roof on a house). After seeing the silicon mess a previous owner created on the camper I wanted to try an alternative. I will see if it leaks over time and I can always add silicon.

I installed two new vents(Heng) with powered fans that I purchased for cheap off ebay. They have translucent covers which should let in some nice light(the original vents had metal covers).
 

Attachments

  • IMG_0324.jpg
    IMG_0324.jpg
    47.9 KB · Views: 826
  • IMG_0325.jpg
    IMG_0325.jpg
    39.9 KB · Views: 925
  • IMG_0326.jpg
    IMG_0326.jpg
    43.9 KB · Views: 882
  • IMG_0327.jpg
    IMG_0327.jpg
    40.2 KB · Views: 768
Cleaning the old Pop Up Canvas
I read somewhere on here that the old pop up canvas like mine had two layers with insulation in the middle. I got out the scissors for further investigation and an hour later I had cut all of the interior liner and insulation out of the canvas. If you do this you have to be careful not to cut the vinyl exterior liner. The interior liner was gross because the insulation acts like a giant sponge to help spawn mold growth on the lightweight nylon interior liner. I purchased some Camco Awning cleaning to clean the aged canvas. After another hour of scrubbing with a sponge the canvas was looking rejuvenated with life.

Re-Installing the roof
With the roof complete and the canvas all clean I was excited to put the new roof on. I set the roof back on the camper and elevated it a few inches so the canvas could be pulled up and wrapped around the edge of the roof(like it was originally). The first side was easy, I started at one end of the metal trim strip and worked the canvas as I put a screw in every foot. Of course it was the last 6 inches that proved to be the most difficult. The canvas doesn’t have any give to it and by the time you get all the way around the roof there is no slack left to pull it up on the final corner. After trying for a good half hour to stretch it over the final corner I decided to unfasten one side to see if I could pull more of the vinyl to get enough slack. It didn’t work, instead when I pulled hard in a section toward the middle I heard a RIP.....

Darn, so close to having the camper back together(or the outside) and I tore the canvas. The tear started from a screw hole towards the front of one side. The canvas was pretty brittle along the top edge from years of dirt and rain. I was done for the weekend and had to decide to try to patch it or spend the money for a new canvas.

I decided patching would be too much of a temporary fix for my liking. I called up ATC to find out about getting a new liner and it was more reasonable than I expected, so I went ahead and ordered. I also received some information from Marty about installing the new canvas. On the newer campers they install the canvas inside the lip of the roof so even if water works its way behind the trim piece it will run down the inside of the canvas. I plan on installing my new canvas this way.
 

Attachments

  • IMG_1950.jpg
    IMG_1950.jpg
    58.3 KB · Views: 669
  • IMG_1953.jpg
    IMG_1953.jpg
    56.4 KB · Views: 669
More deconstruction
I removed the trim strips from the bottom of the canvas as well as the trim around the bed board. I cleaned underneath the trip strips really well and smoothed any sharp screw holes in the siding so they don’t damage my new canvas. The bed board had some serious sag in the middle as well as some water damage in the front so why not replace it too.

Replacing the bedboard was sort of a pain. The old bed board has a lot of screws holding it in(bottom and sides) as well as a fair amount of staples that hold the siding on. There are also the two strips of wood above the bedboard that are tight inside the aluminum C channel and have screws and staples into them as well. I ended up cutting the bedboard in half with a circular saw to make it easier to remove. I chose some nice 3/4” sanded plywood as the replacement. It is way lighter than any sort of mdf and because of the added plys it is stiffer than typical CDX plywood. I used the Ace equivalent of Rustoleum to paint the underside of the new bed board white.
I decided to leave the new bedboard full width, 48”, and let it overhang the front wall of the camper by 5”(the old bed board was 42”). Then I don’t have to do any sort of sliding extension to make the bed larger and I can add some storage underneath the overhang if I want. I added a strip of plywood inside the C channel of the aluminum frame across the front and sides(like before) of the bedboard to add strength.

I also cut and fitted rigid insulation inside the walls of the camper. Next up, wiring and wall panels.

I guess I’m going to end up with a new camper after all....The only part of the part of the camper that I have not taken apart is the upper band of original siding that still wraps all the way around the camper. Hopefully my exploration will help others out if they are thinking of doing something similar.
 

Attachments

  • IMG_2115.jpg
    IMG_2115.jpg
    55.4 KB · Views: 861
  • IMG_2117.jpg
    IMG_2117.jpg
    50.8 KB · Views: 1,011
  • IMG_2119.jpg
    IMG_2119.jpg
    65.5 KB · Views: 982
  • IMG_2124.jpg
    IMG_2124.jpg
    27.4 KB · Views: 963
  • IMG_2131.jpg
    IMG_2131.jpg
    47.8 KB · Views: 981
  • IMG_2132.jpg
    IMG_2132.jpg
    54.9 KB · Views: 976
Looks like you've made some good progress. I've got another 2 weeks before I'm back working on my restoration. I think I get what you are saying about the fabric on the roof -- not 100% sure, though.

I've got the replacement fabric from ATC in a box ready to go when I get to that part. It is what I am worried about the most. Metal, wood and electrical stuff all seems straight-forward; that fabric stuff seems like an art.
 
More deconstruction
I removed the trim strips from the bottom of the canvas as well as the trim around the bed board. I cleaned underneath the trip strips really well and smoothed any sharp screw holes in the siding so they don’t damage my new canvas. The bed board had some serious sag in the middle as well as some water damage in the front so why not replace it too.

Replacing the bedboard was sort of a pain. The old bed board has a lot of screws holding it in(bottom and sides) as well as a fair amount of staples that hold the siding on. There are also the two strips of wood above the bedboard that are tight inside the aluminum C channel and have screws and staples into them as well. I ended up cutting the bedboard in half with a circular saw to make it easier to remove. I chose some nice 3/4” sanded plywood as the replacement. It is way lighter than any sort of mdf and because of the added plys it is stiffer than typical CDX plywood. I used the Ace equivalent of Rustoleum to paint the underside of the new bed board white.
I decided to leave the new bedboard full width, 48”, and let it overhang the front wall of the camper by 5”(the old bed board was 42”). Then I don’t have to do any sort of sliding extension to make the bed larger and I can add some storage underneath the overhang if I want. I added a strip of plywood inside the C channel of the aluminum frame across the front and sides(like before) of the bedboard to add strength.

I also cut and fitted rigid insulation inside the walls of the camper. Next up, wiring and wall panels.

I guess I’m going to end up with a new camper after all....The only part of the part of the camper that I have not taken apart is the upper band of original siding that still wraps all the way around the camper. Hopefully my exploration will help others out if they are thinking of doing something similar.


The job you have taken up is quite a big one.Sure looks good.I will look forward to future up dates.

Great job

Frank
 
So there is no metal framing along the floor except the front and back? How difficult do you think it would be to remove just the floor? I need to build a platform to raise my 81 Fleet up 6 inches, and although I'm only 5'10" and it's not a huge problem, a few more inches of headroom would be fantastic.
 
So there is no metal framing along the floor except the front and back? How difficult do you think it would be to remove just the floor? I need to build a platform to raise my 81 Fleet up 6 inches, and although I'm only 5'10" and it's not a huge problem, a few more inches of headroom would be fantastic.


Nope just a wood floor pack.

Are just planning to strip out the interior of your fleet so you have access to things and to rework the interior to match the new lowered floor. Difficulty would depend on how skilled you are. ;) One thing to keep in mind is the door will move up with the camper so you'll have a step over (aka tripping hazard) threshold to deal with.
 
So there is no metal framing along the floor except the front and back? How difficult do you think it would be to remove just the floor? I need to build a platform to raise my 81 Fleet up 6 inches, and although I'm only 5'10" and it's not a huge problem, a few more inches of headroom would be fantastic.


You are correct, there is no metal framing along the floor except for the front and back. I was a little surprised by this when I bought my camper after all the reading about the aluminum frame on the FWCs. From an ease of construction it makes sense, plywood is cheap and easy to assemble(unfortunately it also rots over time).

You can look at my pics to see how I removed my floor. First, you have to gut the inside of your camper(down to the frame). Then you have to support the frame of the camper somehow and the best way I could think of was to screw 2x4s on the sides of the frame and support the camper from them. It also involves removing the lower trim and probably some siding. Then you unscrew the floor pack from the frame and it drops out. I assembled my new floor pack on the garage floor using a biscuit joiner, gorilla glue, and staples. Paint it and then install.

As far as difficulty goes, I would say it is fairly difficult. I searched a bunch on this forum and couldn't find anyone else who had tackled replacing their floor pack(that might tell you something). If you do carpentry for a living or have at some point then you can probably tackle it. If you don't have much experience doing carpentry or fabricating things then you might find yourself in over your head. Hope that helps!

I am really happy with the result because you can custom fit your camper to your truck.
 
Back
Top Bottom