Lift/Lowering device type II

Star152

Senior Member
Joined
Jan 5, 2007
Messages
188
I want to thank BUZZ for giving me the inspiration for thinking about and creating the roof lift and lowering device. I used many items that I already had and the cost of the items I needed was about $15.00 and OSH. Items needed.
1. 1 pair of aluminum crutches
2. 4 hose clamps
3. ¾ inch PVC pipe 2 pieces cut into 7 inch pieces (check if the crutch fits inside the PVC pipe and slides freely)
4. ¾ inch square dowel cut into 2 7 inch pieces
5. 2 double wheel pulleys
6. A piece of metal strap.
7. (1) 6 inch long bolt and nut to replace the one for the handle


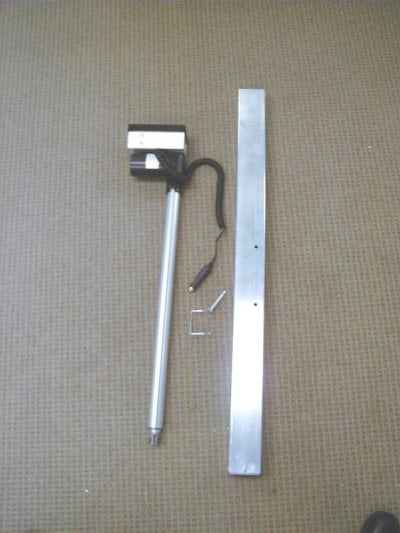
Take one crutch and remove the underarm support and handle.
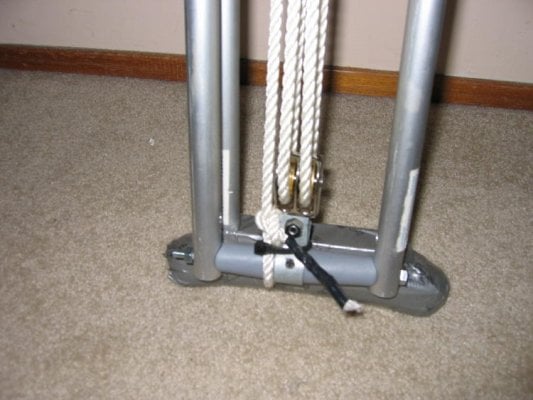
Take the other crutch and remove the adjustable foot you will no longer need this.

Using a long piece of wood knock out the plastic cap at the other end of the adjustable foot support.

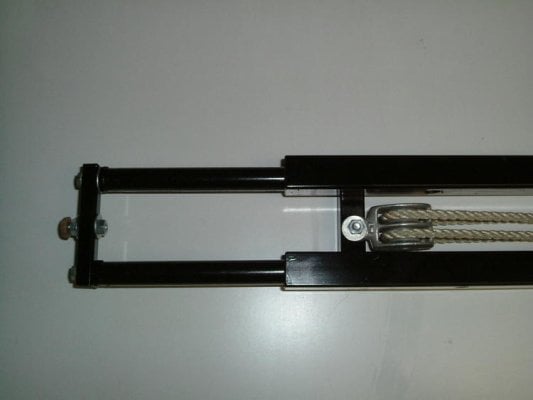
Drill a hole to fit a bolt and nut to hold pulley.

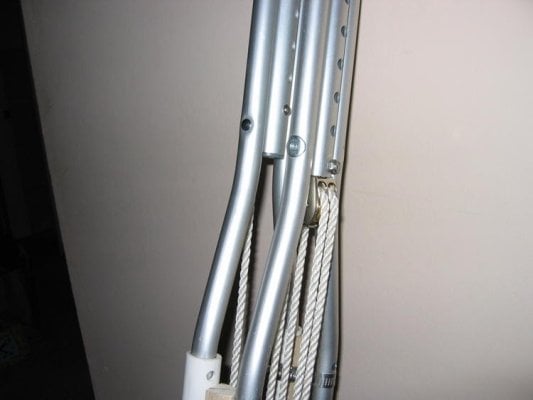
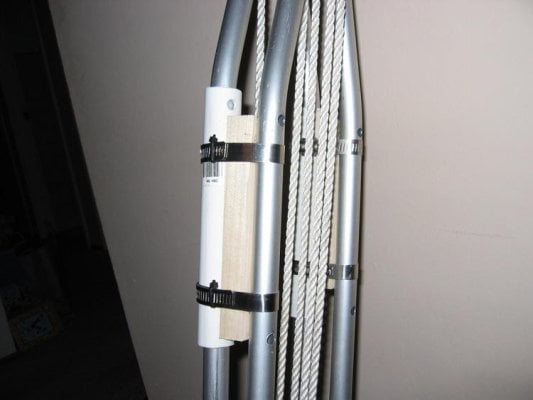
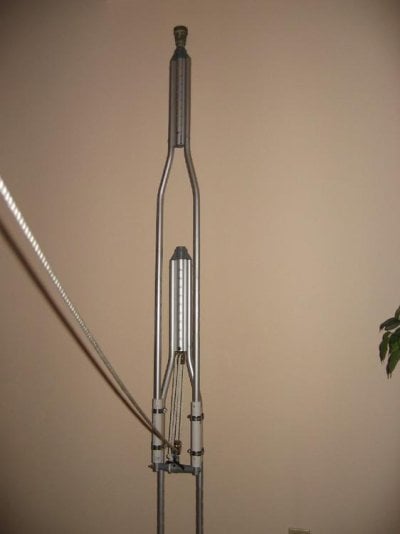
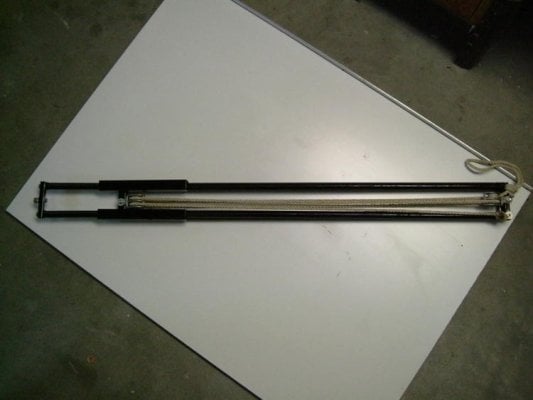
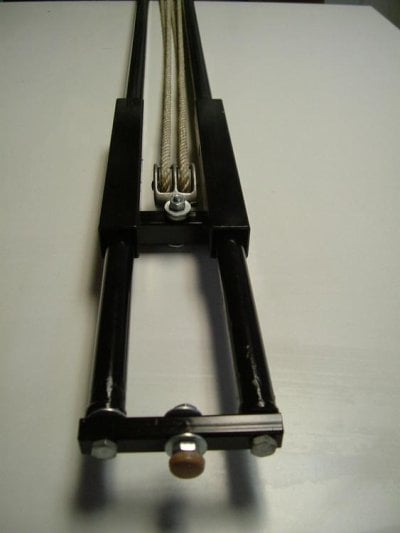
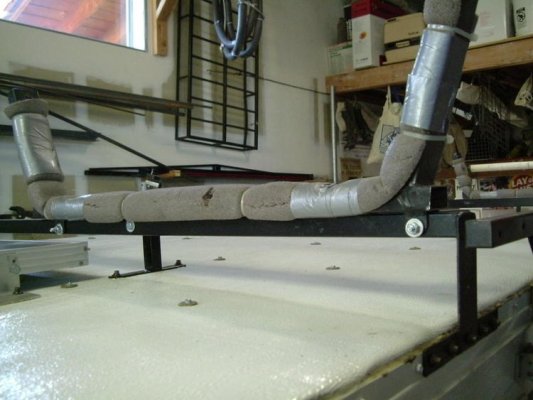
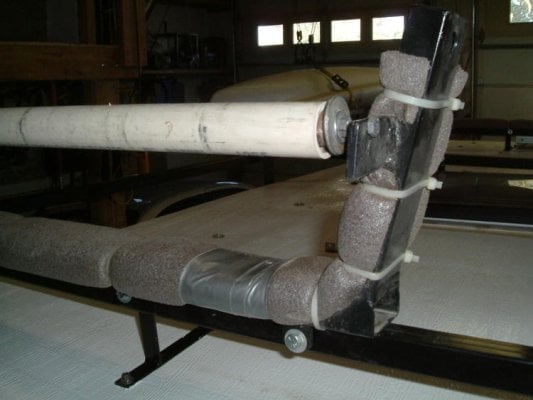
Attach the PVC pipe and wood using hose clamps see photo.

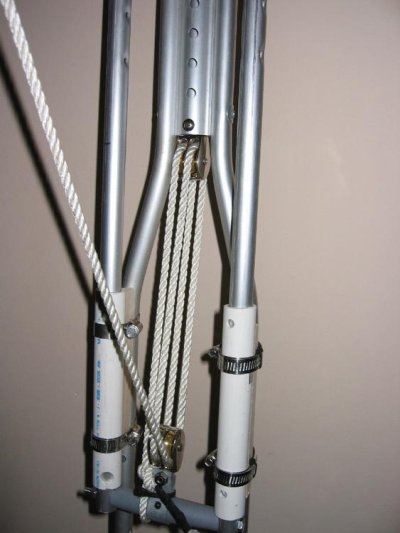
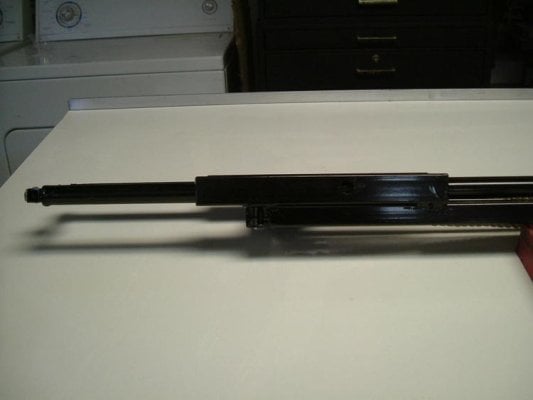
Take the other crutch and drill holes and enlarge to fit a larger bolt for strength where the arm support was removed. Slide the crutch with the foot into the PVC pipe.

Secure the saved handle with the larger bolt and tighten.
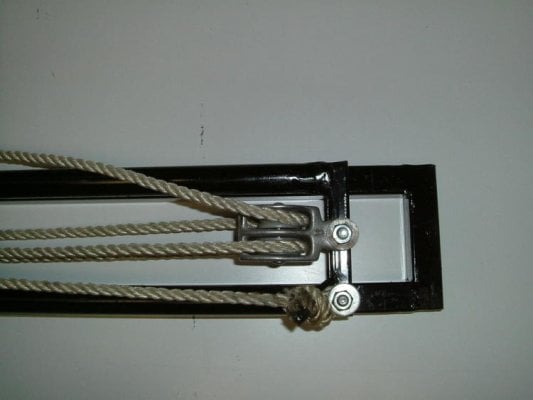
Shape a piece of metal strap around the plastic handle and drill a hole to fit the other pulley.

Drill a hole and screw down to hold the pulley parallel to the crutch.

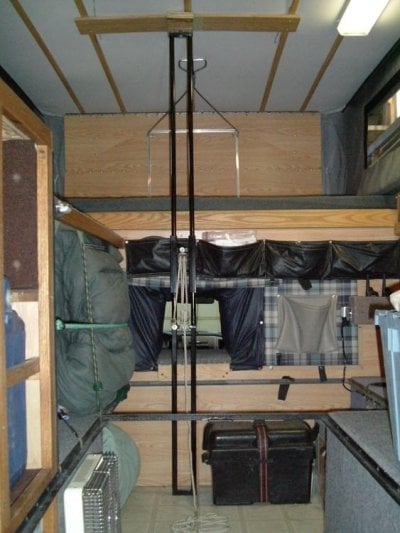
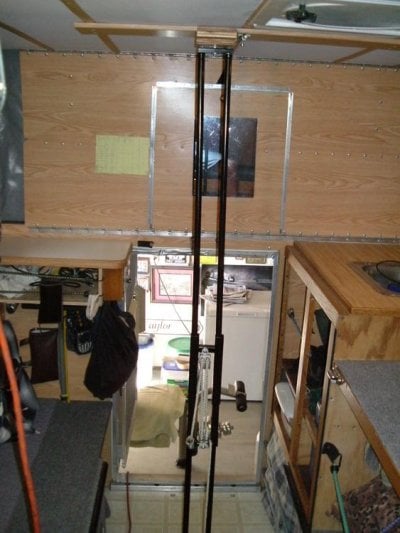
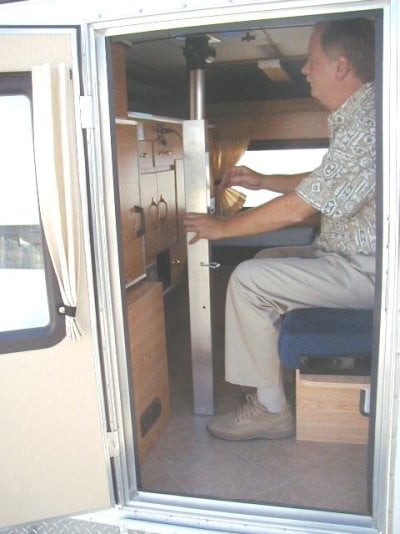
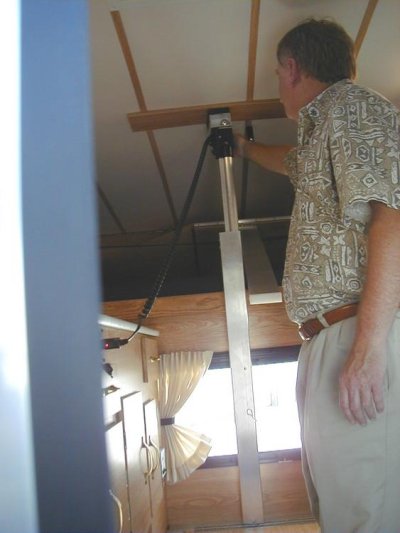
Tie one end of the rope to the handle where the pulley is attached. Route the rope through the pulley so that the rope ends up so you can pull up the rope to raise the crutch. Now you are done.

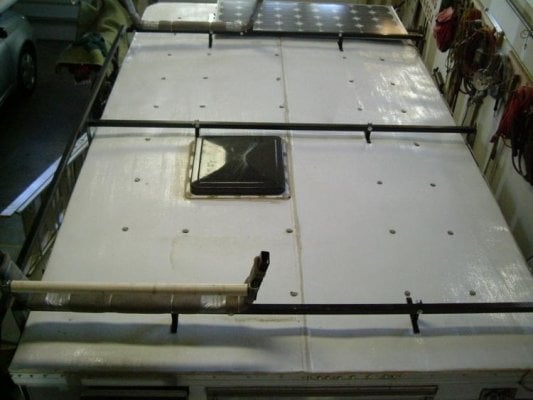
Raise and lower the camper top to your hearts content.

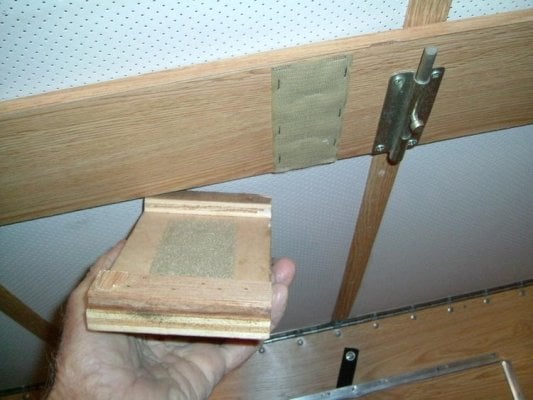
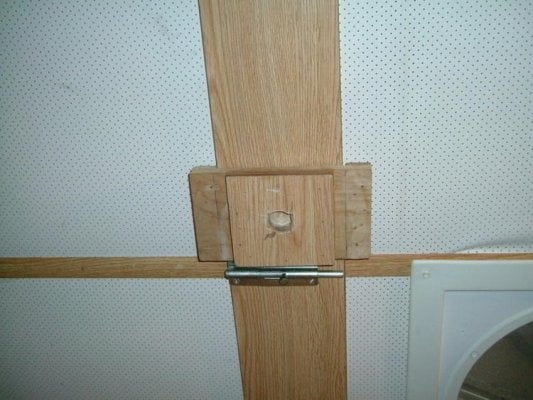
NOTE on my camper the front is higher than the rear. I raise the foot section to meet the roof support and pull the rope to raise the top. Have fun……it works great.
 

Attachments

  • IMG_4530.jpg
    IMG_4530.jpg
    32.7 KB · Views: 980
  • IMG_4531.jpg
    IMG_4531.jpg
    38.3 KB · Views: 963
  • IMG_4532.jpg
    IMG_4532.jpg
    58.4 KB · Views: 972
  • IMG_4533.jpg
    IMG_4533.jpg
    42.1 KB · Views: 964
  • IMG_4534.jpg
    IMG_4534.jpg
    19.9 KB · Views: 970
Good! I was hoping that I could inspire someone to take something from my idea and carry it farther.

I really like what you've done with those old useless crutches. The mechanical advantage that you gain with your pulley system will serve you well when you load the roof rack. Great choice of material!

Ben B. at ATC suggested that I use closet rod hangars to keep the crutch tip from possibly slipping and damaging the roof. The crutch tip diameter is too large to fit into the hangars; so, I made two 1/2" thick blocks of hardwood (happen to have some laying around the garage) with holes large enough to accommodate the crutch tips and attached them to the two lift points on the roof. Thanks, Ben.

Way to think outside the box!

-Buzz
 
BUZZ thank you.....I did catch what ben said. if the crutch slipped opps......I will make a set of stops to protect the roof.... one thing I did noticed the hand support looked like it bowed a little where the crutch tip was placed. Did you see that as well......I also tested the lift potential. it looks like it saves 35 to 40% in weight lifting savings. My back is saved...
 
Nice work guys, keep it up. Since FWC and ATC don't seem interested in updating the archaic lifting system then I guess we will figure out a better way on our own.
 
Brilliant! A lift system with mechanical advantage, light in weight... WELL DONE!!. I think it would be fairly simple to add to use of a device like this by constructing lightweight metal lift support frames at each end of the camper. This would replace the old system entirely leaving the camper end sections open to have windows installed. The support frames would unfold as the lift is raised and pop into place. I'm thinking a knee joint that locks open. So lowering would mean setting up the lifter, popping the end lock and lowering the roof. Lifting would be easier.... set up the lifter, raise and the ends lock automatically. Where can I find a nice old Eagle to renovate!! Trouble is, I want one with the 48 inch cab over so there is probably not that many around.
 
Len,
I've also given that end support issue some thought and decided that an aluminum frame of some type, and there are many configurations that would work, would do very nicely. The only real requirement beside vertical strength is lateral rigidity. The current lift panel system also provides all of the side to side support for the roof. So, what it may take is something like a braced frame or a folding shear wall system, but I know it is doable. Now, my problem is that our camper is just too new to be messing with that much. Good Luck and keep us posted.
 
i am a copy cat ! love this forum!

just as soon as i saw star152 lifting device which was inspired by buzz i had to discard my device and head to to garage to come up with mine!support frame is 37.5" long,3/4" thin wall tubing.slide tubes which are mounted on support frame are 1" square thin wall tubing 8.5" long.lifting frame is 3/4" thin wall round tubing 45.25" long.lifting frame has 1/4-20 nuts welded into tube ends so you can slide lifting frame through slide tubes then bolt top end to frame,in center of top end i mounted a adjustable leg that fit into roof bracket so as not to slip.this fits my eagle shell i dont know if all models are the same height something to consider. i had my wife try it the first time worked perfect.2nd test was with 6 10ft 2x6 pieces of lumber on roof rack,(close to weight of kayak) as boat is mounted on left side i will probably have roof storage basket loaded at same time to even out load,was able to raise and lower with complete control.i will ad the next time i get to a marine supply a cam clete to control pulley if needed.bracket on roof is same one i used with old lifter i mounted velcro to both areas to keep support in place. thank's again to buzz and star152 drive slow and enjoy "its the journey"
 

Attachments

  • DSCF0768.jpg
    DSCF0768.jpg
    31.1 KB · Views: 792
  • DSCF0764.jpg
    DSCF0764.jpg
    23.3 KB · Views: 804
  • DSCF0765.jpg
    DSCF0765.jpg
    31.7 KB · Views: 784
  • DSCF0762.jpg
    DSCF0762.jpg
    26.6 KB · Views: 789
  • DSCF0763.jpg
    DSCF0763.jpg
    23.4 KB · Views: 771
more copy cat pics!

rest o pics of my lifter
 

Attachments

  • DSCF0757.jpg
    DSCF0757.jpg
    60.2 KB · Views: 803
  • DSCF0758.jpg
    DSCF0758.jpg
    70.2 KB · Views: 858
  • DSCF0755.jpg
    DSCF0755.jpg
    65.3 KB · Views: 871
  • DSCF0760.jpg
    DSCF0760.jpg
    64.4 KB · Views: 860
Ok lq, how long before you are in production so the rest of us can have one too? You know, you could make a career out of making custom stuff for this forum.
 
more on lifter!

pvstoy, after raising and lowering roof a couple of times i found the weight of roof caused slight imprints on floor so i make sure i put a piece of carpet under support!took care of it.every time i think i came up with a bullet proof idea some one shows me a better way thats why this forum is great it stays on topic (fwc & atc campers)drive slow and enjoy "its the journey"
 
not Fair..........lqhikers do you have a welder I want one.....I like the block you made for the roof hand support.........hey you think this system could be built into the camper.....Ben , Stan what do you think.....
 
My Next Lifting Assignment

Welders..... A little MIG outfit would be nice.

My next job is to design a kayak loading device. I've been having visions of pulleys and cranes mounted to the top of the ATC. Would be nice to get it done before I head for AK in the spring.

I know there are a few yakers out there who are struggling with the same problem. Any ideas?

-Buzz
 
more lifter info.& kayak mount

after posting my design i thought i would ad some more info. after testing lifting with weight on roof rack i noticed that with the added weight the roof was bowing due to all the pressure on just a small spot.if you notice from some of my old posts my roof rack has 3 cross bars that are edge mounted putting weight on edges, so as you can see on attached pictures i have added 2 supports on each bar which turns roof into a truss of sorts.i will also replace inside lift areas with a sold piece of oak approx 3/4"x4" and have it extend from side to side,attached to each end i will add a swing down bracket that will lock to lower part of camper when roof is raised as i always build with worst conditions in mind,i know that with no bracing with my double Hobie mirage kayak, roof basket loaded with gear,etc under some of the high winds that come up in Baja i would not plan on the support panels that the campers are built with to hold up,or would i think that they should as the campers were not designed to be used as i use mine. so i would suggest to anyone who plans to put any extra weight on roof to not over load with out some thought on the results! also some pictures of the rack we use for our kayak one picture shows rear mount with roller that just sets in grove on rack .i stand kayak on end lower onto roller then as it is a double there is two of us so with a line tied to the front of kayak my wife stands in front of truck with pressure on line pulling as i lift and push once up roller is taken off and kayak is strapped down,if i'm loading by myself i lean it on roller the get on roof and pull it up.been doing this for years works for us! drive slow and enjoy "its the journey"
 

Attachments

  • DSCF0773.jpg
    DSCF0773.jpg
    47.1 KB · Views: 460
  • DSCF0774.jpg
    DSCF0774.jpg
    53.2 KB · Views: 459
  • DSCF0769.jpg
    DSCF0769.jpg
    47.8 KB · Views: 457
lq,

Once again you nailed the fabrication, very nice work. It looks like you could add another pulley in there if you chose to for greater leverage, keep up the good work.
buzz and star, nice work guys, lets keep feeding lg ideas and we'll all benefit.
 
we are working on a couple of "lift assist" ideas right now here at the factory

as soon as we find something we like, we will let you know right away !

Over the past couple of years we have just been building and selling a 12v operated version of the "lift assist" -- the cost is $ 250.00 and it plugs into the 12V outlet in the cabinets -- seems to work pretty well.

(see sample pictures attached)


=====================================================

not Fair..........Stan what do you think.....


.
 

Attachments

  • LIFT ASSIST PICTURE 3.jpg
    LIFT ASSIST PICTURE 3.jpg
    53.2 KB · Views: 445
  • LIFT ASSIST PICTURE 16.jpg
    LIFT ASSIST PICTURE 16.jpg
    70 KB · Views: 448
  • LIFT ASSIST PICTURE 12.JPG
    LIFT ASSIST PICTURE 12.JPG
    37.7 KB · Views: 470
  • LIFT ASSIST PICTURE 18.JPG
    LIFT ASSIST PICTURE 18.JPG
    42.6 KB · Views: 478
  • LIFT ASSIST PICTURE 11.jpg
    LIFT ASSIST PICTURE 11.jpg
    40.9 KB · Views: 468

New posts - WTW

Back
Top Bottom