New ATC Ocelot Shell Buildout

Ambling1

Advanced Member
Joined
Jan 29, 2014
Messages
76
Location
Sonoran desert
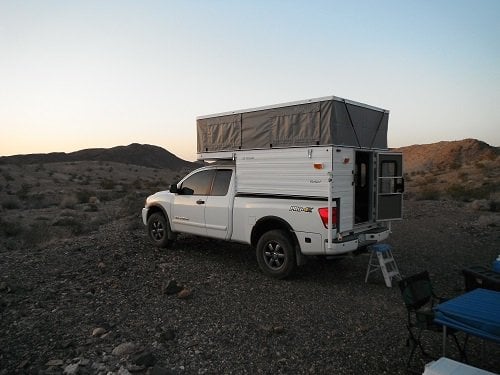
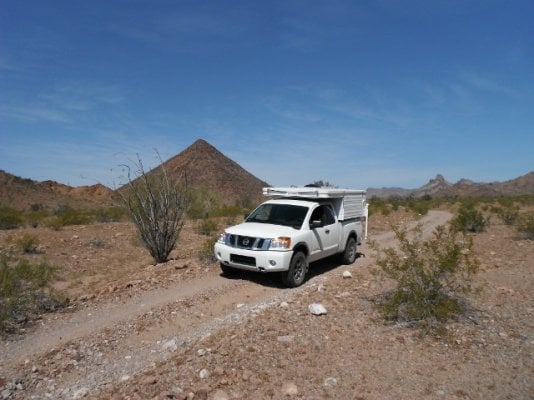
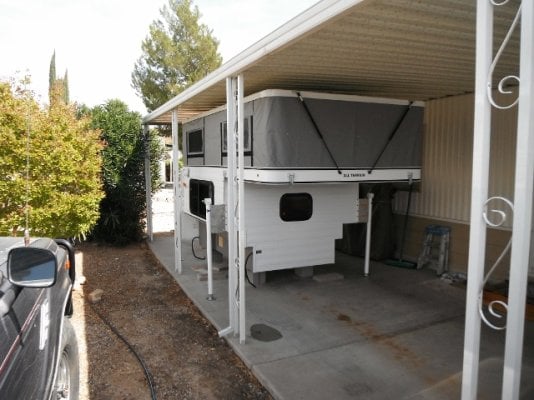
As a newer member I would like to say hi, and thank everyone for this great forum. What a great resource of information, pictures, ideas, references, trip info, and help! I've decided to post a build thread to share ideas that I stole from others. Hope I can help those who decide to go the custom route by posting pictures and thoughts. First, I want to thank Jay Aronow (Chlnile), sales rep for ATC down in Tucson. I received excellent information and service from order to delivery. The camper was exactly as ordered and perfect. Next, a thanks to Gene and Phil on WTW, for showing off their Ocelot shells and a warm welcome. And the biggest thanks to Marty and the crew at All Terrain Campers for building outstanding campers!
 

Attachments

  • DSCF1279 (640x520).jpg
    DSCF1279 (640x520).jpg
    254.4 KB · Views: 647
  • DSCF1278.JPG
    DSCF1278.JPG
    105.4 KB · Views: 724
  • DSCF1281 resize.jpg
    DSCF1281 resize.jpg
    114.4 KB · Views: 721
The Camper

March 2014 All Terrain Camper Ocelot Shell Model 78" wide x 6.5' box

Options

-Mechanical jacks and brackets
-2" softwall extension (for more headroom over the bed area)
-Small window at front wall (cab side) of camper
-Solar panel with solar controller
-Auxiliary battery system with Optima battery
-Fantastic Fan over bed area
-Extra awning lights on both passenger and driver sides
-Gas lift shocks
- Extra reinforcement in rear wall for future Roto Can install


The Truck 2014 Nissan Titan Pro-4x

Mods -Nitto Grappler load range E tires
-Ride Rite air bag
-Du-Ha under seat storage box for HiLift jack, recovery gear, tools
 

Attachments

  • DSCF1286 (640x480).jpg
    DSCF1286 (640x480).jpg
    216.5 KB · Views: 621
  • DSCF1288 resize.jpg
    DSCF1288 resize.jpg
    115.4 KB · Views: 624
  • DSCF1281 resize.jpg
    DSCF1281 resize.jpg
    114.4 KB · Views: 523
Design Criteria

-Use existing products that I already had from my Landcruiser FJ60 with rooftop tent setup (Engle 45 frig, water tank, LP tanks, Zodi portable shower, and other misc items).

-Minimal exterior penetrations (service doors, vents).

-Keep as much weight over or in front of the rear axle and down as low as possible

-No 110v service, water heater, or furnace ( plan on using a Wave3 for heat)

-Make the floor area as roomy and open as possible

-Side dinette seating. I want to easily see out of the large side window.

-Create a sleeping platform for stealth camping or extra company, that doesn't crowd the isle.

-Not design around cushion size or have any carpet.

-Have an exterior water supply from water tank.

- Secure and safe LP storage locker with easy and convenient access.

-Water tank on floor and next to front wall.

-Battery on floor next to water tank.

-Frig at front wall of camper
 

Attachments

  • DSCF1319 (640x480).jpg
    DSCF1319 (640x480).jpg
    244 KB · Views: 353
  • DSCF1322 (640x480).jpg
    DSCF1322 (640x480).jpg
    244.5 KB · Views: 360
Home

After the trip home from taking delivery, it was time to take the camper off the truck and get ready to work. I had the camper bottom well supported and perfectly level before starting. Truck and camper just fit under the carport roof!
 

Attachments

  • DSCF1325 (640x480).jpg
    DSCF1325 (640x480).jpg
    244.8 KB · Views: 481
  • DSCF1326 (640x480).jpg
    DSCF1326 (640x480).jpg
    252.5 KB · Views: 500
Starting The Build

I waited six weeks from order to delivery, and during that time followed many WTW build threads and spent serious time internet shopping. Seems the longer I waited for delivery the more I bought and my original modest shell upgrade turned to an almost full build. This is my first pop up truck camper, and even though I had a plan, materials, and ready to start, I was totally overwhelmed on where to begin, so I sat in the camper for a couple days thinking, measuring, replanning. This is when the pictures, and ideas from Bisleybud, Ski3pin, BillHarr (except for the x-ray) builds were invaluable for me. Thank you all! Time to start! First was moving the 12v electric wiring where it came out the front wall, up and over to the side. It was in the way of the water tank. I added a fuse panel.
 

Attachments

  • DSCF1328 (640x480).jpg
    DSCF1328 (640x480).jpg
    213 KB · Views: 795
  • DSCF1359 (640x480).jpg
    DSCF1359 (640x480).jpg
    215.7 KB · Views: 777
Water Fill Door

I had to pull back the paneling on the drivers side and front wall to examine in wall wiring layout, and to decide where to install the water fill door. At this time I added wiring for a future front spotlight and a future rear spotlight.
 

Attachments

  • DSCF1358 (640x480).jpg
    DSCF1358 (640x480).jpg
    212.7 KB · Views: 683
  • DSCF1421 (640x480).jpg
    DSCF1421 (640x480).jpg
    170 KB · Views: 670
Looking forward to your build. Take lots of pictures along the way. I wish I would have taken more "before" pictures to show how much the camper has changed. That internet shopping is fun.

Bill
 
Randy is a terrific guy and a great client. He is going to be an outstanding addition to WTW. This guy camps! He used the camper the day he took delivery.
 
Bill, you can never take enough pictures, and I am sure I didn't. Internet shopping wasn't fun for me until I ordered the camper. Now it's my new drug. Jay, you just gave away to the world my under cover name. Got any ideas for a new one?
 
Future electric switches wiring and location. Camper front wall before water tank install.
 

Attachments

  • DSCF1340 (640x480).jpg
    DSCF1340 (640x480).jpg
    213.9 KB · Views: 653
  • DSCF1357 (640x480).jpg
    DSCF1357 (640x480).jpg
    192.2 KB · Views: 685
Water Tank

I built a sloped floor under the water tank to help with draining of the tank. Also the tank is NOT tight up against the front wall. It is set away from the front wall so as the water tank fills and expands, there is no pressure exerted to the wall. Water drains out the sidewall of the floor pack and is piped to the rear of the camper.
 

Attachments

  • DSCF1362 (640x480).jpg
    DSCF1362 (640x480).jpg
    204.5 KB · Views: 710
  • DSCF1364 (640x480).jpg
    DSCF1364 (640x480).jpg
    196.9 KB · Views: 716
Ambling1 said:
Bill, you can never take enough pictures, and I am sure I didn't. Internet shopping wasn't fun for me until I ordered the camper. Now it's my new drug. Jay, you just gave away to the world my under cover name. Got any ideas for a new one?
I forgot you were in witness protection. Your secret is safe with these guys.
 
LP Locker

Located the LP tanks on the floor at the rear drivers side corner. The box is built with 1/2" plywood lined with sheet metal and sealed. The access door will be located inside the camper and sealed. Vent holes were cut in the upper sidewall of the floor pack and in the floor at the rear of the camper for ventilation. I designed the box to hold 1-20lb tank, or 2-11lb tanks, or 1-11lb and 1-5lb tanks. A two stage regulator is wall mounted in the box with two feeds. One is for the Wedgewood stove and the other for a future Wave3 heater. I do most of my cooking outside and away from the camper, so I wanted a secure, safe, convenient, and dedicated place to store the more portable 5lb tank and hose. Coleman stove will be stored next to the frig.
 

Attachments

  • DSCF1343 (640x480).jpg
    DSCF1343 (640x480).jpg
    228.6 KB · Views: 754
  • DSCF1346 (640x480).jpg
    DSCF1346 (640x480).jpg
    232.7 KB · Views: 738
Ambling1 said:
Starting The Build

I waited six weeks from order to delivery, and during that time followed many WTW build threads and spent serious time internet shopping. Seems the longer I waited for delivery the more I bought and my original modest shell upgrade turned to an almost full build. This is my first pop up truck camper, and even though I had a plan, materials, and ready to start, I was totally overwhelmed on where to begin, so I sat in the camper for a couple days thinking, measuring, replanning. This is when the pictures, and ideas from Bisleybud, Ski3pin, BillHarr (except for the x-ray) builds were invaluable for me. Thank you all! Time to start! First was moving the 12v electric wiring where it came out the front wall, up and over to the side. It was in the way of the water tank. I added a fuse panel.
Ambiling, your going to like that battery isolator Marty uses.
If you get solar when the truck battery needs a charge it will also charge it. It's great when in my case the camper sits on the truck full time and I don't drive it much. During the winter I don't have to worry about the truck battery going dead.
So far so good on your build.
Thanks for the pictures.
frank
 
LP Locker with more detailed pictures. You can see the upper vent in sidewall. I used QuickGrip rubber straps to easily hold the tanks and control vibration and noise. Also added rubber mat to floor and sidewall to cushion tanks. I highly recommend the rubber straps, they take care of both vertical and horizontal movement.
 

Attachments

  • DSCF1405 (640x480).jpg
    DSCF1405 (640x480).jpg
    221 KB · Views: 682
  • DSCF1424 (640x480).jpg
    DSCF1424 (640x480).jpg
    217.5 KB · Views: 721
Start of drivers side cabinet. 1/2" oak plywood.
 

Attachments

  • DSCF1350 (640x480).jpg
    DSCF1350 (640x480).jpg
    204.3 KB · Views: 608
  • DSCF1352 (480x640).jpg
    DSCF1352 (480x640).jpg
    214.9 KB · Views: 576
First picture shows 1x2 sub framing for countertop and face frame. Second picture has the oak 1x2 face frame attached with cabinet screws.
 

Attachments

  • DSCF1354 (640x480).jpg
    DSCF1354 (640x480).jpg
    204.6 KB · Views: 500
  • DSCF1355 (640x480).jpg
    DSCF1355 (640x480).jpg
    226 KB · Views: 503

New posts - WTW

Back
Top Bottom